Nathan vs Perler Beads Part 2: Metroid and Zelda

Avatar image for theuselessgod
theuselessgod

339

Forum Posts

476

Wiki Points

0

Followers

Reviews: 20

User Lists: 2

Edited By theuselessgod

Time for the next batch of perlers! This one, for the Metroid series, we have something nifty: a step by step walkthrough of me making both these sprites!

And by "step by step" I mean like two steps. Yeah...you'll get over it. Here's how I do 'em.

Metroid!
Can you tell who this is from just the black beads?

I don't use any grids or anything when doing the sprites; I just look at the original pixel art and go off it from there. In nearly every situation, I start by doing the black outline, which gives me a stable framework to design off of. In some cases, especially the SNES sprites, the entire outlines aren't just black. This can be a little trickier, but usually the next color in is just a dark gray or something.I also have to determine the sprite size before beginning. All trays a 29x29, so you'll have to do the math accordingly.

As you can see, Samus had some orange outline pixels.

And a finished Samus. My math was off; I actually didn't need the upper right corner grid. In the original sprite there were something like four shades of gray for her arm-cannon. Since there are only two gray shades in perler (light and dark), you have to consolidate sometime, usually with the SNES sprites. You really can't tell, however, unless you put the perler side-by-side with the sprite.And yes, you do have to put each bead down individually. It can take a while. I usually go color by color (black outline, then work inward), as this makes filling in easier.

I put the SNES cart in for scale.

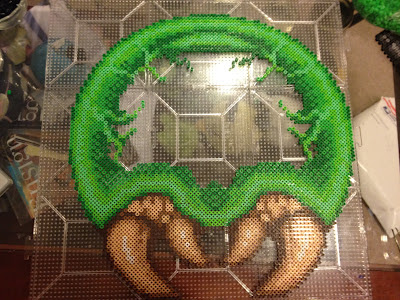
In this one's case, I did the mouth part first, then did a dark green outline. This sprite had a lot of green shades, which meant I had to just use the greens I had (there's about four greens that blend good together). For those wondering, that's nine trays, which is 87x87.Symmetrical ones like this are easier but kind of boring, as once you do one half you just mimic it for the other side. That's when having a good podcast or movie on helps.

There's actually four shades of green here, even though it can be hard to see.

Sometimes you don't know which color to use, and in that case I usually do a limited amount of the sprite in two different shades and see which "blends" better. I'd like to say my pixel art days helps me figure out which colors best substitute, but sometimes it's just random guesswork. If you do that you have to carefully remove every wrong colored pixel and replace it, which can be a pain.

Finished Metroid!

This isn't actually finished yet; I filled in all the empty spaces with clear beads. If you don't, when you iron it the pieces will frequently break off, which sucks. I only use clears in rare instances, since they aren't completely clear. A project like this Metroid was done in two chunks, and was around four hours of work.

Brain-sucking!

The finished metroid, sucking out all my life. Look how big it is! This one we couldn't sticky-tack to the wall; we had to actually nail 'em in.There's the Metroid ones! Now, next up we have another iconic Nintendo franchise...

ZELDA!

Zelda is a tricky one to perler, as a lot about those games are the epic environments. However, we still got a few done, and got a timeline thing going on!

Looks empty, huh? Zelda's a lot about the environments.

We have a good representation from the first NES Zelda game, though I wanted to make a dungeon entrance to bump up the scenery. From Zelda 2 we have the iconic "P Bag," Link, and Error. I was going to make an "I Am Error" text box, but that would have taken something like 600 black beads so...maybe some other time.

Link to the Past, aka the best Zelda Game.

Link to the Past's sprites look a lot cooler, though I swear Zelda looks mini. But not as mini as Minnish Cap Link! I think Minnish Cap Link is probably my favorite of all the Link sprites. If you haven't played that game you are REALLY missing out; it's absolutely beautiful and we are going to make more sprites from it. Seriously, really gorgeous game.That's all for today's installment! Tomorrow, we'll delve deep into what we have the most of: Square RPGs! Stay tuned!

Avatar image for theuselessgod
theuselessgod

339

Forum Posts

476

Wiki Points

0

Followers

Reviews: 20

User Lists: 2

#1  Edited By theuselessgod

Time for the next batch of perlers! This one, for the Metroid series, we have something nifty: a step by step walkthrough of me making both these sprites!

And by "step by step" I mean like two steps. Yeah...you'll get over it. Here's how I do 'em.

Metroid!
Can you tell who this is from just the black beads?

I don't use any grids or anything when doing the sprites; I just look at the original pixel art and go off it from there. In nearly every situation, I start by doing the black outline, which gives me a stable framework to design off of. In some cases, especially the SNES sprites, the entire outlines aren't just black. This can be a little trickier, but usually the next color in is just a dark gray or something.I also have to determine the sprite size before beginning. All trays a 29x29, so you'll have to do the math accordingly.

As you can see, Samus had some orange outline pixels.

And a finished Samus. My math was off; I actually didn't need the upper right corner grid. In the original sprite there were something like four shades of gray for her arm-cannon. Since there are only two gray shades in perler (light and dark), you have to consolidate sometime, usually with the SNES sprites. You really can't tell, however, unless you put the perler side-by-side with the sprite.And yes, you do have to put each bead down individually. It can take a while. I usually go color by color (black outline, then work inward), as this makes filling in easier.

I put the SNES cart in for scale.

In this one's case, I did the mouth part first, then did a dark green outline. This sprite had a lot of green shades, which meant I had to just use the greens I had (there's about four greens that blend good together). For those wondering, that's nine trays, which is 87x87.Symmetrical ones like this are easier but kind of boring, as once you do one half you just mimic it for the other side. That's when having a good podcast or movie on helps.

There's actually four shades of green here, even though it can be hard to see.

Sometimes you don't know which color to use, and in that case I usually do a limited amount of the sprite in two different shades and see which "blends" better. I'd like to say my pixel art days helps me figure out which colors best substitute, but sometimes it's just random guesswork. If you do that you have to carefully remove every wrong colored pixel and replace it, which can be a pain.

Finished Metroid!

This isn't actually finished yet; I filled in all the empty spaces with clear beads. If you don't, when you iron it the pieces will frequently break off, which sucks. I only use clears in rare instances, since they aren't completely clear. A project like this Metroid was done in two chunks, and was around four hours of work.

Brain-sucking!

The finished metroid, sucking out all my life. Look how big it is! This one we couldn't sticky-tack to the wall; we had to actually nail 'em in.There's the Metroid ones! Now, next up we have another iconic Nintendo franchise...

ZELDA!

Zelda is a tricky one to perler, as a lot about those games are the epic environments. However, we still got a few done, and got a timeline thing going on!

Looks empty, huh? Zelda's a lot about the environments.

We have a good representation from the first NES Zelda game, though I wanted to make a dungeon entrance to bump up the scenery. From Zelda 2 we have the iconic "P Bag," Link, and Error. I was going to make an "I Am Error" text box, but that would have taken something like 600 black beads so...maybe some other time.

Link to the Past, aka the best Zelda Game.

Link to the Past's sprites look a lot cooler, though I swear Zelda looks mini. But not as mini as Minnish Cap Link! I think Minnish Cap Link is probably my favorite of all the Link sprites. If you haven't played that game you are REALLY missing out; it's absolutely beautiful and we are going to make more sprites from it. Seriously, really gorgeous game.That's all for today's installment! Tomorrow, we'll delve deep into what we have the most of: Square RPGs! Stay tuned!