Strategic Points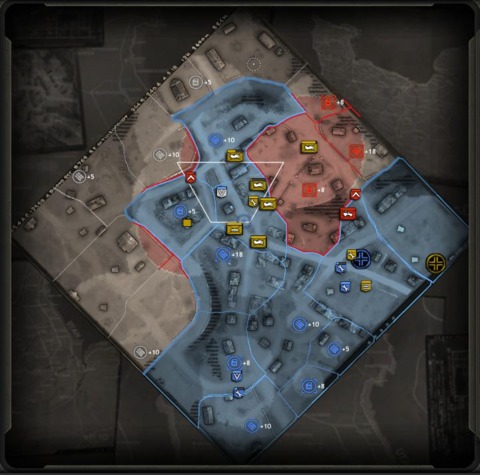 An overhead map showing strategic points and territorial control.Company of Heroes does not have any "resource gathering." Instead of assigning units to collect resources, there are various points on the map that provide resources in a steady flow. The resources are Munitions, required for special abilities and upgrades; Fuel, which is needed to build vehicles and do basic upgrades; and Manpower, which is a staple resource used for the construction and training of any unit or structure. Each strategic point rewards its owner with one of these three resources. These sectors also serve as population control; the more sectors a player has, the higher their population cap, allowing for more troops to be deployed. A territory must be directly connected to its owner's HQ for the territory give the owner the resource bonus. This allows players to actually "cut off supply lines" if an enemy is not effectively guarding their flanks. One or two rogue infantry squadrons can spell disaster for an inattentive player economically by capturing chokepoints behind their front lines. Connected strategic points also give their owner the surrounding territory on which they can build emplacements and equip their troops with special weapons such as Bazookas. An overhead map showing strategic points and territorial control.Company of Heroes does not have any "resource gathering." Instead of assigning units to collect resources, there are various points on the map that provide resources in a steady flow. The resources are Munitions, required for special abilities and upgrades; Fuel, which is needed to build vehicles and do basic upgrades; and Manpower, which is a staple resource used for the construction and training of any unit or structure. Each strategic point rewards its owner with one of these three resources. These sectors also serve as population control; the more sectors a player has, the higher their population cap, allowing for more troops to be deployed. A territory must be directly connected to its owner's HQ for the territory give the owner the resource bonus. This allows players to actually "cut off supply lines" if an enemy is not effectively guarding their flanks. One or two rogue infantry squadrons can spell disaster for an inattentive player economically by capturing chokepoints behind their front lines. Connected strategic points also give their owner the surrounding territory on which they can build emplacements and equip their troops with special weapons such as Bazookas. |
Squads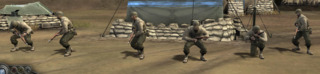 All six of these Rifleman act as a single unit.Instead of making individual foot soldiers, players create "squads" of units (with the exception of Snipers). Each squad moves as a single unit, but can contain anywhere from two to six soldiers. If members of a squad die, they can be reinforced and replaced for a small manpower cost back at their HQ or an in-the-field halftrack. Squads have a built-in AI that is more nuanced than simply shooting back at opponents. If you give the order to move into an area, the individual soldiers in the group not only move and fire independently, but will also use any nearby cover they can find along the way. Once they arrive at their destination, the troops will spread out and use as much cover as is available in their vicinity. All six of these Rifleman act as a single unit.Instead of making individual foot soldiers, players create "squads" of units (with the exception of Snipers). Each squad moves as a single unit, but can contain anywhere from two to six soldiers. If members of a squad die, they can be reinforced and replaced for a small manpower cost back at their HQ or an in-the-field halftrack. Squads have a built-in AI that is more nuanced than simply shooting back at opponents. If you give the order to move into an area, the individual soldiers in the group not only move and fire independently, but will also use any nearby cover they can find along the way. Once they arrive at their destination, the troops will spread out and use as much cover as is available in their vicinity. |
Company Commander and Other AbilitiesAs the battle rages on and units are built and destroyed, the Allies and the Axis gain Command Points. These points can be spent getting access to special units and powers through one of three doctrines for each side. Each doctrine specializes in a form of combat and grants the player more options for pursuing these means. For example, an American player can choose the Infantry Doctrine to supplement his mainly infantry strategy with units exclusive to that doctrine such as the Ranger Squad (elite bazooka infantry), or abilities that would help an infantry centric strategy like Artillery Support. Each player can gain experience (and subsequently Command Points) by killing units, creating buildings, or upgrading units. See Doctrines below for details. |
Vehicle Damage This Armored Car had its engine damaged by a shot to the back.Vehicles have a lot more weight in Company of Heroes than in most RTS games. Rather than completing a rock-paper-scissor triangle, vehicles are simply more robust than infantry, capable of wading through small arms fire without significant injury. Tank are even more drastic, as infantry with rifles and flamethrowers cannot damage tanks at all, forcing players to use specialized anti-armor weapons or other tanks to combat them. Vehicles are generally better armored in the front, weaker on the sides, and weakest in the rear, more accurately reflecting real life armor design. A well placed rocket at the rear of a vehicle could possibly take it out in one shot, but it may take several rockets to accomplish the same task at the front or that particular weapon may not even be capable of damaging it from the front, if the target is a tank. In addition to normal damage, special debilitations can occur to powered vehicles if they are hit in certain locations. These effects range from a damaged engine to broken treads to killed gunners. The Rifleman squad's sticky bomb actually revolves around these hindrances as it does little damage to heavy armor but will almost always leave its target with a hampering condition. This Armored Car had its engine damaged by a shot to the back.Vehicles have a lot more weight in Company of Heroes than in most RTS games. Rather than completing a rock-paper-scissor triangle, vehicles are simply more robust than infantry, capable of wading through small arms fire without significant injury. Tank are even more drastic, as infantry with rifles and flamethrowers cannot damage tanks at all, forcing players to use specialized anti-armor weapons or other tanks to combat them. Vehicles are generally better armored in the front, weaker on the sides, and weakest in the rear, more accurately reflecting real life armor design. A well placed rocket at the rear of a vehicle could possibly take it out in one shot, but it may take several rockets to accomplish the same task at the front or that particular weapon may not even be capable of damaging it from the front, if the target is a tank. In addition to normal damage, special debilitations can occur to powered vehicles if they are hit in certain locations. These effects range from a damaged engine to broken treads to killed gunners. The Rifleman squad's sticky bomb actually revolves around these hindrances as it does little damage to heavy armor but will almost always leave its target with a hampering condition. |
Structural DamageAn HQ's progression of destructionBuildings are very effective for keeping infantry alive. They are better than heavy cover against direct and indirect fire and give those garrisoned inside a range bonus thanks to elevation. However, they are not indestructible. If something bigger than a rifle round hits a building it takes damage to the total structure as it would in any RTS but because of the smaller scale of Company of Heroes, the buildings can also take regional damage from direct hits. If a tank pounds on one side of a building, only that side of the building will have chunks taken out of it. This can be a twisted terraforming advantage if you want to use infantry to guard from a side from a building that has no windows at the moment. One or two well-placed bombs will suddenly make it a perfect, if ruffled, bunker. |
Add-onsMost units in the game can be upgraded individually with new weapons or advancements. Infantry can be given AT weapons like Panzerschrecks, armored cars can add reinforced armor to keep lighter vehicles from puncturing its sides, engineers can be equipped with trench-thwarting flamethrowers, the list goes on. Every on-unit upgrade costs Munitions and this is the primary use of Munitions in the game. These add-ons all also possess special preservative qualities depending on their nature. Upgrades to vehicles can be destroyed just like their engines can be damaged. A machine gunner can be killed, or armor plates eliminated, forcing players to reinvest resources to get the perk again. If an infantry equips a special weapon and then dies, he leaves the weapon behind on the battlefield, allowing his friends (or foes) to pick it back up and put it into service again. |
CoverThis Paratrooper is taking whatever cover he can get.Cover is one of the most basic aspects of Company of Heroes, and a player that uses cover to their advantage will often win a battle. There are three types of cover in the game, heavy, light, and negative. Light cover provides minor benefits, and decreases the damage taken from enemy fire. Units in negative cover, such as streets or low water, actually take slightly more damage than if they had no cover at all (this tends to crop up on choke points such as bridges). In heavy cover, troops take almost no damage from direct enemy fire, while charging enemies get full damage penalties for not being in cover. This makes charging a heavily defended position dangerous and difficult. There are many things to counter the benefits of cover, such as flamethrowers, grenades, and flanking. Flanking counters cover because cover is based on direction, meaning the cover has to be between your unit and the enemy unit to realistically block some of the shots. To make sure that you don't get stiffed on the directional cover mechanic, holding down the right mouse button and dragging in a direction tells your troops which way to face so they can protect themselves intelligently. |
AccuracyLittle to nothing is a guaranteed kill in Company of Heroes for the simple fact that almost nothing guarantees a hit in the first place. Most of the weapons in Company of Heroes do more damage than in similarly scaled games. It does not appear, however, because every weapon can miss and many of them do so frequently. The primary difficulty of attacking units in cover is, in fact, the reduced frequency with which your men will hit their targets. The exact mechanics of COH's accuracy system are questionable, but the errant shots make infantry battles appear much more chaotic than they normally would creating a more engaging and less by-the-numbers experience. It also makes everyone hold their breath during tank battles where, with tank cannon reload times commonly reaching 8 to 10 seconds, a misplaced shot can spell disaster. |
VeterancyIn Company of Heroes, units can gain veterancy, which is a bonus to the fighting ability of a unit in some way, such as a damage increase or a speed multiplier. Each army earns veterancy in a different way. The Americans gain veterancy by kills from the individual units, so a rifleman squad that has gotten enough kills will receive veterancy. The Wehrmacht gain veterancy through purchased upgrades, and the buff is universally applied to all units once it is bought. While the American forces are much more of a hassle to improve because of this field experience style the veterancy reward is much greater, the Wehrmacht upgrades are segmented into four separate categories and become very fuel-intensive after the first upgrade. This fuel cost reduces their ability to produce tanks and is therefore not always worth the expenditure. However, the Wehrmacht vehicles receive special bonuses when they are upgraded in this fashion, such as side armor and extra gunners, add-ons that American vehicles can also get but must individually purchase. |
SuppressionThe machine gun has Pinned this Engineer behind the tractor. He is frozen in place from fear.Suppression in Company of Heroes goes hand-in-hand with cover. Suppression is a tool that can be used to stop an enemy advance or supplement an attack force. In layman’s terms, suppression is when a machine gun makes a squad of infantry hide for cover. Suppressed squads lose a considerable amount of mobility and they do not fire as frequently. If a squad is suppressed long enough to be pinned, they no longer take orders, and the only way to use them again is if the suppressor is taken out or if they are retreated. A heavy machine gun can suppress as many infantry squads as walk into its field of fire, so properly deployed teams of MG42's or Browning .30 cals will neutralize an attacking infantry force very quickly. Vehicles cannot be suppressed the way infantry can and as such make excellent emplacement breakers. |
RetreatingUnlike other strategy games where units are thrown away without a second thought, Company of Heroes emphasizes personal attachment to specific squads with veterancy (they level up as you use them more) and retreating (keeping them alive). If a squad has lost many of its members and is on the verge of being lost (or if you just want the troops back at base for some reason), it can be retreated back to the headquarters, where it can be reinforced back to a full squad or potentially thwart an unforeseen invasion force. Retreating is also beneficial to the survival of a squad because, while cannot fire as they run, they move much faster and take less damage on the way back to the headquarters. It is always cheaper to reinforce an old squad than to build a new one, encouraging the philosophy to live to fight another day. |
Log in to comment