Hello all,
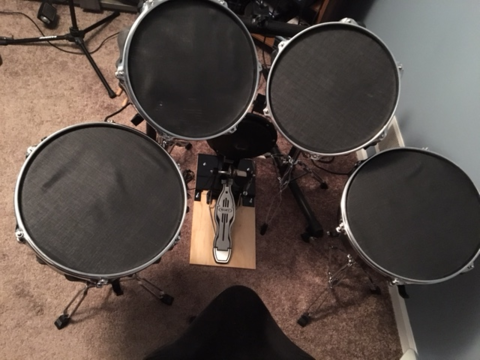
With Alex about to crush it on the drums for the children, I wanted to finally get something up about the custom drums he'll be using all day. Earlier this year, I sent Alex a Custom Rock Band Drum Kit based on a set I had made for myself many years ago. I originally intended to document info on these in video form, but everyday life has continued to take almost every second of my spare time.
That said, I still want to get this info out to those who are interested, so for all the deeply invested Rock Band players out there looking for an awesome project, here are some instruction that will hopefully help you to make a custom kit of your very own.

Part 1: Materials
To complete this project, you are going to need some very specific materials, some easily sourced parts from your local hardware store, and a handful of general purpose household tools. I'll try to sum up the most specific parts to the best of my ability, so without further ado:
Drum Hardware and Mounting Gear
When I set out to complete this project initially myself, one of my main goals was to keep things as simple as possible in terms of materials, and to build as few things from scratch as possible. While it would be totally doable to build a drum body and mesh head mounting mechanism from the ground up, I didn't quite have the time or skill required to perform such a feat. After thinking it over, the simplest solution I came up with turned out to be a fairly elegant one: I would make my kit out of real existing drums. While you could take an entire drum kit as is and convert it into a Rock Band kit relatively easily, I had some additional goals on top of raw gameplay performance:
- I want my drums to be as quiet as possible
- I want them to take up a minimal amount space as for storage when not in use
- I want them to be easily mountable using some sort of standard, off the shelf product
Taking all of this into account, I scaled back from the thought of using an existing drum kit to a more conservative solution, building 4 drum pads out of two physical drums. The drums I have selected for each of these projects have been sets of matching Toms, one 12'' (to serve as the Blue and Yellow pads in RB) and one 13" (for the Red and Green pads). To turn two drums into 4 pads, you simply cut each complete drum in half. This works perfectly for our purposes since we don't need/want them to sound like drums anymore. It minimizes the materials needed to create them, and the space needed to store them. Finally, it makes our pads perfectly suited for mounting on most standard snare drum stands, since one half of each of the toms is very similar in size to your average snare drum.

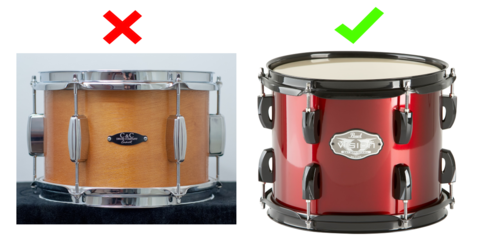
To find your own drums for this project, you can check out your local music store to see if they have anything used for a reasonable price, or hit up eBay or Craigslist for additional options as well. Keep in mind, however, that you want to avoid drums that are built with certain mounting mechanisms. In the included image, the drum on the left has a mounting mechanism that covers the full length of the drum. since we wish to use this same mechanism in our final build, and also wish to cut the drum in half, this is a deal breaker. Look for drums that are put together like the one on the right when making a purchase.
When picking out stands to mount our new pads on, you will want to buy two sets of stands. The first set should have a lower maximum height, and be used for the Red/Green pads, and the second should have a higher height, for the Yellow/Blue pads. I have found these to be good for the low pads, and these for the high ones, but I'm sure there are plenty of others out there that will work just as well.

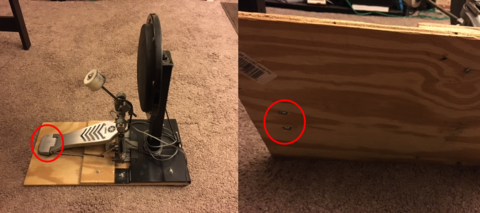
Finally, we need some existing drum gear to build the kick pedal. It's good to pick out a drum pedal that has open space at the base, which will be useful when mounting sensors later. Its also useful to find a pedal that has easily removable screws in its base near the heel, which you can remove and replace with slightly longer ones that will help hold the pedal to the new base you will build for it. In addition to the pedal itself, you will need a surface that the pedal will strike against during use. I have chosen to use an off the shelf practice pad, which suits our purposes well and isn't particularly loud compared to some possible alternatives.
Rock Band Drum Hardware
In addition to all of the actual musical gear you need to procure, you will also need some Rock Band gear to hook everything up to your console of choice once you are done. There are two ways this can be done. The first is to use the brain from the Ion Drum Rocker kit that came out many years ago, and simply plug all of your new gear into the standard 1/4'' audio jacks on that device (you will also need the Wired Legacy Adapter to connect the brain to your console if you are playing on Xbox One). If you are not fortunate enough to have this highly coveted piece of legacy gear however, there is still hope. although it will require some additional work. You should be able to modify any existing Rock Band kit that is compatible with your console and turn it into a drum brain similar to the one that shipped with the Ion kit. We'll get into more of the details on that later, but keep in mind that this modification will mostly destroy whatever kit you choose to use, so you may want to procure a second RB drum kit to carve up for this project.
Sensor Hardware
Now that we have our mechanical drum hardware accounted for, we need a few pieces of electrical hardware that match the sensors used in the standard Rock Band drum kits. All of the RB drum pads detect hits using piezo sensors to emit an electrical signal each time they are vibrated by your drum hits. You can find some examples of these sensor here, here and here. Almost any size should work in your pad setup, and you may even want to buy a few different kinds to experiment. I've personally had the best luck with sensors that are at least 30mm in diameter or larger.
As for the kick pedal, it uses its own magnetic sensor to detect hits and send them to the game. These sensors come in two pieces, and when these pieces come within close proximity of one another, a circuit is opened which registers a hit in the game. You can use simple magnetic security sensors for this, which function identically to the sensors built into stock RB drum pedals. It is worth noting however that you need to use "normally closed" (or N.C.) circuit sensors only for the purposes of this project. That is the type of signal that Rock Band hardware is designed to accept (the sensor I linked above should be a "normally closed" sensor).
Misc Tools and Odds and Ends
In addition to everything else listed above you will also need the following:
- A few sheets of plywood or particle board (2' x 2' and 2' x 4' should do, at around 1/4 and 1/2 inch thick.
- Various nuts, bolts and washers to attach wooden platforms and sensors to your drum hardware. You will need to buy some of these fresh based on measurements you will make later. Others you may need to acquire to replace existing screws on the drums you purchase that are not quite long enough after you add your additional hardware. Just take the old bolts to the hardware store and match up the size/threading.
- Some small angle brackets or corner braces (used to mount your sensor platform inside each drum pad).
- between 5 and 10 1/4 audio jacks, which you'll use to attach our drums to your drum brain (you'll need at least 5 for just your drums, and more if you have to modify a RB kit into a brain instead of using the one from the Ion kit).
- Some small (around 24 gauge) wire, some solder and a soldering iron, and possibly a multimeter to help you test your connections. Don't let this part of the project intimidate you. All the wiring required is dead simple, and you can find a ton of tutorials online that will run you through the basics of soldering in general if you are initially squeamish.
- Scissors or a few Exacto knifes or box cutters, a sewing needle and thread, and some standard window screen.
- Some mounting tape or adhesive pads, and one or two foam sanding blocks (which we won't actually be using to sand things).
- A Jigsaw, a power drill (with bits up to 1/2''), at lease one Philips and flat head screwdriver, and a small adjustable wrench.
That should do it for part one. I know I just dropped a ton of information, but don't let it overwhelm you. I'm by no means an expert in building anything, but I was able to put a few of these kits together relatively easily. With some patience and determination, you can totally do it too. If you are dedicated enough to still be playing Rock Band semi regularly in 2017, the difference in performance that you will get out of this custom kit will be a day and night experience compared to the stock drums. If you love chasing full combos or personal best high scores, you won't beat this kit.
I'll do my best to finish this tutorial over the next few days, but until then, tune into the Extra Life streams, open your wallets, and give what you can to help the kids!
Log in to comment