Gold Rush is an original map for Team Fortress 2 and debut of the Payload game type. In Gold Rush, the attackers must escort a cart to the end of the stage while the defenders attempt to block their progress.
The Cart
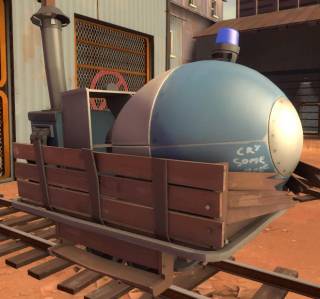 The coveted payload
On payload maps, BLU team tries to get the payload (which appears to consist of a wooden wagon with a Fat Man atomic bomb inside it) from their end of the map to the other before time runs out. The cart is bound to a train track, inching its way forward if at least one player from BLU is next to it. The cart will pick up speed if more BLU players join in but it grinds to a halt if even one RED player is nearby and it will even start moving backward if BLU fails to push it for a long period of time. The cart also acts as a BLU dispenser: if attackers stand near the cart, they will have their health and ammo replenished at a gradual rate. This feature provides additional incentive to push the cart (because apparently winning the game isn't enough).
At the end of stage three, if the attackers manage to escort the cart to the very end, there is a very large explosion that kills everybody in its vicinity. The effects of the explosion were created using Valve's Cinematic Physics system, and it is the first time it has ever been used in a multiplayer environment.
Mechanics of Payload
Payload behaves quite similarly to attacker-defender capture point maps in TF2. There are checkpoints on each stage that serve as both progress trackers and access determinants. When the cart reaches a checkpoint, the round timer is extended and the map layout changes in the attacking team's favor (pathways open and close). The cart will not move backwards past a checkpoint. Also like CP maps, the attackers have shorter respawn times to compensate for the advanced preparation and protection given to the defenders. If the defenders win a stage, or if the attackers win all three, the teams switch roles.
The Layout
Gold Rush has three distinct stages that are further divvied up by checkpoints. Points are awarded to a team for each checkpoint they reach, up to 7 for a flawless victory. At the end of each stage the players move to the next location and the timer restarts. RED is given setup time at the start of each stage to compensate for the spawn time and location advantages given to BLU at the beginning of each match.
Stage One
Out the Starting Gate
 The attacker's fort.
 The ditch.
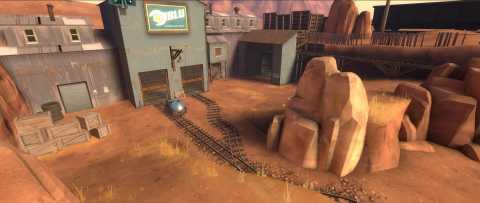
Gold Rush begins with a heavily segmented open plain and four possible entrances for the attackers that all essentially lead to the same place. The cart track runs through a narrow valley on one side of this area, that widens into a defender-side ditch--perfect for sentry ambushes. There is a two-story elevated house on the defender's end with health and ammo both inside and out.
After entering the ditch, the cart manuevers around the house up and out of the ditch to hit the first checkpoint. This area is dominated by Snipers from both teams thanks to the open terrain and the convenience of the elevated perspective out of the house on the defending side.
The first checkpoint.The sniper house up the hill.As with any preliminary area in this kind of game, the defenders must act intelligently not to get steamrolled by Ubercharges and attacker side respawn times.
The Elbow of Death
The eponymous elbow.Guess where the elbow is.Just after the first checkpoint, a fully enclosed hallway and elbow confront the attacking team. A heat map provided by Valve (posted on the right) has shown this area to be one of the biggest bloodbaths on any map in TF2.
The inability to easily escape ambush and its exposure to the defender's second point fortress are predominantly responsible for this. The elbow also has an outlandish number of possible entry points above and below to guarantee a constant flow of players through the space.
The real estate won for getting past the Elbow of Death.The defender's fort.If the cart makes it past the Elbow of Death, chances swing in BLU's favor considerably as it increases their territorial advantage to include a tall wall facing the defender fortress where Engineers can start porting in teammates. Though this positional advantage can be squashed by a soldier/demo RED counteroffensive, it usually doesn't take long for the cart to make it to the end after this foothold is gained.
Stage Two
Passing Through Town
Heavy vertical gameplay.The view from BLU's lower exit.The first leg of Gold Rush's second stage puts a much greater emphasis on the third dimension than most levels. The cart's track serves as a kind of middle ground with very little play left or right until it reaches the checkpoint. The cart is surrounded throughout by buildings and trenches that make Soldierly tactics quite effective on the defense.
The BLU base is not barred to RED on this map, so spawn camping is occasionally a problem if BLU loses the initiative. However, this kind of griefing is fairly rare; if the attacking team was able to push the cart through the Elbow of Death and beat the first stage, chances are they will make it through this section without much trouble.
The map closes down quick after the first checkpoint.Over the valley, hook right, and you're there.The primary defensive position on the first leg is behind the tower to the right of the cart when it begins crossing the bridge. A large ammo and med kit, as well as a substantial assault blindspot, make Engineer installations very popular here. Once any opposition is neutralized in this corner, BLU is basically free to the truck the cart to the checkpoint without hassle.
Fight for the Center
The two-sectioned fortification.The outposts above the tunnel are a great foothold for BLU.A short tunnel gives RED time to prepare for the second leg of Stage 2, where the cart simply has to keep going straight to the end. This proves difficult to accomplish because the fighting quarters is claustrophobic compared most of the usual fare in TF2. The section is divided into two halves by a large wall with health and ammo on both sides.
You would think that Engineer emplacements would be a given, but the attacker's side of this arena is so frequently swept with fire that most sentries and teleports are taken down before they can have a lasting impact. Instead, most the construction takes place behind this wall for RED and in the building over the tunnel for BLU.
It isn't far, but securing the track is so easy it doesn't matter.The view from the attacking sniper post.It is difficult for RED players to attack the BLU emplacements because they must go all the way through the tunnel to get up to that position; it is difficult for BLU players to attack the RED emplacements because there are three good places to put sentries that can all each other up, not to mention any player support they might have at the time. This section tends to stalemate more than any other in Gold Rush. The distance from the divider to the terminus is small, but blood is paid for every inch of it.
Stage Three
Running in Parallel
Many roads to victory.The final stage splits out the gate into three paths and an overhang. The cart occupies a winding trench in the center of the boulevard. The lower road next to the cart is a good exit for BLU as it gives them better access to the top of this shallow hill--the better to thwart dastardly schemes likely brewing on the upper road with the shed where RED can easily deploy sentries and Ubercharges to great effect.
The cart's trench is narrow and is easy to ambush or bomb. Even after the cart makes it up the slope, the attackers are not home free; RED has a temporary spawn point just outside the checkpoint, usually slowing the cart's progress considerably once it comes into the area's line of sight. Once the checkpoint is locked down, so is this spawn point.
So many options.The four paths converge on the checkpoint.A Tunnel In Disguise
A dark path and a light path.Good ambush setups abound.With the defending spawn point pushed all the way to the back of the map, BLU tends progresses to glide through this section. The second of three parts in the final stage is primarily a stretch of what is essentially a hallway outside.
To the left and right, the position is littered with nooks and crannies for putting up a fight, though these implements are blinded in BLU's favor for the most part. If RED gets the jump on these spots (anticipates a break at the first checkpoint and builds up in advance), BLU will be delayed significantly though not terminally.
This lip is RED's only reliable stand for this section.The dark path follows the track nearly to the checkpoint.This leg is, in many ways, the simplest of any in Gold Rush. Stubborn pushing will win the day for the offense almost without fail. Just watch out for Snipers.
The Final Terminus
A sniper's view of the last stand.BLU's makeshift base for the final push.Despite a vast array of options available to assault, Gold Rush's last leg can be daunting to complete. It is the longest on the map and has many pitfalls for the offense, in particular an open sniper's ledge that is only normally accessible by RED with a splendid view of the last straightaway and a well blinded walk-up outpost that is nearly impossible to infiltrate owing to its RED-side exposure.
The first part has none of these issues and is rarely where the cart will be resting when the timer hits zero. BLU must take advantage of the space given them in the first part of this section to build up strike forces (walking from BLU's spawn to the action can take nearly 20 seconds at this point).
This passage has a variety of benefits for avid spelunkers.The situation from BLU's point of view.Instead of running headlong into sticky bomb traps and headshots, the discerning attacker might choose to take the newly opened underground passage on the right side of the fortress. From there, they can proceed to the track from a more obscure vantage or use a peephole on the elevated wall at the opposite end of the base to harass the enemy. This route has many advantages but its effectiveness for getting to the cart is questionable. There is also drop-down entrance on the left side of the base.
This final stand tends to stall hard for a while, but if BLU pushes from all directions available to them and throws in an ubercharge or two, RED base will fall.
Many hiding spots at this corner.
Log in to comment