Overview
Guild Wars is an action RPG mainly focused on mastering skill usage rather than skill training. The series implements a level cap of 20, which is reached fairly early in the game, or can be achieved instantly with the creation of a PvP character. In addition, with the exception of the early stages of the game, all armors and weapons for a character class only differ in aesthetics. This design is meant to reduce the time spent grinding at skills and gold farming, and increase the time mastering the gameplay.
Guild Wars takes place in the land of Tyria, where a terrible curse has befallen the land. The hero begins in the lush land of Ascalon, in a kingdom at war with the Charr, a race of beast-like creatures, but things quickly go awry after the Searing, a cataclysmic event leaving the land burnt, the cities ruined, and evil Charr ravaging the land.
The game is divided into two modes, PvE and PvP, which the player may choose at the character creation screen. Each account has 4 character slots by default, and 2 additional ones are added per expansion, and more can be purchased from the online store.
PvE
The PvE portion of the game is reminiscent in tone and genre of many other online RPGs. However, the game is structured in instanced missions and quests, with persistent hubs linking them, where the player may meet up with other players, chat, or trade items. These missions are repeatable, and have hidden side quests. As the level cap is so low relative to other games of the genre, the 'late game' portion of the experience comes early and focuses on the accumulation of titles, which players can display for bragging rights. After each campaign is completed, the player can unlock hard mode, where the enemies greatly increase in skill, health, and quantity.
PvP
The PvP portion of the game allows players to create a level 20 character from the outset of the game and team up to fight other players around the world. Characters created in this fashion are limited to PvP play however, whereas PvE characters are able to participate in PvP as well. Creating a PvP character can be preferable, since they are easily and freely customizable with maximum level equipment and will have access to any skills that have been unlocked on the account.
Gameplay
Players navigate using the WASD keys and mouse, and activate skills by clicking on them in the skill bar or using hotkeys. There are various screens to look at and use such as the map, minimap, quest log, party, inventory, and skills. Players can travel to any location they've already been to using the map and clicking on that area's icon. The main game is mission and quest based, and players must complete them to progress through the game. New skills and equipment found in PvE are unlocked for unlimited use in PvP. The opposite is not true however, as skills unlocked in PvP will not be available for PvE.
Players can communicate with each other using the various chat channels (all, party, trade, guild and whisper) or by using emotes by typing "/" followed by a particular action such as "dance". There are various kinds of emotes and some are even required for quests. Players can trade with each other and look at other trade offers using the trade channel, and can whisper, ignore or add friends using the friends list.
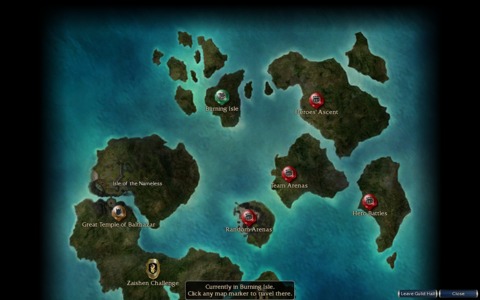
Different copies of the same map are called districts, and the player can alternate between districts by using the map. Towns or outposts are mainly used to form parties to go through a nearby quest, mission or explorable area. Party members can be composed of other players, henchmen (an NPC with set equipment, level, and skills) or heroes (a customisable NPC). You can join another player's party, or host your own. Parties have a maximum size of 8 and while you could originally only use 3 heroes at once, up to 7 heroes may now be used to fill out a party.
Heroes, once unlocked, are unlocked for the entire account and can also be used in certain PvP arenas. Heroes are generally more useful than henchmen as you can customize them and control them to extent, and NPC's in general react faster, and more accurately to what human players are doing, although they lack the more cohesive team play. Although it is probably better to use a team of other players to beat missions, the main campaign can also be completed using only heroes and henchmen.
Players fight by targeting an enemy and then pressing space to begin attacking. The character will stay locked onto the target until the target is changed, the enemy dies, or your character dies. Commands such as skills can be entered without locking off the target; monks can even heal their own party members and keep locked onto the target they was attacking. Your own party members can be more easily targeted using the party window.
Players have a health and energy bar, which replenish at varying rates, with health regenerating naturally only if nothing is happening. Characters have a base health of 480 at level 20, and a variable amount of base energy. The amount that any bar is regenerating or degenerating is measured in "pips", shown as small arrows going in the direction of change. A pip is equal to 2 points per second for hp and 0.33 points per second for energy. Therefore, when somebody has 3 pips of energy regeneration, they are regenerating 1 energy per second. A maximum of 10 pips in any direction may exist.
When a character dies on a mission, they are sent back to the area where the mission was given. When a character dies in an explorable area or most quests, they are resurrected either by another character with a resurrection skill, or at the nearest resurrection shrine, with a -15% penalty on their health and energy. This penalty is cumulative up to -60%, however it can be decreased with morale boosts (obtained by defeating bosses), which decrease the penalty by 2%, and by defeating large amounts of regular monsters (where 75 experience points decreases the death penalty by 1%). Going to any non-instanced area such as a town or outpost removes your death penalty or morale boosts.
The player must also consider hexes, enchantments and conditions. Enchantments are a persistent or temporary positive, conditional effect. Hexes are the opposite, giving a negative, conditional effect to the player. While each hex skill has its own unique effects, there are a set number of conditions in the game:
- Bleeding leads to -3 health degeneration.
- Blindness incurs a 90% miss rate for physical attacks.
- Burning leads to -7 health degeneration for a brief period of time.
- Cracked Armor reduces armor by 20 to a minimum of 60.
- Crippled reduces movement speed by 50%.
- Dazed slows down spell casting by 50% and interrupts the foe whenever they receive physical damage.
- Deep Wound reduces the opponent's maximum health by 20% temporarily and removes 20% from healing effectiveness.
- Disease leads to -4 health degeneration and spreads to nearby foes of the same species.
- Poison leads to -4 health degeneration.
- Weakened decreases physical damage by 66% and gives -1 to all attributes temporarily.
All conditions have a set time limit in which they expire, although they can be reapplied before the time limit runs out. Knockdown, although not a condition, can be caused by various different skills and interrupts the opponent by knocking them on the ground for two or more seconds. All condition durations can be extended or decreased using runes and insignias. For example, an extra second of knockdown can be added by equipping a Warrior with a Stonefist Insignia.
There are also stances, shouts, and chants, which are instantly cast and give your character a set effect for a period of time. They can also be cast while knocked down. Hexes, enchantments, conditions, stances, shouts, and chants will appear in the upper left corner of the screen along with a duration bar if applicable, and will disappear once they have expired or are removed.
Equipment
The player character begins with twenty inventory slots which can gradually be upgraded to forty-five. Stackable items, such as iron ingots, only take up one inventory slot. Players gather loot from monsters, quests, and treasure chests. Loot is comprised of crafting materials, equipment and miscellaneous items. Crafting items include furs, ingots, and wood and are used to make equipment.
Equipment includes all of the armor and weapons in the game, and plays the most important role in terms of earning money and unlocking items for PvP. Equipment varies in rarity, and is defined by the item's colour:
- White items are common items without any upgrades.
- Blue items are common items with lower-range upgrades.
- Purple items are uncommon, and often feature mid-range upgrades.
- Gold items are rare items with maximum or near-maximum upgrades.
- Green items are unique, and have perfect stats.
Miscellaneous items are items dropped that can be sold for a small amount of gold, such as badges, banners and beads. Items can be stored in a bank by talking to a Xunlai Storage Agent after paying an initial fee. Banks, or 'storage chests,' hold up to eighty items over four tabs, as well as 250 of each crafting item. Items and money kept in the storage chest can be accessed by all of the characters on a single account, who otherwise have individualised storage.
Players can talk to merchants to sell their items and also buy important items such as identification kits, salvage kits, lockpicks and keys. Lockpicks and keys open chests in the PvE world. Identification kits identify the upgrades attached to the various equipment you receive and any identified runes or item upgrades, such as staff heads, are unlocked for unlimited PvP use. Identifying equipment will make it sell for significantly more gold, including white or common equipment.
Salvage kits can take identified equipment and turn it into raw materials (for example, a staff into wood), while higher quality salvage kits can also salvage the runes and upgrades of various equipment. For example, a Stonefist Centaur's Harness of Superior Strength could be salved for leather using a basic salvage kit, or, with a better salvage kit, either the Stonefist Insignia, or the Superior Rune of Strength. There are Expert and Superior versions of both the identification and salvage kits, of which the Superior versions hold four times the amount of uses and still only take up one inventory slot each.
Weaponsmiths and armorsmiths can be found in nearly every significant town or outpost. Armor is useful for weathering physical attacks and doubles in effectiveness every 40 armor points (AP). The minimum AP available is 60 (the maximum AP available for caster classes), and at 100 AP the player would take half the damage they would at 60, although all other bonuses and conditions still apply as normal. Characters can only wear the armor of their primary profession, but they can wield the weapons of any profession they wish (although effectiveness will vary, see "Skills"). Weapons can be further customized by weaponsmiths to give a 20% bonus to damage, although after doing so they are unsellable to other players. Hero weapons can also be customized.
The services of weaponsmiths and armorsmiths, along with items from merchants and skills from skill trainers can be purchased using gold and platinum, the currency of the game which can be obtained from monsters and selling loot (where a platinum is 1000 gold). The Xunlai storage chest can hold an infinite amount of platinum, whereas the player can only hold 100 platinum in their inventory at a time. Due to this, trades are often done by trading platinum along with collateral items, such as globs of ectoplasm, which are very valuable, but fluctuate in value. In this way players can purchase or sell items that are worth more than 100 platinum.
Combat
Guild Wars features a unique combat system that blends in both collectible card game strategy and fast-paced action. Each player is given "skills" throughout the game, in which he/she may choose what to bring from what they collected in towns and outposts. Players can and will collect up to hundreds of skills for each character, but they can only bring 8 skills into an explorable area, mission, and arena. A fully equipped skill bar is called a "build." In general, most skills are tailored towards damaging the enemy, whether it may be from a certain sword attack that makes a fleshy creature bleed, or a fireball that explodes on impact and damages other adjacent foes. The one exception is the Monk class, where most of the class' skills is to heal party members. The skills that are available to each player is mainly limited on their primary and secondary profession, but the player will have a chance to change their secondary profession on demand later in the game to collect every skill possible, if the player chooses to do so.
Skills are heavily affected by their corresponding attribute, and a higher attribute rank will make the skill more effective. For instance, Word of Healing has the effect "heal target ally for 5 health and an additional 15 health if their health is below 50%" at level 1 healing prayers, but it reads "heal target ally for 180 health and an additional 134 health if their health is below 50%" at level 21 healing prayers. Other than increasing the effectiveness of the corresponding skills, some attribute ranks also give a passive bonus (for instance, the fast casting attribute decreases the time it takes to cast a spell).
Skills are obtained in PvE by completing certain quests, using a Signet of Capture on a dead boss monster (boss monsters are colored depending on their profession) to obtain Elite Skills, or by talking to a Skill Trainer and buying them. Elite Skills can only be obtained from boss monsters or unlocked for PvP use for 3000 Balthazar faction. Elite skills have a gold border around their icon, and only one Elite skill may exist in a skill bar at once.
Any one attribute can be increased to a maximum of rank 12 using 97 attribute points (a player has a total of 200 attribute points at the highest level with the completed, necessary quests), but can still be increased for an extra 4 ranks by using headgear and runes, and even an additional 5 points using certain consumables, however the maximum attainable in PvP is 16. Headgear will increase one attribute's rank by 1 depending on the headgear, a minor rune will also increase it by 1. A major rune will increase it by 2 at the expense of 35 hp, while a superior rune will increase it by 3 at the expense of 75hp (the maximum hp is generally around 600). Runes do not stack, so 3 minor runes will increase attribute rank by 1, not 3, however different runes can be used for different attributes (e.g. a minor rune of blood magic and a minor rune of death magic will stack). A character has 8 slots in their skill bar, and skills are usually activated using hotkeys.
Each class can have a secondary profession, however the primary attribute will be available to only the primary profession. The primary attribute's skills of the second profession can still be used, but can't be increased. For example, a primary warrior will have access to Strength, while a primary monk will have access to Divine Favor. A Warrior/Monk will be able to use both Strength and Divine Favor skills, but will only be able to increase strength as an attribute and not Divine Favor.
PvP Game Types
Random Arenas (RA)
Two teams of 4 random players fight each other in a "last team standing" scenario. Though most of the maps are a simple 4v4 battle, there are some slight variations: Some maps contain obelisks which can be capture and will slowly damage the opposing team, while others give each team a Priest who resurrects dead players at 2 minute intervals for as long as he is alive. In the latter case, both the players and the Priest must be killed for a team to be defeated. Once a match has ended the losing team is disbanded, allowing its individual players to rejoin the arena as part of a newly randomized group, while the winning team is kept together to fight their next available opponents. If a team wins 5 times consecutively, its members are awarded a single point towards their Gladiator title. If that team continues on to 10 consecutive wins, it is awarded another two Gladiator points and then taken out of the Random Arenas and placed into the Team Arenas. Gladiator points gain is increased by 1 up to 4 at the 20th victory.
Team Arenas (TA)
 The PvP Battle Isles
This game type is identical to that of the Random Arenas, except that teams are consciously picked by players rather than randomly assigned. This makes the level of coordination among players much higher and thus competition is much fiercer. Unlike the Random Arenas, when teams reach 10 consecutive wins here they are allowed to continue on indefinitely, being awarded Gladiator points at 5 win intervals (the number of points awarded increases by 1 each time, up to 4). Gladiator points contribute to Gladiator rank, which increases your total Balthazar faction limit.
*Kills and victories in either RA or TA will yield Balthazar faction, up to 300 per battle. Balthazar faction is used to unlock skills and heroes in PvP, as well as purchasing Zaishen Keys. Zaishen Keys open the Zaishen Chest, which gives various rewards. Opening up the Zaishen Chest also contributes to your Zaishen title track.
(NOTE: As of the October 2009 update, TA was retired and replaced with Codex Arena).
Zaishen Arenas/Zaishen Elite (ZA/ZE)
Although you face off against computers, an account must have completed the Zaishen Arenas first with at least one character before being able to access the real PvP arenas. After completion of the Zaishen Arena, you unlock the Zaishen Elite which is a harder version. Although you don't face off against humans, you still gain Balthazar faction (up to 6000 per day), however you don't earn Gladiator points in this mode.
Heroes' Ascent (HA)
Previously known as Tombs, this competitive venue allows teams of 8 players to compete in an ongoing tournament to capture the Hall of Heroes. While most maps are a simple 8v8 fight, there are wildly different scenarios as well: Some require teams to capture and hold Shrines to accumulate points over time, others require teams to run Relics from one side of a map to their Ghostly Hero NPC, while still others are based around 3 teams all trying to capture a central Altar. Losing teams are thrown out of the tournament and forced to restart, while winning teams continue onwards and are rewarded with exponentially increasing amounts of Fame (which, in turn, counts towards each player's Hero title). Once teams win enough consecutive maps to reach the Hall of Heroes, they must fight a final battle in an attempt to capture it from the holding team. If they succeed, they are rewarded by the opportunity to open a golden chest for valuable prizes, before becoming the new holding team which other teams then try to dislodged.
Guild Battles (GvG)
Undoubtedly the most serious form of competition in Guild Wars, GvG sees teams of 8 players belonging to the same guild facing off against each other. Each team has its own base, which contains a certain number of NPCs (approximately 8 archers depending on the map, exactly 2 Knights, 1 Bodyguard and the Guild Lord himself) around which the game revolves. There is also a Flag Stand on each map which plays a crucial role. This is because when it is held for 2 consecutive minutes it grants the holding team a 10% Morale Boost, which recharges Resurrection Signets, removes Death Penalties (referred to as DP), and buffs team members. Each dead player with less than 60% DP is also resurrected and moved to their base at 2 minute intervals. Thus there are two ways to win a Guild Battle: Either each player on a team has to accumulate 60% DP and then die, which is very rare, or one team has to kill the other's Guild Lord. The winning team's Guild Rating improves, making their Guild Rank drop, while the losing team's Guild Rating lowers and their Guild Rank increases. Teams with a Guild Rating of over 1200 each (usually this means the teams are within the top 200 in terms of Guild Rank) also gain one point towards their Champion title upon winning.
Character Classes
There are 6 character classes in the original Guild Wars campaign.
Warrior
 The Warrior class
The Warrior is a strong fighter who specializes in the use of Swords, Hammers and Axes. Warriors, unlike most other classes, use adrenaline skills. Adrenaline is much like energy, however unlike energy adrenaline is gathered by successfully hitting an opponent or getting hit. Some skills also supply adrenaline. The warrior has more health and armor than any other class, and also has various skills that increase its armor or maximum health. This makes it the tank of the game, however it is also quite capable of dealing rapid damage with its weapons. The sword and axe have high DPS (damage per second) and can give many conditions while the hammer has several knockdown techniques, interrupting the foe and preventing them from escaping. While it is one of the more basic classes in Guild Wars, Warriors are a force to be reckoned with when used properly.
Attributes
Strength (Primary) - increases armor penetration (does not affect lower armored targets)
Sword Mastery - increases damage with swords and chance of critical hits
Axe Mastery - increases damage with axes and chance of critical hits
Hammer Mastery - increases damage with hammers and chance of critical hits
Tactics - increases the effectiveness of Tactics skills (mainly stances)
- Energy: 20
- Energy Recovery: 2
- Armor: 80
- Armor Bonus: 20 armor against physical damage
Ranger
 The Ranger class
The Ranger is an agile class that is most proficient when using a bow. Rangers also have the unique ability to charm certain 'pets' to aid them in their fight. Rangers are valued for their ability to spread conditions and interrupt powerful spells. Rangers can also pair nicely with other professions due to its Expertise attribute, which can dramatically reduce energy costs of various skills. Because of its versatility and ability to attack from great distances, rangers are a great support group and in combination with classes such as the Mesmer, can lock down another team.
Attributes
Expertise (Primary) - decreases the energy cost for ranger related skills as well as touch skills
Beast Mastery - increases the damage and health of your pet, must have at least 1 Beast Mastery to use a pet
Marksmanship - increases damage with bows and chance of critical hits
Wilderness Survival - increases the effectiveness of Wilderness Survival skills (mostly traps and condition effects)
- Energy: 25
- Energy Recovery: 3
- Armor: 70
- Armor Bonus: 30 armor against elemental damage, 5 energy
Monk
The Monk is a holy class that uses spells to either smite their opponents or heal their allies. The Monk is the only core profession with efficient healing spells thus giving a huge advantage to any team that has one. Not only can monks heal, they are also effective against the undead due to their ability to use holy magic. Protection prayers also give the monk the ability to prevent damage rather than heal it, and is often more effective. Monks are often the first person on a team to be targeted in PvP, but due to the effectiveness of its healing spells and its various compatibilities with other professions, the monk is arguably the best support character class in the game, though an inexperienced player may do more harm than good playing a monk.
Attributes
Divine Favor (Primary) - increases the bonus amount an ally is healed when a monk spell is cast on them
Healing Prayers - increases the effectiveness of Healing Prayers skills (mainly healing spells)
Smiting Prayers - increases the effectiveness of Smiting Prayers skills (mainly smiting spells)
Protection Prayers - increases the effectiveness of Protection Prayers skills (mainly protection spells)
- Energy: 30
- Energy Recovery: 4
- Armor: 60
- Armor Bonus: 10 Energy
Necromancer
The Necromancer classThe Necromancer is a dark class that can use the energy of dead corpses to summon undead allies to fight by its side. Necromancers specialize in spells that drain health from an enemy as well as spells that hex an enemy. Necromancers can summon large amounts of undead minions which can launch an aggressive attack when they attack together. Similar to a Mesmer, the Necromancer can use powerful hexes to hinder the enemy team, but it also specializes in various condition and direct damage dealing spells. This versatility, paired with the Necromancer's unsurpassed ability to leech and regenerate health makes it a tough opponent to defeat, especially for melee classes.
Attributes
Soul Reaping (Primary) - increases the energy gained from an undead creature when it dies
Curses - increases the effectiveness of Curses skills (mainly conditions and hexes)
Death Magic - increases the number of undead familiars you may have at a time
Blood Magic - increases the effectiveness of Blood Magic skills (mainly health leeching)
- Energy: 30
- Energy Recovery: 4
- Armor: 60
- Armor Bonus: 10 Energy
Mesmer
The Mesmer classThe Mesmer is a class that uses their mind to control and dominate in battle. They are masters of illusion and can cause classes to inadvertently damage themselves, degenerate their health or energy, and break enchantments. The Mesmer has access to the strongest hexes in the game and can quickly disable a character if they don't react fast enough. It has multiple spells that punish a character for using skills or even attacking, and can steal massive amounts of much needed energy from spell casters. However, the Mesmer lacks effective self defense or direct damage skills, and is therefore better suited to being one of the best support classes in the game.
Attributes
Fast Casting (Primary) - decreases the time required to cast spells
Domination - increases the effectiveness of Domination skills (mainly interrupts and powerful hexes)
Illusion - increases the effectiveness of Illusion skills (mainly various hex spells)
Inspiration - increases the effectiveness of Inspiration skills (mainly health and energy leeching and protective stances)
- Energy: 30
- Energy Recovery: 4
- Armor: 60
- Armor Bonus: 10 Energy
Elementalist
The Elementalist classElementalists harness the power of the elements to destroy their opponents. They specialize in high-cost massive damage spells that can be cast from afar. The Elementalist's primary attribute, Energy Storage aids them in this ability as every rank of Energy Storage provides an additional 3 maximum energy points. That, along with several skills that conserve or add energy allows them to continually cast expensive spells for long periods of time. Along with powerful single target spells, Elementalists can also cast area of effect spells that do a set amount of damage to everything in the area every second for a period of time. They have very few healing or self defense spells, but their high DPS makes them one of the most effective attackers in the game. Elementalists must be supported by a good Monk or other support units because they resurrect with little to no energy, making them almost permanently useless in a battle if they die.
Attributes
Energy Storage (Primary) - increases maximum energy
Air Magic - increases the effectiveness of Air Magic skills (mainly blinding and knockdown spells)
Fire Magic - increases the effectiveness of Fire Magic skills (mainly area of effect and burning spells)
Water Magic - increases the effectiveness of Water Magic skills (mainly slowdown and ice spells)
Earth Magic - increases the effectiveness of Earth Magic skills (mainly self protection and area of effect spells)
- Energy: 30
- Energy Recovery: 4
- Armor: 60
- Armor Bonus: 10 Energy
Features
- Access to the continent of Tyria which consists of 8 regions
- A Story mode consisting of 25 missions
- Many Quests (205)
- 214 Skills Including 60 elite skills
- 54 Armor types
Soundtrack
The Guild Wars SoudtrackThe music from Guild Wars was composed by Jeremy Soule.
- Guild Wars Theme 1:34
- Autumn in Ascalon 2:12
- Mhenlo's Theme 1:47
- Trading Outpost (Bonus) 3:10
- Over the Shiverpeaks 2:16
- Eye of the Storm 2:17
- Prince Rurik's Theme 0:34
- Sands of Kryta 2:19
- Divinity Coast (Bonus) 3:14
- The Door of Komalie 2:30
- The Moment of Truth 2:10
- Devona's Theme 1:24
- Gynn's Theme 1:14
- Tears of the Fallen (Bonus) 3:36
- Eve's Theme 1:10
- Abaddon's Mouth 2:32
- Crystal Oasis 2:16
- Gwen's Theme 2:44
- Ashford Abbey 1:47
- Aidan's Theme 1:10
- Guilds at War 3:04
- Hall of Heroes 2:29
- The Rift 2:56
- Witman's Folly 1:23
- Tasca's Demise 2:26
- Ascension 2:28
- Temple of Tolerance 2:19
- The Great Raid (Bonus) 2:31
- Althea's Theme 1:11
- The Charr 1:23
- The Great Northern Wall 1:02
- Droknar's Forge 1:19
- First Light (Bonus) 3:15
- The Elementalist (Bonus) 2:45
- A Warrior's Heart 3:10
- Beyond the Ocean 3:11
System Requirements
Minimum
- OS: Windows 98/ME/2000/XP
- Processor: Intel Pentium III 800 Mhz or equivalent
- RAM Memory: 256 MB
- HDD Space: 2GB
- Video Card: ATI Radeon 8500 or GeForce 3 or 4 MX Series Video Card with 32MB of VRAM
- Sound Card: 16-bit Sound Card
- Internet Connection
- Keyboard, Mouse & CD-ROM Drive
Recommended:
- OS: Windows 98/ME/2000/XP
- Processor: Intel Pentium III 1 Ghz or equivalent
- RAM Memory: 512 MB
- HDD Space: 2GB
- Video Card: ATI Radeon 9000 or GeForce 4 Ti Series Video Card with 64MB of VRAM
- Sound Card: 16-bit Sound Card
- Internet Connection
- Keyboard, Mouse & CD-ROM Drive
Log in to comment