


Hey there, snugglebugs, to a new one-off episode of Bosswatch! I got into the habit of writing these about Soulsbornes because the boss fights invariably represented the best the game had to offer: the peak of their mechanical complexity and slow mastery curve coupled with the cathartic release that follows the defeat of any major antagonist, enhanced exponentially by the number of failed attempts each one generated.
But more so than that, Soulsborne bosses are frequently masterpieces of design, both in terms of their appearance and backstories - both usually quite elaborate - but also the array of attacks they throw at you and the ideal methods to counter them. Each one is a learning process, and that sort of engenders this love/hate connection that grows in intensity the longer you spend trying to defeat them. It often feels like most of the running time in a Soulsborne game is split between anticipating the next boss fight and trying to move past it.
All that said, Hollow Knight is not quite a Souls game. That is, its mechanics are far more streamlined and far less versatile, as you only have the one weapon and a small set of skills and modifiers (via the game's adaptable charm system) to wield against each foe. The health system is greatly simplified also: almost all boss attacks do one hit of damage to you, and you can either attempt to heal that damage with the default charge spell - this puts you in danger, as it can take a few moments to activate - or try to complete the battle without losing the rest of your meager 5-9 HP. It's a smart condensing of the usual Soulsborne conventions concerning boss fights, putting itself more in line with a classic Castlevania, but you still have to employ the usual mix of cautiously choosing your moment to strike, finding those rare opportunities to heal between enemy patterns, quickly recovering from errors instead of freaking out and exacerbating the situation further, and just trying to avoid being too greedy in general.
Hollow Knight also follows the Soulsborne example of frequently providing more narrative context to these fights only after the fact, subtly doing most of its worldbuilding in an incidental fashion. Each of these boss entries gets a little into the fight itself and the opponent's history, if any. Keep in mind a lot of this is my own interpretation; as these games rely heavily on subtext, I spend a lot of time looking for clues and pondering their meaning during the quieter moments of the game. There are also items like the Dream Nail that offer tantalizing hints to the thought processes of bosses and other enemies once you've obtained, should you be bold enough to use it on them in the middle of the melee. Suffice it to say, there's plenty of spoilers to go around:
| Dark Souls II | Part 1, Part 2, Part 3. |
| Dark Souls III | Part 1, Part 2, Part 3. |
| Bloodborne | Part 1, Part 2. |
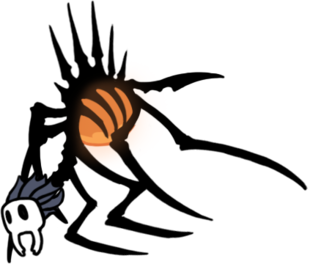
False Knight
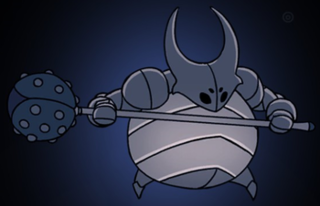
This large guy feels very "tutorial boss," and is actually a stronger version of some regular (though still challenging) enemies you may have encountered earlier in the same area. His attacks are slow, but generally hard to get around if you're too close, so this fight teaches you two things about boss fights right off the bat: find your window, and then bug out (so to speak) and get some distance until that window comes around again. Of course, keeping the pressure on and only dodging at the last second is a viable strategy also; just keep in mind that there's no quick dodging skill yet and there's certainly no way to block.
You don't discover the significance and motivations of this boss until way later, when you can reach a secret area above the boss arena with an ability you won't obtain for a long while. You not only learn that the melon-headed maggot controlling the big suit of armor was only doing so to protect his two brothers - the game maliciously has you cut them both down if you want the game's collectible bestiary entry - but the armor itself was the discarded shell of Lord Hegemol, one of the Kingdom of Hallownest's Five Great Knights: a clear allusion to the Four Knights of Gwyn (who, in turn, had something of the Arthurian legends about them with how they split apart to pursue their own quests). The game's never clear about what happened to Lord Hegemol after Hallownest fell; the other four require some subtext to suss out also, though you can at least encounter them in some form, if not alive and well.
(You can also come back and fight the "dream" version of the boss, which requires the Dream Nail acquired around the mid-point of the game. Dream bosses are far tougher and faster variants but largely fight the same way give or take a new move, so I won't bother covering them here. Make no mistake: the dream version of False Knight, False Champion, is easily the equivalent in toughness to the first final boss and nothing like the pushover you originally encounter.)
Vengefly King & Massive Moss Charger
I'm throwing these two together because they're just larger versions of enemies you find in the arboreal Greenpath area, the former being a large flying insect that charges you a lot and teaches you how to effectively downslash horizontally-moving enemies and the latter being a rampaging enemy that's too big to easily jump over so instead you're better off pulling a Bald Bull and getting the timing right on the pre-emptive hit as it thunders towards you. Neither has much plot significance or offers any real challenge, but apparently a later update upgraded both of them to boss status so I'll give them a shout out here.
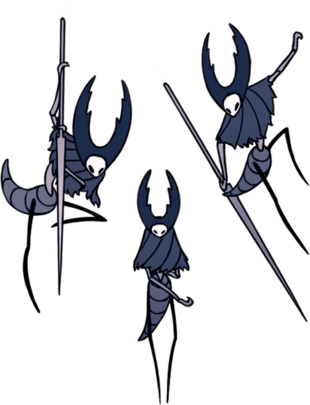
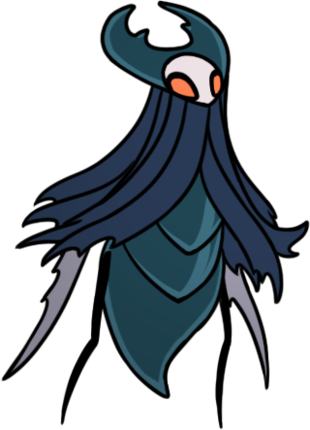
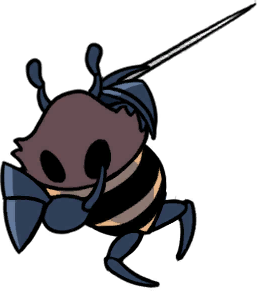
Hornet

Hornet's the Protoman (well, Protowoman) of the game, challenging you and otherwise checking in on your progress throughout the game, neither enemy nor friend. She's also the only real "equal footing" type of boss; the sort of fight where your opponent is as much a human as you are (or sapient bug, in this case) but still a fast and intelligent opponent that offers more of a challenge than the mindless beasts you usually fight. This battle was the first one I had any real trouble with, as Hornet has a number of fast attacks and offers few spaces to heal. It takes some practice until you start seeing the Matrix code, as it were, and can not only start evading her attacks more frequently than not but also using them to your advantage. One example is Hornet's blade toss, where she throws her needle-like weapon at you and then pulls at its thread to draw it back to her hands: I was regularly getting caught twice by it, once on the way out and again on the way back, but I noticed that the whole attack takes several seconds to complete and the blade can only travel so far: if you're standing as far away as possible, you have plenty of time to heal, and likewise by getting on the other side of her you've got several free hits. It's tactics like those, discovered organically (unless you're reading them for the first time here, I suppose), that really exemplify a great Soulsborne boss.
You meet Hornet twice overall, her second version a lot more powerful than the first. However, as my muscle memory of that first struggle was still intact I didn't have nearly as much trouble with the rematch. It helps that I also had half the game to get used to the controls, and mastery of advanced techniques like jumping and downslashing charging enemies or using the mid-air dash to quickly escape danger. Hornet's probably the second most significant character in the game after the hero, and plays a role in the final battle if you've followed her advice in locating a way to permanently eliminate the infection spreading across Hallownest. Unfortunately, it's not so much a case of Princess Zelda joining in on the Ganon fight in The Wind Waker than it is her providing a momentary opening to progress to the next stage of that encounter, but it's still cool.
Soul Warrior

This guy provides a neat little switcheroo before the more traditional boss you encounter in the City of Tears's ominous "Soul Sanctum". The Soul Sanctum is the requisite "we let the kingdom's best minds figure out how to put an end to this cyclic problem of ours, and they came up with the most messed up solution ever" environment, full of laboratory equipment and the unfortunately still-alive mistakes the scholars left in their wake. Also the Soul Warrior, who fights like an ensorcelled sentry bug - there's plenty of them in the city - imbued with the evasive teleportation ability of the wizard enemies floating around this part of the map. A lot of rad ideas, like teleporting above you for a downslash or teleporting away just after a charge to avoid giving you a counter opportunity. It's also one of those fights that offers few openings with which to heal, because his speed and his teleports are far too unpredictable to carve out those precious few moments you need.
It's not too clear if the Soul Warrior was a willing recipient of these powers or yet another scientific experiment, albeit one that was a lot more successful than the others. What is clear is that he fights just like you but with an additional ace up his sleeve, making him as much of a challenge as the true boss of the area.
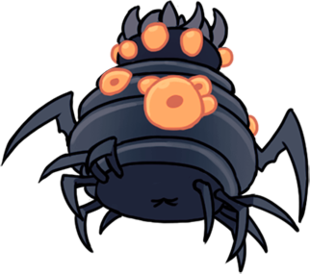
Soul Master
The Soul Master fits Hollow Knight's usual pattern up to this point of being a larger, more menacing version of common enemies you've fought so far. The game will eventually stop giving you these "trial run" type foes, as they switch the script in surprising ways. That you've encountered teleporting wizards (and a separate boss) with these attack patterns doesn't make Soul Master that much easier though; this boss is a maelstrom of projectiles and being in the wrong place at the wrong time, presenting a similar problem when trying to heal that the Soul Warrior does. However, Soul Master does have a few patterns where you can sneak in a heal, typically when he floats horizontally across the screen either with a retinue of magical projectiles or without. He typically has to move all the way to the opposite side before a new attack pattern can begin, and that gives you the window you need. The most brutal part is when you think you've won after he destroys the floor and leaves behind the spell you need, only for him to come back for a final round: while he doesn't have much health left at this point, his desperation attacks become much faster and harder to avoid, and it's even harder to carve out a space to heal. At this point it comes down to finishing him off before he can finish you off.
The Soul Master was, as far as I can tell, the lead scholar in trying to figure out a way to curtail the infection devastating Hallownest. Their solution was to accumulate soul energy to unlock the secrets of immortality, which was the sort of drastic solution that could only save the kingdom's upper crust at the cost of all other lives. It didn't work.
Mantis Lords
The Mantises of the Fungal Wastes are a big shift from the sort of slow-moving mushroom enemies you'd faced so far in that region; instead, these are spindly things that move fast and have wide arcs to their slashes that take some practice to fight without incurring harm. At the heart of their village are the Mantis Lords, who actually need to be challenged to battle and are considered so strong that Quirrel, a recurring NPC traveller, advises you to find the Nailsmith in the City of Tears to get at least one upgrade to your damage output before taking them on. The difficult part of this fight is that there's three of them: you take on the first alone, and then the other two fight you simultaneously. It's a well-structured fight, letting you get used to dealing with their patterns - which includes wall-grabs, something your protagonist has also recently learned to do - with a solo assault. When you get the duo, what often happens is that one finishes their pattern just as the other starts their next, so it's less about focusing on just one and getting in quick defensive hits on whichever one's attacking that moment. I surprised myself by acing it on the first run, but then I was a little intimidated by the advice to level up first that I may have left the battle a bit longer than I should.
The Mantis tribe occupy an unusual narrative role of being a village of violent outcasts that are nonetheless unaffected by the infection. Something about their strict, martial society has steeled their collective wills, and they've been able to hold onto their sanity as a result. Thus, while this means that they'll still attack you on sight due to you being an interloper on their lands, by the time you've earned their respect (by defeating their lords in mortal combat) they won't attack you ever again. Well, unless you attack them first because you still have some bestiary entries to fill out.
Crystal Guardian

The Crystal Peak region, a network of mining tunnels that lead up a mountain, is a gauntlet of timed laser beams that you learn to anticipate and navigate around. That comes to a head with the Crystal Guardian battle: one that's only instigated because the boss in question is hogging a bench you need for a checkpoint. The boss tosses lasers at you from every direction, from his own weapon and from the outer edges of the environment alike, but because it takes a moment for these beams to "solidify", you can usually figure out where best to stand to avoid damage. That also means getting close enough to lay on several hits while the lasers slowly peter out, or standing somewhere safe to heal.
You don't get much story info from the Crystal Guardian, save that there's something about the pink crystals that has their own deleterious effect on the minds of those who mine it. Something akin to The Hobbit's "gold sickness". The game's never clear if the crystals are an extension of the more orange-tinted infection spreading across the rest of Hallownest or have their own mind mojo going on - though it is worth pointing out that the Crystal Guardian has the telltale orange eyes of an infected. You can fight a harder version of the Crystal Guardian with the right tools: in this new form, every hit does twice as much damage, which makes evading those telegraphed beams all the more important. (I'll have much more to say about bosses that do two damage per hit instead of one in a bit.)
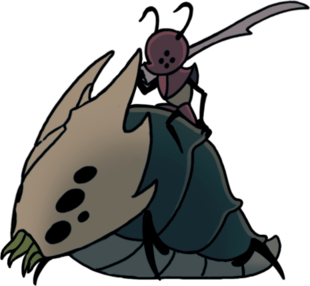
Dung Defender
The affable Dung Defender is a former knight who is guarding the Royal Waterways underneath the city for his own reasons. Most of his attacks revolve balls of dung, as you might expect, and he's also the requisite "burrowing boss": the type that disappears under the ground for protracted periods and requires you keep an eye on where he emerges. The most challenging of his attack patterns is when he sends several balls bouncing around the room, a rolled up version of himself included, though being dung balls they're easy enough to destroy with your nail if you need some space. I generally find staying close to him works best: the large amount of splash damage that occurs whenever he pops out of the ground can be avoided by staying within a nail's length of him.
It's later confirmed that he is also one of the Five Great Knights of Hallownest, and even though he attacks you he doesn't seem to be one of the infected insane like the rest of the kingdom. Rather, after losing his king and his friends he's also lost his purpose, and attacks you merely to test your might and, I suspect, to earn his blessing for the quest that lies before you. There's definitely something jovial about him; he's the closest this game has to a Solaire type, in my view. He's also another with his own deadlier dream version, which again is about as difficult as the first stage of the final boss and requires full mastery of his now-accelerated attack patterns.
Watcher Knights

Hollow Knight has a little fun here recreating the Abyss Watchers fight from Dark Souls 3, where you walk in on what is essentially a mass grave of sentinels and witness a formless evil rouse them from their endless vigil and attack you in force, usually more than one at a time. I had some serious issues with this fight as it, like the Mantis Lords fight, requires that you multitask dealing with multiple opponents following independent attack patterns. The Watcher Knights have a tendency to roll around the arena and they're all fairly big and fast and difficult to evade. That becomes twofold when there's a couple of them bearing down on you, plus there's always some trepidation whenever one of them is off-screen as there's no telling how and when it's going to suddenly reveal its presence. It's a long, difficult endurance battle where you can't easily rest because each defeated boss tag-teams in their next compatriot in a matter of seconds. You do get good at "pogo-ing" enemies though, as it's an easier way to get past them than trying to clear them with a single jump.
The Watcher Knights are guarding one of the game's three "dreamers": powerful souls who went into a voluntary coma state to keep the infection's source at bay, as it's later revealed that the infection is partially spread through the metaphysical plane of dreams (kinda, at least; the game is fairly tight-lipped about the nature of the true antagonist). The dreamers themselves don't put up a fight, however; they recognize that you're the last best hope for Hallownest and will quietly let you kill them. Not that the same is true for the creatures protecting them.
Uumuu
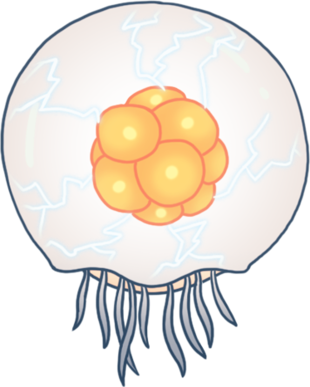
The irksome Fog Canyon is home to a colony of jellyfish-type foes, many of which will violently explode if you try to jostle them. They're all passive enough, thankfully, and let you pass without incident if you're careful. Uumuu is the sole aggressive exception in this region, as an enormous version of the same jellyfish who has been given the task of defending another of the dreamers. You actually need help on this one: the well-informed Quirrel, who you've been encountering for most of the game such as with the Mantis Lords above, steps in occasionally to provide the opening you need to do any damage to Uumuu, as it'll spend most of its time inside an invincible bubble tossing electricity your way. It's an interesting fight, because you have no control over when the boss will suddenly become vulnerable, and need to be close by to make the most of these opportunities when they arise. You also have to be constantly on the move to avoid its ranged attacks too, so it becomes this pattern of closely circling the boss waiting for an opening.
It's made apparent that Uumuu and all its children were created by the dreamer they guard as a form of self-defense; a way to protect the dreamer's vulnerable body from hostile infected parties. It was probably unintentional that its self-replicating behavior led to the entire region becoming colonized by smaller versions of the same entity, though I suppose it wouldn't hurt to have as many protectors as possible either. It's kind of cool also that Uumuu and its type are perhaps the only enemy types in the game that aren't based on an insect or other bug, though I guess I don't really know enough about the taxonomy of jellyfish to say for sure that they aren't. (I want to say that this was Team Cherry acknowledging the Metroid influence, but maybe that's evident enough.)
Broken Vessel

The Ancient Basin is where you start putting the pieces together about the player character's role in saving Hallownest from its current predicament, after you encounter another "vessel" like yourself that has long since failed its purpose and fallen to the infection. The Broken Vessel attacks much like the player, but is assisted by physical manifestations of the infection, which are also controlling its movements. This means a lot of fast slashes to avoid, but also gobbets of infection that the boss tosses out at random intervals and floating balloon enemies that it regularly summons to hound the player until they're pushed to deal with them.
This fight serves to properly introduce the vessels and the infection, as both have only been hinted towards up to this point. Each vessel carries a piece of the Void - an endless darkness beneath the kingdom that Hallownest's King intended to use to seal away the true source of the infection: a blinding light known as the Radiance. A strong enough representative of the Void would be capable of sealing the Radiance away, the King thought, and he experimented endlessly with creating a shell to hold a piece of it in place and compel it to carry out this mission. That means that you're not technically alive, and neither are you alone, which explains why certain NPCs in the know - like Hornet - treat you with some degree of suspicion. The infection is the Radiance's control over the world; it starts by warping the minds of intelligent creatures through their dreams, and as it becomes stronger starts to physically manifest in the real world as this orange goop. It's around this point that the Forgotten Crossroads become the Infected Crossroads: shifting the once quiet early location into something far more perilous and eerie. (Which, by the way, was my favorite part of Bloodborne: how the world would shift after certain turning points and become even more nightmarish and messed up.)
Traitor Lord
This fight is similar to the Mantis Lords, though he's far more difficult due to how his slash attacks do two points of damage each (though contact damage and its projectiles still only do one each). Chances are that you'll die quickly if you can't heal, as you're unlikely to survive more than four of these attacks, but his incredible speed and the relatively small arena makes it tough to find a gap. This double damage system is an irritating way to make certain boss fights more difficult - until this point, you only took two points of damage from big attacks with a lot of build up and telegraphing behind them. You do have one advantage here though: the newly acquired Shade Cloak turns your dash into one with a healthy amount of invincibility frames, so it's entirely possible to phase through each of his attacks and slice away at his rear when you re-emerge. Of course, the timing needs to be perfect, or else you'll finish the dash inside him and take contact damage or get hit by his attack a split second before phasing.
This is the last of the non-final boss fights with some story significance behind it, as the Traitor Lord guards the White Lady who, in turn, has a piece of the regal Kingsoul: a charm you need to tame the Void and make it your own. The Traitor Lord is actually the former leader of the Mantis Village, who fell to the seduction of the infection and left to carve out his own empire apart from the village along with a congregation of fellow infected traitors. You also get help in this fight from Cloth, a wandering adventurer with a sack cloth over her head who I suspect is based on fan-favorite phantom Maneater Mildred from the Souls series. She doesn't so much distract the Traitor Lord but add to the damage you do, however.
Brooding Mawlek
It's hard to tell apart the truly optional boss fights from the ones that precipitate actual, required progress. Many bosses will unlock the way to the next region, or provide an ability or spell required to do the same, but others exist only for beneficial but not strictly necessary items like a health container upgrade or a valuable charm. The Brooding Mawlek, which can be found via a secret tunnel leading out of the Forgotten Crossroads region, can be encountered relatively early but remains a fairly strong foe until the mid-game, at least until you've upgraded your weapon a few times and have some of the more useful evasive moves. Most of the trouble in fighting this boss comes from learning to avoid its enormous infection spit attack, which requires you launch yourself over the boss to the opposite side of the arena to avoid the splash zone - not only is it a pretty large foe to be leaping over, but getting close also means contending with his very fast scythe arms.
The mawleks and mawlurks are actually common enemies in the Ancient Basin part of the world, which is a relatively quiet mid-game area that links to a few key locations. Chances are, you're meeting the Brooding Mawlek long before then. At the same time, the brooding version is considerably more aggravated because of the isolation from others of its type - the Forgotten Crossroads is just under the surface of this world, and about as far away from the depths of the Ancient Basin as you can get.
Flukemarm
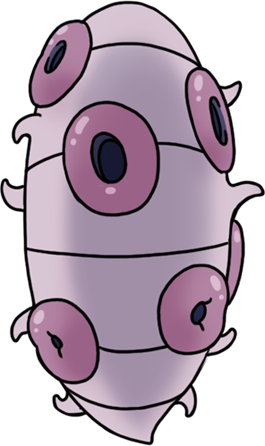
One of the grosser creatures in the Royal Waterways, the Flukemarm and its progeny occupy the lower areas and resemble very angry tapeworms. The Flukemarm represents the "adds" boss, where it will continue to summon tenacious flying enemies to defend itself until the player has to make the choice to either focus on depopulating the battlefield or keeping the pressure on the spawner and finishing the battle faster. It's another "random monster" type of encounter too, one with little narrative presence beyond being another weird gross thing that has latched onto the decaying remains of a civilization that at one point may have had the means to deal with it.
Though that does raise an interesting point about the way Hallownest's ecology works. Everything in Hallownest is an invertebrate, but there's a clear distinction between civilized bugs - those have learned to communicate and build and create art - and the more mindless predators, scavengers, and beasts domesticated for food or conveyance (the fast-travel stag beetle is a curious example of a civilized bug who is also used for transport). Now that the infection has put everyone on a level-playing field sanity-wise, barring a few coherent NPCs and holdouts like the mantises, it's become harder to make the distinction between the beasts and the once-sapients. I suspect the Flukemarm was never a doctor or a politician, though.
The Collector

A seriously creepy visitor from the Void who has taken to collecting specimens from the surrounding regions and hoarding them in a tower in the City of Tears, one that requires a special "Love Key" to enter. In addition to being a quick foe, it'll toss down jars of captured enemies as distractions while it surreptitiously flies in from the shadows surrounding the arena for surprise attacks. Depending on when you find the key and encounter the Collector, it can either be a tough boss or a cakewalk, but neither lessens how sinister it is.
The reward for defeating the Collector is a map that highlights the locations of all the remaining grubs - a game-wide collectible hunt that tends to involve a lot of challenging platformer sequences and return visits to older areas with new skills. For collectible nuts like myself it's a vital prize, though it's still very much possible to complete the game without it. I like the implication that it was this jerkwad who put all the grubs in jars and scattered them around in the first place, which makes it all the more enjoyable to punish it for its actions.
Nosk
For as malevolent and spooky as the Deepnest is, it's surprisingly free of bosses. Well, except for Nosk. This arachnid boss charges around its arena and frequently disappears into the ceiling to surprise attack you, not unlike the Collector. It took me a few tries to defeat this guy because he's very quick, but the way this arena has a central raised platform makes it possible to evade some of his attacks: by hiding next to the edge of this platform, Nosk's charge attacks fly right over you, giving you enough time to get some heals in. He's still a dangerous and unpredictable opponent though, and easily the scariest.
Nosk is the game developers leaning into the poorly-lit terror of the Deepnest by presenting a shadowy foe with a tendency of masquerading as other characters to entice them into its nest. Once you find its lair, you'll move through it chasing what appears to be a clone of the protagonist: it's only when the fight begins that you see that the "Knight" part was simply the creature's Angler Fish-like extremity. He doesn't seem to serve any role in the story, but it's evident from the many corpses scattered around his lair - including several vessels like yourself - that he's very effective at what he does.
Hive Knight
I believe the Hive Knight was added into a later update as something to contend with once you'd reached the end of the Hive, an optional area that resembles an enormous honeycomb beehive. There's not much in here besides a handy charm, but I guess the developers thought this place was a little bereft without a final challenge. For that reason, I don't think he has any connection to Hallownest, but he fights much like Hornet and the other Knight-like foes, with a mix of charge attacks and aerial sweeps. He'll also use the Hive against you, summoning little spike grenades around the arena or bringing in some of the region's ubiquitous hiveling enemies to distract you.
The sad part of this fight is that the knight has no-one left to defend: the Queen of the Hive, Vespa, is long dead and hangs in the background silently watching the fight. She speaks to you via the Dream Nail afterwards (which allows you to talk to spirits of the deceased, in addition to entering dreams) and basically tells you that you're barking up the wrong tree by disturbing the Hive, and that the Queen of Hallownest is elsewhere (referring to the White Lady in the Queen's Gardens).
God Tamer
The God Tamer is a unique fight in the Colosseum of Fools, which provides a trio of tough gauntlets against multiple foes in waves. God Tamer appears at the end of the last of these trials, the Trial of the Fool, and if you're still standing after the dozen or so previous rounds she serves as a tough finale. Though she rides a massive steed into battle, the two quickly separate and attack you independently, with the steed adopting a Watcher Knight moveset full of aggressive roll charges and the God Tamer hanging back and sniping at you while you try to deal with her mount. It's not the most challenging fight in the game, but chances are that your nerves are high after ten minutes of straight combat with the other arena gladiators and you may end up psyching yourself out, or having very little health and soul left after the previous onslaught.
She has no bearing on the story, and honestly there's no real explanation for why the Colosseum exists except as a means of release for any bugs that haven't yet been driven insane by the infection. Personally I thought the Trials were a real chore, though I stuck with it for the prizes and the few unique enemies it has.
The Hollow Knight
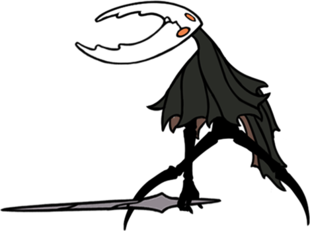
At last, we have the final boss. The Hollow Knight is a previous vessel that had completed its journey and sealed the infection within itself. It sort of looks like you, but a whole lot taller and meaner. An untold amount of time spent trying to contain the infection has left it insane, and in danger of breaking free from its dreamer-enforced gaol and spreading its plague outside the confines of Hallownest and to the unseen world beyond.
I love this fight, not only because of how it utilizes every trick in the book for how to contend with a fast opponent that employs the same tactics you do, but in how it demonstrates that the Hollow Knight is constantly at odds with its own disease. For most of the fight the infection takes over its movements directly; the only time you know for sure that the Hollow Knight is in control is when it starts violently stabbing at the orange swelling in his gut where the infection is spreading out. As the fight continues, you'll see more dangerous, desperate and self-damaging attacks that are clearly the infection's abuse of its host: these include a mawlurk-like acid spreading attack and one grisly move where the cancerous polyps are able to lift the husk and slam it down on where the player character is standing.
Depending on how the fight concludes and the preparations you've made, you'll have one of three ways to conclude the fight. The third and most ideal of which leads to...
The Radiance
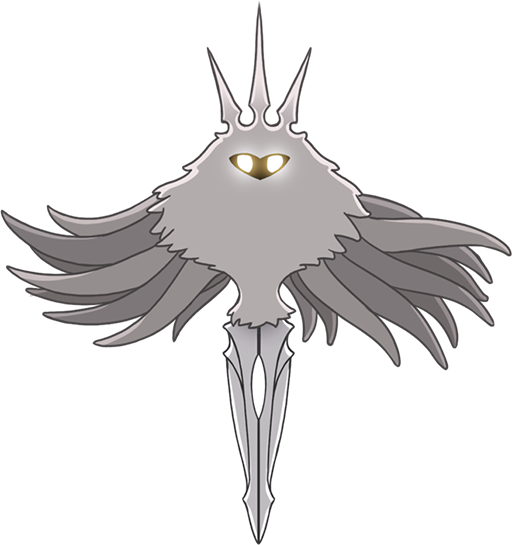
The true final boss requires a lot of subtext and time spent with the ancient Moth Seer in the Resting Grounds, where Hallownest's noble dead are interred. The Seer explains that the Dream Nail and the magic of her tribe are tied to "essence": a metaphysical force that represents a sapient being's soul energy and the source of their creativity and imagination. Naturally, a moth-based civilization is drawn to any sort of light, the light in this case being an extradimensional deity that dwells in the realm of dreams. The Pale King of Hallownest determined that his civilization would not stay in thrall to this alien tyrant, and would find its independence somewhere between the radiance and the void. The Radiance wasn't pleased about being ignored, hence the situation Hallownest finds itself in here.
The Radiance doesn't attack directly, but instead summons various energies and weapons to attack you from within the dream world, a universe utterly under its control. Since this is a final boss and everything has to be more difficult, all of its attacks do two damage instead of one and failing means having to take on the Hollow Knight again. As a result, I got very good at defeating the Hollow Knight quickly without losing too much soul - the game is at least kind enough to replenish all your health for the Radiance fight. You spend most of this fight avoiding blades flying in from the top and sides, radial lasers, heatseeking energy balls, and spikes that pop out of the ground. The Radiance is teleporting around this whole time and will only take blows to the face for the brief time they're in one place, so I tended to use a lot of charged attacks to maximize damage output for those brief periods of vulnerability. The fight even goes through a few stages, switching from a single large platform to several smaller ones as the Radiance continues to take damage. Eventually, you do enough damage for your friends in the Abyss to take over, dragging the Radiance to the Void and eliminating its influence on the world forever.
It wouldn't be a true Soulsborne game if you weren't fighting something that represented the fading light, and had the choice to either take its place or extinguish it forever, so I appreciate that Hollow Knight went that one extra step to create a set of endings that were germane to Soulsborne formula in that you couldn't be quite sure if your quest resulted in a net positive for the world. I mean, whatever, right? You're just some weird little guy from the endless inky void beneath the world. As far as you're concerned, the world is as it should be: pitch black, cold, and soon to be devoid of life.
It's Over!
That's going to do it for this Hollow Knight boss rundown. I'm not sure who this is for precisely - there's too many spoilers for newcomers, and nothing you don't already know if you've played the game and paid attention - but I like talking my way through each of a Soulsborne's boss fights, giving props to those great designs and smart mechanics, and kvetching about those that could've been toned down just a smidge. Though it's really more of a spacewhipper, Hollow Knight takes more than a few tattered and bloody pages from the Soulsborne bible and I'm happy to venerate the wealth of time and effort that went into its creation and its dogged adherence to the best qualities of the games it imitates. Fine job, Team Cherry.
What's next for Bosswatch? Well, I've been meaning to get into this copy of Nioh I bought earlier this year...


Log in to comment