Nhancer hasn't been updated for a few months, so I thought I'd show you guys how to use the current best driver tweaker for Nvidia cards, Nvidia Inspector. It's actually a bit more comprehensive and easier to use than Nhancer as well, so there's really no reason not to switch.
For those that have never tweaked drivers before, it is essentially a method of getting extra image quality for minimal performance hit. It's also a way to iron out image processing compatibilities in certain games. With a few minutes of work, you can say goodbye to jaggy branches and muddy distance textures (assuming you have a reasonably modern Nvidia card).
There isn't really any danger to tweaking drivers, and in the rare case that something goes wrong you can simply revert settings to default, or, at worst, reinstall the driver. Still, I should mention that I accept no responsibilities and you do this at your own risk.
1. To get started you will need Nvidia Inspector, here is the latest release as of November 2010. It's a very lightweight application that doesn't require installation.
2. Unzip the content to a folder. Don't delete the other two files, but keep them in the same folder as Nvidia Inspector and you can ignore them.
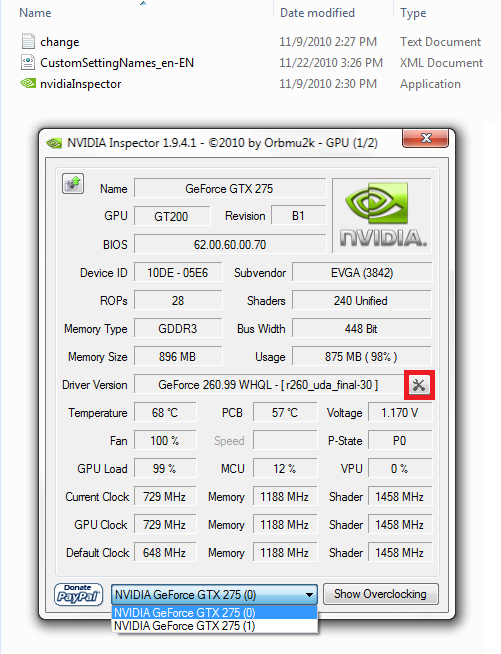
3. This is what you'll see when you open Nvidia Inspector:
Anyone that's used programs like GPU-Z before will be familiar with this interface. It shows real-time info about your graphics card(s), including clocks and usage (I'm folding in this picture which explains the 99% usage and relatively low overclock for 24/7 stability). Nvidia Inspector also has an overclocking function, but there are much better programs out there for that like MSI Afterburner. What we are interested in is the driver tweaking tool, highlighted in the red box in the picture.
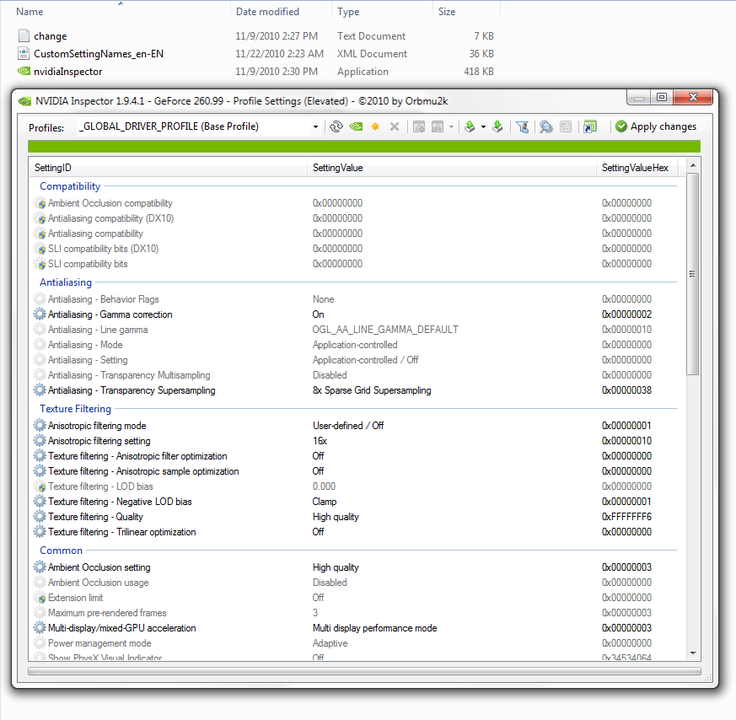
After clicking we get to this screen, the global driver settings which is what all applications will default to when first run. It seems a bit overwhelming at first, but just keep in mind most options are fine the way they are, and the rightmost column doesn't need to be touched at all. I will also explain all the settings:
Compatibility
Everything under the compatibility header is application-specific. These are generally set by the Nvidia driver team and you don't have to worry about them much (except in some circumstances, explained below)Antialiasing
- Behavior Flags: Similar to compatibility; don't need to touch it.- Gamma Correction: This should be "On"; it will improve color.
- Line Gamma: Ignore/Default.
- Mode: Application-controlled; for the most part, you want to control antialiasing through your game client (this settings enables/disables the ability to change the next setting).
- Setting: Application-controlled; again you will usually want to use the options available to you through your game client, but you can also access other alternatives like supersampling.
- Transparency Multisampling: Ignore/Default. Supersampling is better and pretty much the same cost.
- Transparency Supersampling: This should be set to 8x Sparse Grid Supersampling. It strongly antialiases alpha textures like tree branches, wires and fences. 8x Supersampling blurs less, but aliasing is also more apparent.
Texture Filtering
- Anisotropic filtering mode: Ignore/Default.- Anisotropic filtering setting: This should be set to 16x. Distance textures will be much more distinct and this comes at almost no performance cost.
- Anisotropic filter optimization: This should be "Off" to achieve maximum image quality
- Anisotropic sample optimization: "Off" once again.
- LOD bias: Ignore/Default. This controls the level-of-detail scaling in games which reduces texture detail as distance grows from the viewpoint to the texture. Setting it to lower values (e.g. negative) will reduce the scaling and thus increase overall texture quality but comes at a performance cost that varies per game. Also, it may cause glitches in some games. It's best to leave it at the default of zero.
- Negative LOD bias - Should be set to "Clamp" for a better effect when paired with anisotropic filtering.
- Quality: Should be set to "High Quality" for obvious reasons.
- Trilinear Optimization: Like all other texture optimizations, it should be "Off".
Reducing optimizations doesn't really affect performance, but can provide a noticeable improvement in texture quality.
Common
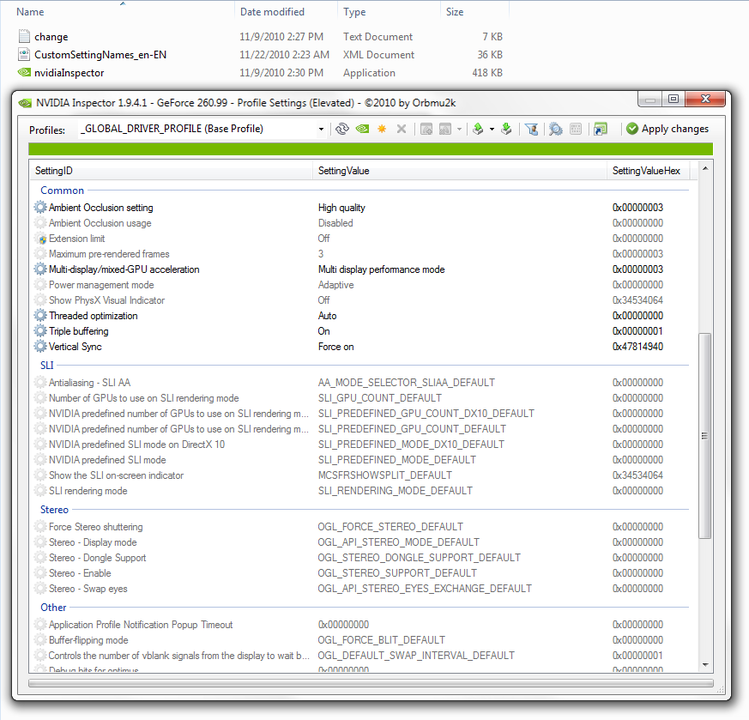
- Ambient Occlusion setting: High Quality (note: may cause performance slowdown in AO-heavy games on older hardware)- Ambient Occlusion usage: Enabled (shown as "Disabled" in the screenshot by mistake)
- Extension limit: Ignore/Default
- Maximum pre-rendered frames: 3 seems to be the most compatible
- Multi-Display/mixed GPU acceleration: Ignore/Default
- Power management mode: Adaptive
- Show PhysX Visual Indicator: "Off" (unless you happen to be testing whether your PhysX is working or not)
- Threaded optimization: Auto (controls usage of CPU threads; most modern games will use it "On" but some older games like it "Off")
- Triple buffering: "On" (enhances performance when using vertical sync, does nothing when not, so it should always be on)
- Vertical Sync: If you get an average of 60fps or over in most games, this should be forced on. Most monitors refresh at 60Hz and vertical sync "synchronizes" your framerate with your refresh rate for maximum smoothness while controlling unnecessary GPU usage. If you don't consistently get 60fps, or if you're not sure, then just use "Use application 3D setting".
The rest of the categories under "Common" don't really need to be touched. If any game ever needed SLI tuning, you should do it through its individual profile, and adjustment of 3D properties should be done through the official Nvidia Control panel as it's a bit more intuitive.
Once you're done, hit "Apply changes" at the top right. Now let's look at an individual profile.
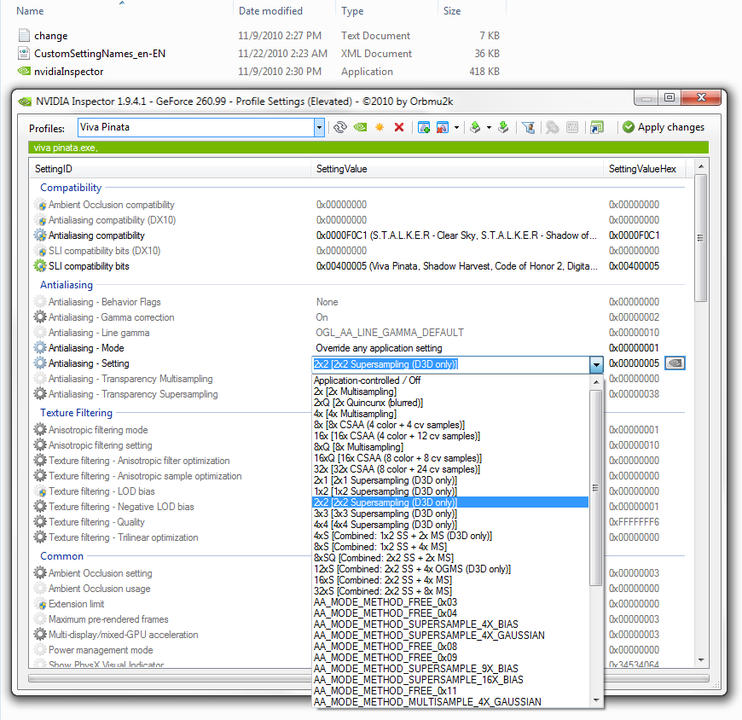
As you can see at the top left, I've changed the profile from "Global" to "Viva Pinata". Now we're looking at the individual game profile, and any changes made here will affect that particular game only. All the values filled in here by default are the values taken from the Global profile, so you don't need to do everything as in the Global profile again.
Now, you might be looking at the screenshot and be wondering what Viva Pinata and S.T.A.L.K.E.R Clear Sky have in common. The answer is deferred rendering! All games on the PC deserve a bit of antialiasing, but antialiasing isn't directly compatible with games that use deferred rendering. Fortunately, there's a fix for that and here's where the compatibility flags come in.
First, you want to hit the magnifying glass pointed at two cogs in the toolbar at the upper right (it's grayed out in the above picture since I've already used it) - it's the third button to the left of "Apply changes". This will search up existent compatibility flags already within the driver, and display them in English along with their hex code in the drop-down menus of the compatibility categories. The S.T.A.L.K.E.R. flag is commonly used to resolve antialiasing compatibility issues in games that involve deferred rendering. Since my system uses SLI, the SLI compatibility bits also lit up but I didn't need to do anything since SLI was already defined for Viva Pinata in the driver.
Next, we go to the Antialiasing section and choose "Override any application setting" under the Mode section (you should do this whenever you want to adjust antialiasing through the driver). Finally, I choose 2x2SSAA under the Setting section, since for me that is the best balance of visuals and performance. You'll notice that along with the regular MSAA options you are also shown various other ones including Quincunx AA, Coverage Sampling AA, and Combined AA (combo of SSAA and MSAA). It is generally best to stick with the familiar 2x-8x MSAA functions, or the SSAA functions (SSAA provides superior results but is very demanding). The ones shown in the menu that are past 32xS AA are debug versions of AA that can be ignored.
After choosing those, hitting "Apply changes" will confirm the settings and the game will now run under whichever options are now outlined for it in the driver. In the aforementioned example it was shown that an incompatibility was resolved and antialiasing was enabled where it otherwise would've been impossible through the normal Nvidia Control Panel. SLI issues can be resolved the same way assuming you know the correct compatibility flags.
Also, if you look at the other options in the toolbar you'll notice that you can further create other profiles or manage your current ones.
That's my quick primer on using Nvidia Inspector to tweak your Nvidia driver settings to your liking. Thanks for reading and good luck.
Log in to comment