Something went wrong. Try again later
    Follow

    PlayStation 3

    Platform »

    The PlayStation 3 (often abbreviated PS3) is the third home video game console created and released by Sony Computer Entertainment Inc.

    Easy Guide to Fix your DS3 loose R2/L2 Buttons (Pics Inside!)

    Avatar image for ltcoljaxson
    ltcoljaxson

    1204

    Forum Posts

    5859

    Wiki Points

    0

    Followers

    Reviews: 0

    User Lists: 1

    #1  Edited By ltcoljaxson
     Loose DualShock 3 (DS3) triggers? This requires an extra SixAxis, as the spring is very small - do this only if your warranty is void and you have some tech experience. I take no responsibility if you did not follow the instructions properly or if your controller breaks some other way. This is how I did it - and it seemed pretty easy although it takes some patience. This requires you to take apart 2 controllers, the DS3 and SixAxis.
     

    For a while I was using my DS3 and was noticing the R2 button was beginning to become very loose. I looked this up, and found out that this is due to a broken spring inside. Such a spring looks like \o/ but when broken becomes more like \o... so the plastic R2 button relies on the actual rubber button inside to press it out. This isn't that great as sometimes it will rest on it and press inadvertently. So I decided to open up the controller. Now what you will need is small head Phillips screwdriver (make sure it fits right otherwise you will strip it), your DS3 with the loose button, and a spare Six-Axis controller that you don't mind having a loose button on (I had 2 from launch, so I just took apart one of those to get the extra spring that wasn't broken - I'd rather use my DS3 than that).  
     
    For the purpose of this guide, I will just take apart the spare SixAxis I used - the DS3 is essentially the same and you will have to take apart both controllers. Read the guide to first take apart your SixAxis and remove the spring, then open up the DS3 to remove the broken one and put the good one inside:

     
     Broken Spring
     Broken Spring

     Phillips (Star)
     Phillips (Star)
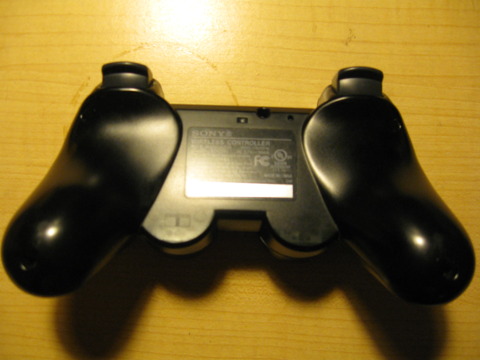
    1. Put the controller upside down, so the analogue sticks are facing your desk. Do this in a clean area so if anything falls out, it is easily locatable. However, on my first try - and when I reopened it to take these pictures... nothing fell out if you do it properly and gently enough. 
     
    No Caption Provided


    2. Using your screwdriver (and a magnet if needed to remove slightly stuck screws), unscrew the 5 screws on the back of the controller. Do not try to pry it open yet though. 
     
     Screwdriver and a magnet on the shaft to lift the screws
     Screwdriver and a magnet on the shaft to lift the screws


    3. Now that the screws are removed, gently pry up areas around the shoulder buttons - keeping your controller facedown the whole time. You will notice that it is stuck between the two analogue sticks - this is normal as there is a clip located there. Press firmly between the two sticks and on the bottom half of the controller. Press it so it will be pushing forward, using both thumbs in between the sticks - eventually the clip will come loose. It is necessary to have the shoulder areas already pried up or else this won't work - this will be the hardest part for most people as it is firmly in place. BE CAREFUL NOT TO BREAK THE CLIP, as this will make the controller a bit looser when put together (although the screws will still hold it in place).  
     
     Press forward in this area, holding the controller from the outer handle area with your fingers, and pressing inwards with your two thumbs.
     Press forward in this area, holding the controller from the outer handle area with your fingers, and pressing inwards with your two thumbs.

     The clip. As you can see, if you just pull up the casing without removing the clip - it will break. It must be pushed forward and out.
     The clip. As you can see, if you just pull up the casing without removing the clip - it will break. It must be pushed forward and out.


    4. Now just remove the case. Nothing should have fallen out, but if a part has it might have been the Reset Button Extender. I will post a picture of that, but otherwise it should look like the first picture. 
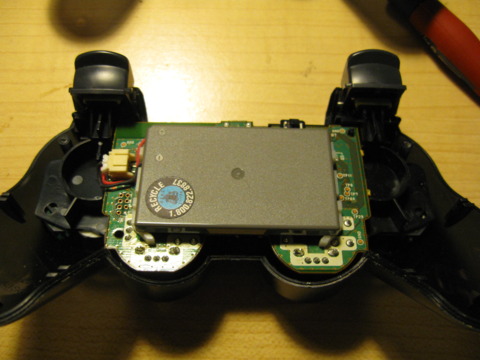
     
     This is what it should look like in the SixAxis when the back is removed.  The DS3 has the rumblers in the handles, the most noticeable difference.
     This is what it should look like in the SixAxis when the back is removed.  The DS3 has the rumblers in the handles, the most noticeable difference.

     This is the Reset Button Extender, it might fall off but you can clip it back on if it does. The DS3 does not have this, instead it is built in better.
     This is the Reset Button Extender, it might fall off but you can clip it back on if it does. The DS3 does not have this, instead it is built in better.


    5. Now when you examine the shoulder buttons, you will notice the spring inside. If it is broken, then it will not have both ends and is therefore unable to work properly.  You should only be focusing on this area, and it is not necessary to touch any other components. Be careful about any ribbons inside the controller - do not pull out any components as these will rip.
     
     This is a working spring, and where you will find the broken one if it is. If it is not broken, but still loose - there might be dirt on the spring or is about to break and becoming weak.
     This is a working spring, and where you will find the broken one if it is. If it is not broken, but still loose - there might be dirt on the spring or is about to break and becoming weak.


    6. To remove the spring, you must take out the little mount between the L1/L2 (or R1/R2 depending). It slides out pretty easily.
     Slide out the black piece of plastic inbetween the two shoulder buttons. When you are putting this back together, this should push the button forward a bit if the spring is working properly.
     Slide out the black piece of plastic inbetween the two shoulder buttons. When you are putting this back together, this should push the button forward a bit if the spring is working properly.


    7. Slide out the little metal bar that is holding the button in place. 

     
     Push the metal bar from one end, and pull it out the other. Now the R2 or L2 button should come off - the L1/R1 should still stay in though.
     Push the metal bar from one end, and pull it out the other. Now the R2 or L2 button should come off - the L1/R1 should still stay in though.


    8. Now that the button is off, and the broken spring is out - you can replace it with your new spring (that you took off your SixAxis to put into the DS3). I found the easiest way to do this, is to hold the button in place to about where it should rest. Then gently drop the spring so it rests in place, as shown in picture in step 5. Keep holding the button there and with the spring resting in position  - take the little metal bar and slide it from the spring side and straight through. This requires some precision and a bit of jiggling to get it through to the other end - but is easy enough. 
     
    While holding the button in place,  rest the spring between the button and the frame. It should rest in  pretty easily, and make sure the circle part of the spring will line up  with the holes where the bar goes.     (There is no spring inside here, as these pictures were taken for demo  purposes)
    While holding the button in place, rest the spring between the button and the frame. It should rest in pretty easily, and make sure the circle part of the spring will line up with the holes where the bar goes.    (There is no spring inside here, as these pictures were taken for demo purposes)
     
     
     While still holding the button,  jiggle the bar inside from the spring side. It should go in easily  enough, and will hold the spring as your are pushing it through. Once it  is done, you are basically finished. Gently test to make sure it works,  but not too hard.
     While still holding the button, jiggle the bar inside from the spring side. It should go in easily enough, and will hold the spring as your are pushing it through. Once it is done, you are basically finished. Gently test to make sure it works, but not too hard.


    9. Now slide the little shoulder mount back into place. If you notice there is space between the mount and the R2/L2 button - press gently downwards on the black plastic piece that rests inside the controller. It should rest ontop of the frame, otherwise you will have trouble closing it up again. When you put on the mount, it will push the spring and the button forward and in a bit. When the back of the controller is put on, it may be pushed it even a little more.
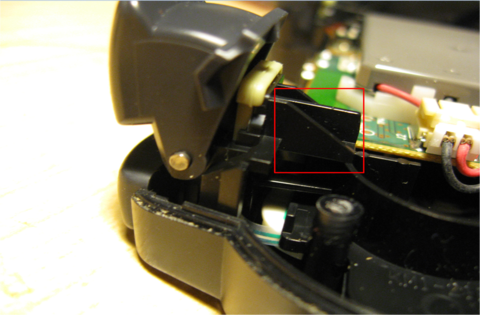
     
     Make sure this little plastic lip from the shoulder button component is pressed against the frame ensuring a tight fit with the plastic mount inbetween the L1/L2 buttons (or R1/R2).
     Make sure this little plastic lip from the shoulder button component is pressed against the frame ensuring a tight fit with the plastic mount inbetween the L1/L2 buttons (or R1/R2).


    10. When the little mount between the buttons is put in properly, now take the back frame of the controller and it slides into place on these small mounts as well as lining up with the other screw holes. Click in the controller around the shoulder button area first, then the handles, and lastly press on the back of the controller the snap in the clip (this must be done last). Put back in the five screws, and you are done! That is it and now you will have a good DS3 with both shoulder buttons working perfectly (and a wonky Sixaxis - but who cares about that anyway?)
     
     The back of the controller will slide into the two mounts between the shoulder buttons, also line up the screws and click everything in. You may have to push the R2/L2 button so they also fit into place properly. If it does not push down, make sure step 9 is complete.
     The back of the controller will slide into the two mounts between the shoulder buttons, also line up the screws and click everything in. You may have to push the R2/L2 button so they also fit into place properly. If it does not push down, make sure step 9 is complete.


     I hope this guide can help some who want to fix their DS3, and if there are any questions feel free to ask! Please post if you might use this guide, or if this can be stickied if useful to many. I know this is an issue for many people with DS3 controllers, so this should help if you also have a spare SixAxis lying around.
    Avatar image for liquidprince
    LiquidPrince

    17073

    Forum Posts

    -1

    Wiki Points

    0

    Followers

    Reviews: 1

    User Lists: 5

    #2  Edited By LiquidPrince

    Cool, I'll be sure to check this out should anything happen to my controllers.

    Avatar image for chililili
    chililili

    1432

    Forum Posts

    5932

    Wiki Points

    0

    Followers

    Reviews: 4

    User Lists: 7

    #3  Edited By chililili

    This happened to me but I use all of my controllers so its not like ima open one to break another without the spring

    Avatar image for ltcoljaxson
    ltcoljaxson

    1204

    Forum Posts

    5859

    Wiki Points

    0

    Followers

    Reviews: 0

    User Lists: 1

    #4  Edited By ltcoljaxson
    @chililili said:
    " This happened to me but I use all of my controllers so its not like ima open one to break another without the spring "
    Well I figured that if you have a DS3 that has a loose trigger, and a SixAxis one (that has no rumble) you might as well just take it out of the SixAxis and have the DS3 in working condition. The SixAxis will still work but it will have one loose trigger, instead of your DS3. I'd rather have the heft and rumble features of the DS3 myself.
    Avatar image for canucks23
    canucks23

    1081

    Forum Posts

    5

    Wiki Points

    0

    Followers

    Reviews: 0

    User Lists: 2

    #5  Edited By canucks23

    Hmm... i've never had a problem with loose triggers on my ps controllers before, but if i do i'll have to check this out again.

    Avatar image for ltcoljaxson
    ltcoljaxson

    1204

    Forum Posts

    5859

    Wiki Points

    0

    Followers

    Reviews: 0

    User Lists: 1

    #6  Edited By ltcoljaxson
    @canucks23 said:
    " Hmm... i've never had a problem with loose triggers on my ps controllers before, but if i do i'll have to check this out again. "
    Yeah it just randomly happened to me so I got annoyed and decided to fix it. While I did that I thought I might as well make a guide if someone else had to do it.
    Avatar image for omegapirate
    OmegaPirate

    5643

    Forum Posts

    6172

    Wiki Points

    0

    Followers

    Reviews: 0

    User Lists: 5

    #7  Edited By OmegaPirate

    Hey this is actually pretty neat - i have 2 dual-shocks, one of which has a fucked r2 spring by the looks of it, and about 3 sixaxis which only get used as a last resort (right now in place of tha dual-shock) may have to give this a go! Cheers man!

    Avatar image for silentcommando
    SilentCommando

    607

    Forum Posts

    5923

    Wiki Points

    0

    Followers

    Reviews: 0

    User Lists: 3

    #8  Edited By SilentCommando

    Now only if I could figure out how to fix my squeaky Xbox 360 trigger...

    Avatar image for marsbergen
    Marsbergen

    42

    Forum Posts

    0

    Wiki Points

    0

    Followers

    Reviews: 0

    User Lists: 0

    #9  Edited By Marsbergen

    Monumental achievement. Good job sir. I shall follow this guide should I ever need it.

    Avatar image for ltcoljaxson
    ltcoljaxson

    1204

    Forum Posts

    5859

    Wiki Points

    0

    Followers

    Reviews: 0

    User Lists: 1

    #10  Edited By ltcoljaxson

    I thought I'd bump this thread if it might be useful to anyone.

    This edit will also create new pages on Giant Bomb for:

    Beware, you are proposing to add brand new pages to the wiki along with your edits. Make sure this is what you intended. This will likely increase the time it takes for your changes to go live.

    Comment and Save

    Until you earn 1000 points all your submissions need to be vetted by other Giant Bomb users. This process takes no more than a few hours and we'll send you an email once approved.