12 minutes
Aeravon's forum posts
Pinball + Hockey = Pocky. Trademark that right away before.... wait
@mighty_best: Hey sorry I didn't get back sooner; I thought people stopped paying attention to this thread as soon as Bakalar finished his cabinet.
The spacing isn't as bad as you think. Full-figured dudes would be a little tight quarters in this configuration. But to do any different, you'd have to do a full custom top, and at that point you might as well do your own complete design. For my and my skinny-self, this did not prove to be a consideration but I can totally understand my experience is not everyone's experience. For their part, the 2 player layouts by recroommasters are spacious and nice.
Shameless bump. For Beastcast listeners, I've been helping Jeff Bakalar with his arcade and other than his LED marquee and not doing the RGB buttons, he followed this guide pretty closely. So the success has been repeated! I hope this helps more people enjoy the hobby in an easier way. If anyone wants assistance with any step in this journey, DM me here and we can message on discord.
After the shoutout on the Giant Beastcast (thank you Jeff), I got asked by some users to post here what I sent to Jeff Bakalar.
This is all from my personal experience and I do not represent any companies or products listed herein. I am just trying to help people get a finished machine without suffering any bumps or costly missteps in the process.
Original DM (updated with details) as follows:
======
Okay, so this all started when I met the man who would become my step father. He had no experience with kids, but liked Gauntlet and Rampage, so shared time in the arcade at the local supermarket and strip mall while mom shopped was a chance to bond. This would have been in the late 80's. Fast forward to 2018, and my step father was starting to become very sick, very frequently. I wanted to do something for him, like buy him an arcade machine, but he had trouble standing by that point. I thought a 1-up machine would be a good idea, being so low to the ground, but he would have to lean forward a lot and couldn't with his back. I was thinking a raspberry pi with some stuff on it might work, but would lose the packaging. While I debated what to do, he passed away. 6 months of settling affairs and helping my mom, I decided I was done deciding. And this is what I did:
I'm no stranger to a wood shop, but I'm no Vincent Caravella. Unless you design your own, finding the right arcade plans for what you may want is probably impossible. I looked around for pre-built empty cabinets, and came across this site:
https://www.recroommasters.com/
The benefit here is that the control deck (fully half the cost) is pre-built, ready to go, and just has 2 USB cables total that plug into whatever device is going to run the cabinet. I didn't stop there, but I'm getting ahead of myself.
I decided I like the 4 player option the best, because pre-covid I hosted board game nights and like the Simpsons, X-men, and TMNT games a little too much to skimp on. Also, Gauntlet is 4p and Rampage is 3p, so I needed the extra space. With other games like the Avengers (a 90's beat 'em up) I was glad I did. Anyway I bought the cabinet. It took about a 90 days to arrive and it came in 3 large boxes. While I waited, I also ordered the rest of the things I wanted:
1) 20 RGB LED Soft-touch buttons. (https://www.ultimarc.com/arcade/buttons/goldleaf-pushbuttons-rgb/)
- I wanted soft-touch because they are low-throw and you can play all day and not get tired from button travel. Also, less noise than traditional switches.
2) 2 - "PACLED 64" controller boards for the above RGB LED buttons. (https://www.arcaderenovations.com/ultimarc-pacled64.html)
- 1 PACLED controls 2 players at a time. So internally mounted by layout, #1 drives players 3 and 1, and #2 drives players 2 and 4
- I also got the additional female crimp to 2-pin wiring necessary to attach the RGB LED buttons above, to these controller boards. Regular buttons have 2 connectors - they listen to see the circuit is closed. LED buttons have 3 connectors, with the 3rd being the voltage to light the light. RGB LED's have 6 connectors (R, G, B, Power plus the standard 2 to register a button press) but the buttons I chose have the 4 extra already heat-shrink tubed connected to a pin-out connector for the PACLED. They are both Ultimarc products, so they were made to go together and its dead-simple.
3) LEDBlinky software license (LEDBlinky site: https://ledblinky.net/LEDBlinky.htm)
- This runs on boot and contains a database (which you can add to) of how to light your buttons per game or system. I will show examples of this later.
- Together these 3 items will replace all the original solid black cherry-switch buttons on the control deck and allow all the buttons to be programmed per game to change color. You'll see this in action later. **THESE 3 ARE COMPLETELY OPTIONAL and by no means necessary. The buttons that come with the control interface from recroommasters feel very good to the touch. But I was gunna do this fancy, so I went all out.
Additional NOT Particularly optional, but technically optional buys:
4) A Keyboard and Mouse
5) Arcade Audio Kit (https://www.arcaderenovations.com/arcade-game-audio-kit.html)
- The cabinet includes the speaker grills, but nothing behind it. This kit has a really nice 2 speaker amp, additional grills (I use the original cabinet grills, but these do fit the cabinet I picked), decent speakers that more than qualify for an arcade cabinet, and all the wires and mounting hardware and power. you could honestly use a pair of logitech PC speakers attached to your Pi or arcade PC, but this kit is almost the exact same price and honestly feels better/right.
6) Launchbox (https://www.launchbox-app.com/)
- My Front end of choice. It is literally the easiest emulator/arcade management software I have ever seen and integrates all of the components and options I chose for my setup.
Additional NOT optional at all buy:
6) A 32" television. I bought an insignia 32" 720p LED for about $100 on sale. that is more than sufficient for anything this arcade could play, but if I had to do it over I'd fork a few extra bucks and get a 1080p if only to make Windows look better when the arcade software isn't running.
While I waited for my orders, I put a fresh install of Windows on my previous PC to get it ready and installed Launchbox.
Everything arrived at about the same time. Ultimarc is overseas but stuff arrived really fast. I laid out all the pieces and got started.
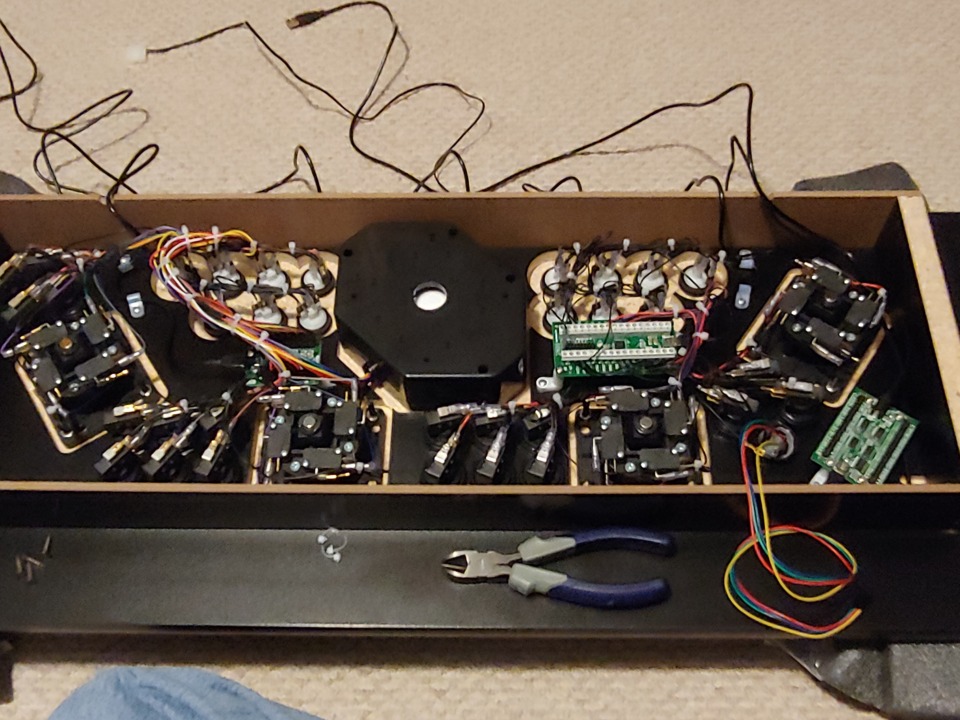
I assembled cabinet and then started working on the control deck changes. This is what it looked like with the first PACLED 64 installed into the lower right corner on some plastic standoffs it came with. All the installed buttons in this picture are the originals. The "rainbow" in the lower right is the RGB/Power connector for one of the new RGB LED buttons that go to the PACLEDs, as a comparison to the original buttons and wiring layout.
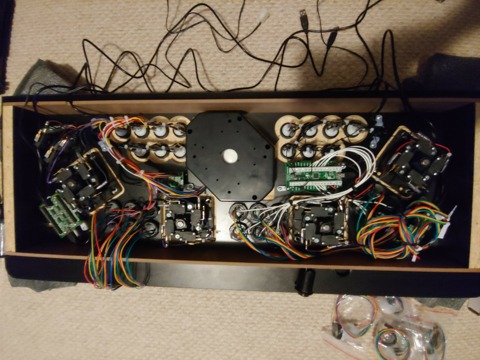
Here, with nearly all the buttons were replaced, and a few of the action definition wires (white) lengthened by replacement, it looked like this. Players 1 and 3 (the right side of the picture since the unit is upside down flipped) is all hooked up and zip tied and I put little flag labels on every wire so I know what button is connected where. Since the RGB LED buttons already have the connectors on them at purchase, I chose not to shorten them by trimming and putting new ends on them. That is a finishing step for something no one but me would ever see, and add time and cost (I'd have to buy the crimping tool and connectors). They spooled up fine. Notice I did not change the joysticks themselves. The ones that came on the deck are quite nice. If I wanted to replace them it is relatively easy. A few companies also make RGB LED joysticks (!! - Two versions at Paradise Arcade Shop; one example is here: https://paradisearcadeshop.com/products/paradise-jlf-rgb-led-joystick-long-shaft?_pos=208&_sid=44400542c&_ss=r) if you want to add that detail in. The PACLED64's have lots of extra space in this configuration to support that, and so does LED Blinky.
Once all that was done and the unit put back together, placed in the cabinet, and all the wires connected to the PC and power, the television installed (the cabinet came with a mounting board and bracket connectors so I just had to pick the bolts that fit my TV's depth in the back, same as you would a monitor arm or wall-mount), and a battery backup added to the floor inside, everything was ready to launch. I took this opportunity to use some forstner-bits (1 1/8" on the front, 1 3/4" on the inside so you can attach the plastic locking nut without crushing your fingers) to mount some USB extension ports on the sides (https://www.arcaderenovations.com/cabinet-mount-dual-usb-ports.html) so that it would be super easy to plug in a USB capable controller right into the side of the cabinet for Playstation, Saturn, PS2, N64 or Dreamcast games; honestly whatever you want. Retro-bit makes lovely USB takes on these controllers (https://retro-bit.com/controllers.html). This will also help with any accessories like light guns or driving wheels you might add in the future.
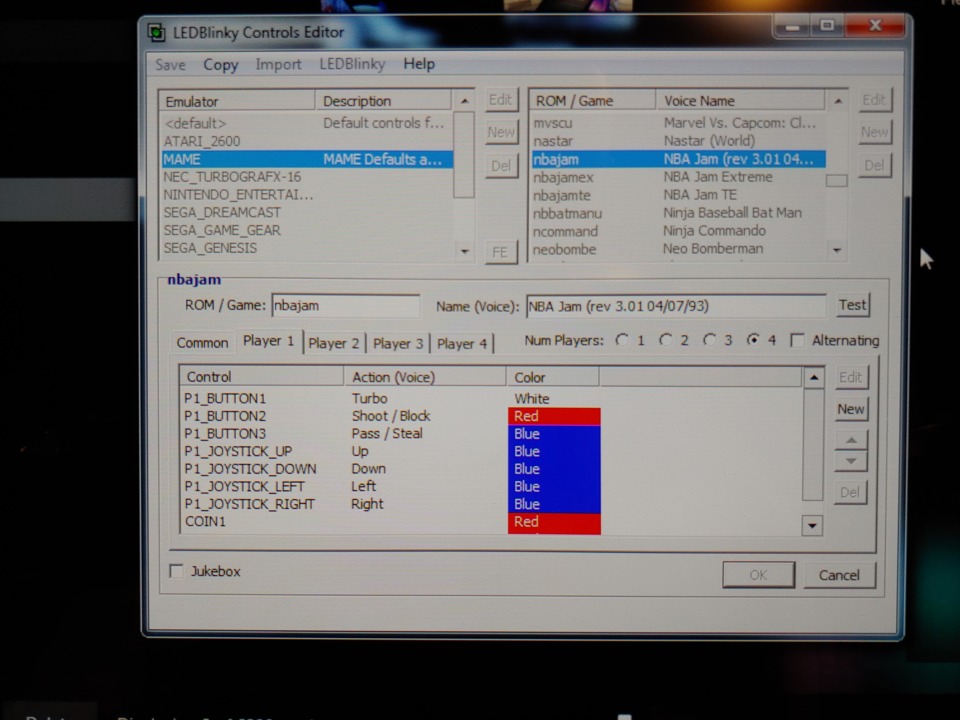
I imported my game collection and let launch box run the show (there are easy and excellent tutorials on Launchbox on their own YouTube channel). I installed LEDBlinky, labeled the 2 PACLED controllers so it could differentiate between them (a one-time setup) and then told the program what controller and what button belonged to what player (by default), so as to line up with what MAME and the emulators commonly understand based on position and game. This provides a baseline and covers a solid chunk of MAME's romset database but everything is fully remappable both here and in MAME and other emulators. With the baseline in place it is vastly easier to define what color the buttons are in the controls editor (for any and all exceptions) then launch the game and remap MAME of the emulator based on what you want. Here is the interface for LEDBlinky:
I periodically will backup my database and roms and can restore the entire thing in about an hour should the HDD or another component fail. Overall it was a fun process to learn and configure. I added USB ports to the sides of the cabinets for plug-in controllers (like those nice Retro-bit 64 N64 controllers that come in USB... for reasons). I replaced the plexi-glass screen shield included in the cabinet with a tempered glass one from a local glass cutter. I added slide rails for the keyboard drawer and knobs for the hideaway keyboard door. I also just bought a driving wheel, and I have a pair of camera-based light guns coming to me as I type this (https://www.sindenlightgun.com/) so the fun is just beginning.
You can set colors per entire system at once like for the NES as a whole, or by game/rom name:
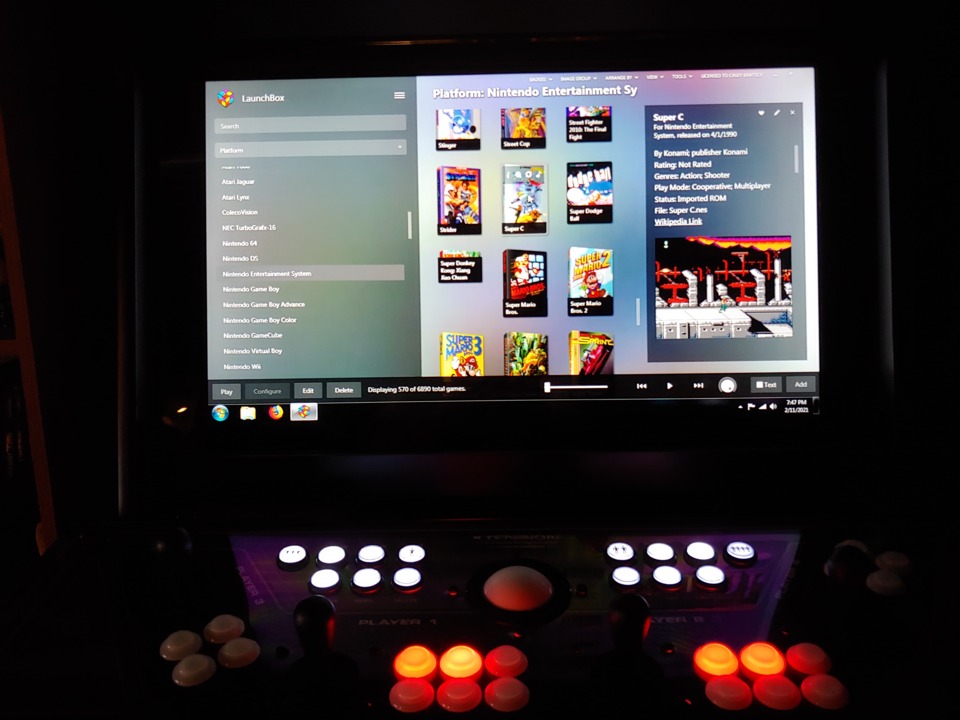
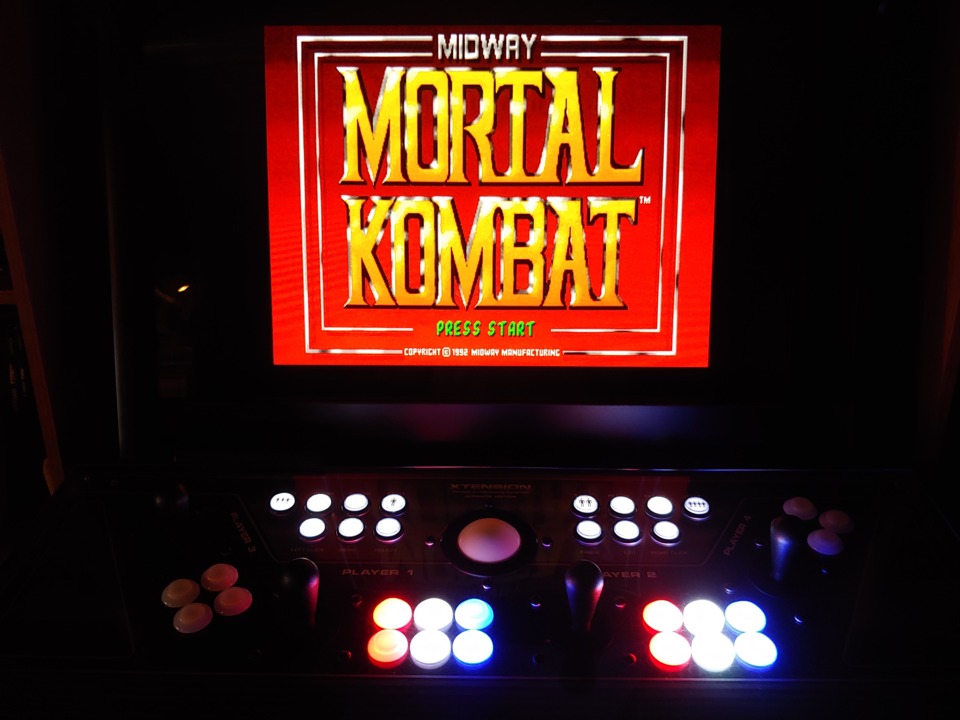

For Mortal Kombat, I made both middle column buttons "Block" for ease of access since the physical layout can't replicate the "X" pattern of the original cabinet.

The interesting thing about LEDBlinky, is that if you map something like P1 Button 1 as "blue" for a game or system, but later change which button P1 Button 1 is in the emulator, LED Blinky pulls that and moves the location of the "blue" button to match its currently mapped location when you run the rom next. It's very slick. The only heavy lifting you do is actually defining the button colors that aren't auto-imported by MAME to LED Blinky's default database (different MAME romsets have different success rates. The version of NBA JAM in the earlier picture above didn't pull the NBA JAM button definitions automatically, so I "copied" the existing internal NBA JAM one into this specific entry. Its like 3 clicks. For console systems, you have to define them all manually but only one definition per entire system is necessary since the buttons are identical across all of that system's games. This is shown in the first picture above for the NES. It sounds like more than it is, and is over all pretty flexible. It also helps for those fun 4-p games where P1 starts at the far left (TMNT, pic 3). By default MAME and would have P1 in the orange position and that just isn't right. So, you define the colors per player in LED Blinky, then remap where all the players are in MAME. Takes about 2 minutes and looks great.
I think my step dad would of been happy with it.
===========================
Some final notes:
I went entirely overboard on purpose. I wanted the first and last arcade machine I would ever want or need. If I was going to do it, I was going to go big.
You don't have to do a lot to get something to be proud of. "Pre-completed" or ready-to-go cabinets like the iiRcade, or the Arcade 1-up machines, or any of the other "ready to go arcade machines" tend to make you pay for the convenience and you end up having to hack them anyway to get anything you might want later. I don't find them to be worth it. My cabinet can play 3DO and CD-i games! WHY? WHO KNOWS! But it can! Maybe I want to re-create the Inca head bob in the privacy of my own home. I already have a racing wheel to add, and I have camera-based light guns coming (Sinden Lightgun – The official site for the Sinden Lightgun). It's going to be a good time.
The cheapest complete route I can think of without cutting wood, lacquering boards and putting together a control deck from scratch, in a full sized cabinet form, would be one of the recroommasters cabinets. They are excellent build quality and the company was easy to work with. Whatever cabinet you decide, you must buy a screen of some sort to mount inside. Past that, even a raspberry pi 3B+ or a 4 running retropie would make a good showing on one of these. For anyone that might ask, I'm happy to give troubleshooting advice or detailed descriptions of any particular aspect of this process that I shot past in this (lengthy) post. Forgive me if the response takes a little bit, but I will do my best.
The takeaway from all this should be that if you really want something to play arcade games on, you might as well go the whole way, even if its just a pi inside. Otherwise you spend half as much, but end up with so much less of a return. One of those 1-up cabinets gives you what, 4 games at most and costs 40% of a real cabinet that would otherwise have infinite enjoyment on it. All the toe-dipping gateways are okay I guess, but they are still hundreds of dollars for very little in return.
BTW, that last picture of 2-on-2 Challenge is a picture I took just for Jeff Bakalar. If you didn't know what that is, its the "NBA JAM" for ice hockey, made by the same team at Midway. It's pretty great.
- "Aeravon" of the Giant Bomb community
Edit: This site hates my pictures and the formatting was all over the place. I edited this to try and fix them and their placement. Sorry if things are out of whack and images were missing initially.



Log in to comment