Retro game comparison time: Pitfall The Mayan Adventure
By dark1x 1 Comments
These days, multiplatform development is extremely common with nearly every major game seeing release across multiple platforms. While there are often differences between the different versions the end results are generally very close to one another. In the past, however, things were not always so cut and dried.
One of the most interesting comparisons I've encountered has to be the nearly forgotten mid-90s platformer "Pitfall The Mayan Adventure". I have pretty fond memories of this game myself but I recognize that it has its fair share of issues. The animation is given priority over response time and the levels can certainly confuse many a gamer with difficult to read platforms galore. Despite this, however, I still feel that it's a solid and interesting game that rewards skilled play.
So, naturally, I needed to experience every version of this game. The first thing I should note is that there are essentially TWO base versions of this game; the SNES version and the Genesis version. It is from these originals that all ports would be derived.
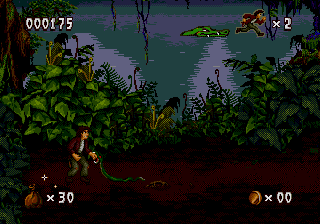
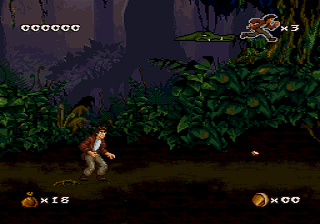
So what's the difference? While the level layout is basically the same, there are dramatic differences between the visuals in both versions. The Genesis sprites, for instance, animate much more smoothly while the controls offer additional precision. On top of that you'll also find additional layers of parallax scrolling throughout each and every level adding greatly to the depth of the scene. Unfortunately it suffers from the typical dithered color palette (64 colors at once) and poor music playback. The Genesis soundchip certainly doesn't excel at producing atmospheric tunes.
The SNES version, then, is a bit darker yet richer in color. The strong purple hues of the first level are immediately apparent and paint a very different picture. Unfortunately, the image is stretched like so many other ports from this era as a result of the lower horizontal resolution. Everything appears shorter and wider than it should as a result. The Genesis typically delivered games at 320x224 while the SNES stuck to 256x224 (same as the NES). The image was displayed at 4:3 with rectangular pixels. If you directly translate pixel art from a higher resolution source you'll wind up with stretched assets. So, while the art was heavily modified, it was clearly derived from the Genesis work. In addition, the sprite work seems to be missing frames of animation and the backgrounds have become nearly static. The moving water reflections in the background on Genny are replaced with a static image of a forest while the complex waterfalls of the second stage have been greatly simplified here. At least the music is of higher quality this time around thanks to the more capable sound chip.

The ports following these two releases, however, are much more interesting.
There's the Sega CD version which basically features the Genesis game combined with a wonderful redbook audio soundtrack. This has wound up becoming my favorite version of the game as a result as it eliminates one of the most significant issues with the original release. They use a couple FMV sequences at startup but the game itself is untouched.

Then we have the 32x port which is just abysmal. The foreground is handled by the 32x and features a much broader color palette while the background is handled by the Genesis and looks the same as the original release. So what's the issue? Well, the foreground layer runs at 30 frames per second WITH significant slowdown while the background layer scrolls at 60 fps. This results in a rather uneven presentation and winds up feeling incredibly choppy as a result. It looks nice enough in stills but once you start moving things quickly fall apart.
The Jaguar port actually suffers from a similar issue. The color palette is much wider than the SNES or Genesis versions (including backgrounds this time) but the framerate is capped at 30 fps and slowdown pops up at certain points on top of it. If the framerate had been 60 fps like the Genesis, CD, and SNES versions it could have been the best version of the game. The music here is a touch better than the Genesis tracks but pales to the redbook audio and SNES soundtracks. Oddly enough, the Jaguar really seemed to struggle with 2D games and often delivered them at lower framerates. So much for their 64-bit claims.
Next we have the PC version. This shares the same visual presentation as the Jaguar version along with full redbook audio of the Sega CD version. It really could have been the ultimate release but it has been shackled by Windows 95 and is virtually unplayable on modern PCs. Even if you do manage to get it up and running the performance isn't as silky smooth as it need be.
Lastly we have the Gameboy Advance version which might just be the least appealing rendition of the game. It uses the SNES version as a base, crops the image resulting in a smaller playing field, blows out the colors for the non-backlit original GBA, and features downgraded audio. It's hideous to behold.
Given the choice today I would always go for the Sega CD version and you should too. If you don't have an actual Sega CD you can even pop the disc directly into a PC and play using an emulator (such as Kega Fusion). Give it a shot!

Log in to comment