Building Your Own Rock Band Drums - A Tutorial (Part 3)
By Dumo 2 Comments
In our previous tutorials we have obtained our components and completed our drum pads, but we will now move on to the last component of the drum kit itself, the kick pedal.
While this final piece of the kit will complete our fully custom kit, it should be noted that, if you are looking fora smaller scale, less intensive project, just building this kick pedal to use with the stock RB drum kit is an excellent starting point. Like the drum pads, it performs worlds better than the stock hardware, and if you complete the pedal first, you can always loop back and eventually build out the entire kit after the fact to go with it. With all that in mind, let's get into the construction of the kit itself.
The Kick Pedal

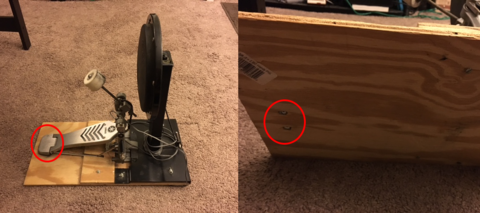
The pedal is actually made up of a relatively small number of components, as seen in the image here. Its basic construction consists of a bass drum practice pad, a standard bass drum kick pedal, a sheet of plywood used as the base that helps to hold the practice pad and pedal together, and a magnetic switch that comes in two pieces, one which is attached to the wooden base, and the other which is attached to the kick pedal itself.

1. The Practice Pad and Audio Jack The practice pad and an attached audio jack. The tall body of the practice pad is hollow inside, and should be easily detachable from its own metal base with wrench or a screwdriver. As you see on this pedal I have built, I have attached a 3/4 audio jack to this pedal by drilling a hole in the top of the metal plate that holds the body of the practice pad onto its base. I attached a length of cable to the audio jack, and ran that cable through the hollow body of this practice pad, and attached it to the two connection points on the magnetic sensor which is itself attached to the wooden base. While this is the most elegant way I have found to attach our audio jack physically to body of the practice pad, it is a bit elaborate. You must first take the practice pad apart to do this, then drill a 1'' hole through the metal cover that comes off of the pad, which is a relatively small surface to begin with. If you want a quick and dirty solution to attaching the audio jack to pedal assembly, you can use duct tape, zip ties, or pretty much anything else you can think of that will serve to hold the audio jack in place. As long as it is relatively secure, and you take care when connecting/disconnecting audio cables from the jack, you should be good to go with any solution that holds the jack in place against the pedal assembly.


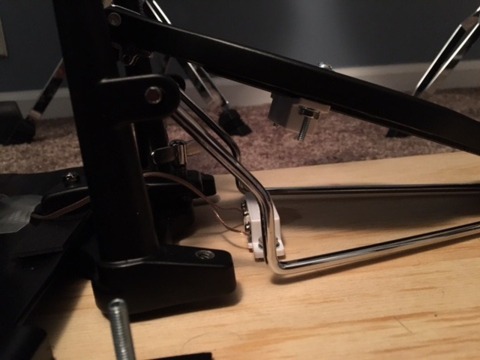
2. The Kick PedalThe kick pedal itself is simply a standard bass drum pedal, with a few modifications. The practice pad is built with an attach point for the bass pedal to screw onto, which will hold the front of the pedal in place. To make the pedal even more secure on the platform, we will attach the heel of the pedal to the wooden base as well. Your pedal should have one or more bolts that hold heel of the pedal together with the rest of the pedal's physical construction. Simply remove these bolts, take them to the hardware store, and find bolts with the same threading that are slightly longer than the originals (how much longer will depend on the thickness of wood you used for your pedal base). Drill out holes in your wooden base that match these bolts, and then run your new longer bolts through the wooden base, and attach them to the heel of you pedal, which should hold your pedal in place completely. We now have our magnetic sensor that we need to attach. One part of the sensor is attached to the wooden base of the pedal assembly. This is done by drilling small holes up through the wooden base, and running nuts and bolts through those holes to hold the sensor in place. You will need to pick bolts that are thin enough to pass through the holes in your sensor (I would suggest taking the sensor itself to the hardware store to match these up). You will also want to be sure that these bolts are relatively long, and get a handful of washers that match these bolts. At the same time, you will buy another set of these nuts and bolts that you will use to attach the top sensor to the metal kick pedal plate.
The sensor becomes activated when the magnet (attached to the pedal) comes within a certain distance of the magnetic switch (attached to the wooden base). Before you drill any of the holes to attach these sensors, make sure you first attach the practice pad and pedal to the wooden base. Once your pad and pedal are attached to the base, you can wire up your sensor to the audio jack, and then slide your two sensor pieces around relative to the base and the pedal to dial in their position. The sensor will likely become active when the two pieces are between 1/4'' and 1/2'' apart. Try to make the initial positions of the sensors a bit further apart that you might first expect. From there, you can adjust the position of the kick pedal hammer to help you tweak the sensor distance, since this will in turn change how low the kick pedal gets when it hits the pad. You can also use the washers we picked up earlier to add height to either of your sensors as needed, and help you further dial in the exact distance that you need between your two sensor pieces to achieve maximum sensitivity on your kick pedal within the game. While the sensor placement will take significant trial and error initially, once you dial it in, you should have to make very small changes to it in the future (if any). Just be sure that everything is tightened down tight once you have all of these pieces in a position that works for you.
3. Attach Points for the Practice Pad Just as we attach the bottom of the sensor and the kick pedal to the wooden base, you should also attach your practice pad by bolting it down. Your practice pad will likely come with a few screws that are run through existing holes already in its metal base. Simply move these and run your own bolts through them to attach the pad to the wooden base. As you can see in the original numbered image above, we have 2 visible bolts holding the pad's base in place, and there are 2 additional symmetrical bolts on the other side of the pedal assembly. Of these 4 bolts, 2 were threaded though existing holes in the practice pad base, and 2 were holes I drilled myself to further secure the pad to our wooden base. Using either 2 or 4 bolts should do the job, so start with the existing holes in the practice pad's base. Once you attach bolts through those, if the pad seems insecure or you just feel like going the extra mile, you can drill 2 (or more) additional holes through the base, and use those to attach the pad more securely.
4. The Magnetic Sensor ArrayDescribed in detail above. These are the two magnetic sensor pieces that, when brought in proximity to one another, create a circuit that is interpreted by the game as the kick pedal being down. It is worth noting that this is exactly the same way the stock RB pedal works, which is why you can simply attach this new kick pedal to any existing RB drum kit, and it should work flawlessly without any additional hardware modifications.
5. The Wooden Base A simple section of plywood, which is used to help hold the practice pad, kick pedal, and bottom magnetic sensor together. I would suggest using wood that is between 1/4'' and 3/4'' thick. Once you have your wood picked out, take some measurements of the width and length of your practice pad and kick pedal while they are attached together, and then cut your wooden platform accordingly. Make sure you pick out bolts for attaching your pedal/sensor/practice pad who's lengths take the thickness of the wood you have selected into account, and from there you should be good to go. Attach everything to your wooden platform as described above, and you should have a function kick pedal that you can use with either the stock RB kit, or with the other components of you completed custom kit.
And that about does it for part 3 of this tutorial. If you already have access to an Ion Drum Rocker drum brain and a Wired Legacy Adapter (for Xbox users), then congratulations, you are basically done with your custom kit! Simply plug everything into your Ion Drum Brain and test it out. After some testing and hopefully minimal adjustments, you should have a completely functioning custom kit that you can enjoy for years to come. If however, you are not fortunate enough to have these rare/legacy peripherals on hand, you will just have to do one more little project to make your custom kit a reality. In the upcoming final part of this tutorial, I will teach you how to modify and existing stock RB drum kit so you can attach your new drums to your Rock Band game of choice.
My apologies for the long delay between parts 2 and 3. I will do my best to get the final part of this tutorial up before the new year. Thanks for reading, good luck with your builds, and look out for the final part of this tutorial within the coming week!

2 Comments