Overview
The spy is one of the nine classes present in Team Fortress 2. The spy is unique in that he has the ability to cloak and blend with his enemy. The spy can cloak past the front lines and emerge in the enemy's base as any member of the opposing team, potentially fooling them into thinking he's an ally. Whether out of sight, out of mind, or both, that is when the spy will start assassinating and disrupting the enemy any way he can.
- Health: 125
- Speed: 100% of normal (unless disguised as a slower class)
- Character Type: Support
The Spy is voiced by Dennis Bateman, who also voiced Pyro.
Backstory
A master of disguise, misdirection, and the byzantine details of who really runs things, the Spy is a double reverse quadruple agent whose reflexive suspicion is entirely justified. He at one point, if not currently, had an intimate relationship with the Scout's mother.
- Country of origin: France
- Motto: "I never really was on your side."
- Emblem: Knife
Meet the Spy
The Spy's mastery over disguise is exemplified in his class's video, Meet the Spy. In this video it is revealed how the announcer works, Scout's mom is revealed, and the possibility that the Spy is the Scout's dad is raised. The video starts with an alarm sounding and the announcer alerting the Blu team that a Red Spy is in the base. A Blu Soldier heads to the intel room as a Blu Scout comes for backup. A Blu Heavy crashes through the two as they discuss the threat. The 3 meet up in the intel room to find that their intelligence is still safe and secure in the base. Soon, a Blu Spy carrying a dead Blu Sniper comes into the intel room and asks whether anyone has seen the Red Spy. The Blu Spy then tosses down the Sniper he is carrying and relegates stories (which are depicted) to the rest in the intel room that depict just how formidable of an opponent the Red Spy really is. Then...
Default Weapons
Revolver
Description:
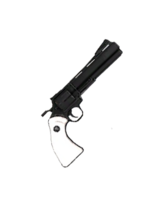 The Revolver
The revolver is a spy's first, and only long range weapon. It is generally used to help defend himself whilst fleeing from enemies that have discovered him as being a spy, or finishing off players that have little to no health left. The revolver is considered a hard gun to use, due to its low firing rate, and unforgiving accuracy. But if a player can master this weapon, it becomes a very potent and viable gun to use in almost any situation.
Statistics:
- Shots per clip: 6
- Shots carried (total): 24
- Close range: 55-60
- Medium range: 35-45
- Long range: 20-25
- Critical hit (regardless of range): 120
Knife
Description:
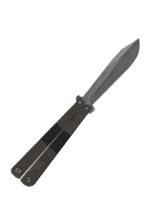 The Butterfly Knife
The butterfly knife is the spy's melee weapon, and can be his most useful. When slashing at enemies from the front this weapon is quite poor, but if used from behind it guarantees an instant kill on an enemy. While the basic combat swing has a normal attack speed, the back stab can be used rapid fire if the targets present themselves. A few examples of this are swiftly killing a medic then his patient, or running through multiple people pushing a cart. The only thing that can survive a backstab besides ubercharges (or another spy with the Dead Ringer) is a sniper equipped with the Razorback. This will block one back stab attempt, destroying the shield and freezing up your stabbing hand momentarily.
Statistics:
- Damage: 30-50
- Backstab damage: Instant kill on any class. (except sniper w/ Razorback)
Notes:
- The knife seems to suffer the most from hit registration issues. What appear to be hits to the front can result in a fatal back stab (commonly known as a face stab) and vica-versa.
- When you are in position for a back-stab you will automatically raise your knife as an indicator.
Description:
 The Electro-Sapper
The electro-sapper is a device that will disable an engineer's buildings, and even destroy it if left on for a long enough time. The sapper can be placed on a building without the player losing his/her disguise, but they can be knocked off by two wrench whacks each.
Notes:
- You can instantly and infinitely place sappers. This means you can sap all his structures while he can fix just one at time, and additionally no matter how much determination the engineer puts into knocking them off, you can put them right back, continuing to do damage. Engineers that know this will start swinging at your head instead.
- When sapping beware because at that point your disguise will only be fooling turrets, due to the engineer's famous outcry. Any other enemies nearby will likely come to his aid.
- Remember that what is usually the biggest danger, the sentry gun, cannot shoot you (or anyone) while the sapper is doing it's dirty work. So if the situation calls you can speed up it's demise with a few shots with your pistol.
- When sapping teleporters both entrance and exit count as one for most purposes. This means that if you place a sapper on one end it will also attach to the other, at the same time the engineer can remove sappers and repair the damage to both from hitting either end.
Statistics:
- Ammo: Unlimited
- Time till an object's destruction:
- Combat mini-sentry: 6 seconds (approx.)
- Teleporters, dispensers, level 1 sentries: 7 seconds (approx.)
- Level 2 sentry guns: 8 seconds (approx.)
- Level 3 sentry guns: 10 seconds (approx.)
Description:
The Invisibility WatchThis incredible gadget lets the spy temporarily cloak, making himself completely invisible to the enemy team. Any source of ammo will refill the corresponding percent to the the spy's cloak meter. Because of this it is possible for the spy to stay in stealth over great distances, provided he takes advantage of fallen equipment and ammo spawns.
Statistics:
- Cloak time: 10 seconds
- Recharge time: 3 sec/1 sec cloak time.
Further information:
When you are cloaked or cloaking/uncloaking you cannot use anything in your inventory except your disguise kit, not even reload. The cloaking and uncloaking process each take about a full second to complete. Even though you become invisible, enemies can see a partial silhouette of you under certain circumstances, such as:
- An enemy bumps into you (Momentary)
- An enemy shot hits you (Momentary)
- You are on fire (Until you are extinguished) Very obvious
- A sniper covers you in Jarate (Until it wears off)
- You jump into water (No silhouette but the initial splash and swimming will show your location, after emerging you will drip for a few moments)
Description:
The Disguise KitThis handy kit, along with holding your cigarettes, will let you disguise yourself as any enemy (or friendly) class in the game. It is used to blend in with your enemies, avoid sentries, and attack when the time is right. The spy can even manages all the class's voices. This disguise will let you benefit from enemy teleporters, dispensers or medics if they are willing/foolish enough, you might even get lucky enough to get an enemy's ubercharge. But be warned both the medic and the engneer are often pretty stern spy checkers.
Unfortunately you don't gain any of the abilities, health, weapons or speed of the classes, and in fact picking soldier or heavy will slow your movement speed to match theirs.
Caution:
- Any attack other than sapping will instantly remove your disguise. Not being able to pretend fire while disguised is a pretty big giveaway, as most non spies will shoot anyone at anytime.
- Every time you disguise it will take a moment to work, and unless changing from one disguise to another you will emit some telltale puffs of smoke.
Advanced:
- Persona - When you pick a disguise the game will automatically assign you as a player playing that class. When looked at by the enemy team you will display having that person's name, health, weapon and even ubercharge amount when a medic, or your disguise's disguise when a spy.
- Health - Your "show" health will match your real counterpart's at the moment of disguise, and will replenish accordingly if you are healed.
- Weapon - Your apparent weapon will similarly match that of your opponent's, but you can appear to switch between the primary, secondary and melee of your disguise's by taking out one of your weapons of the appropriate slot and pressing the "disguise as last class" button. Although you seem to be wielding them, you cannot fire or use any item of the other classes. You can appear to be reloading however if you reload your pistol.
- Friendly disguises - By pressing the minus button when you take out your disguise kit, you can disguise as one of your allies, useful for when you are moving across open friendly territory. If you were to cloak through such an area you might be out of energy by the time you get to where you really need it. And if you were to disguise normally you'd look pretty suspicious running beside your teammates, and no disguise would obviously give you away. This is important because if someone defending an area thinks a spy is moving in towards them they will be constantly thinking to check for you.
- Enemy Awareness - When disguised as an enemy you get the added ability of seeing the enemies names and health levels, giving you the potential tactical edge to pick off weakened enemies.
Unlockable Weapons
Dead Ringer (Replaces the Invisibility Watch)
Description
The Dead RingerA pocket watch which gives the ability to feign death for 8 seconds (a nod to Team Fortress Classic). When brandishing the watch, if the spy takes any damage a fake version of his corpse will appear, distracting opponents, whilst the real spy sneaks away cloaked. This gives him time either to escape or go in for the killing blow. While he cannot use anything but his disguise kit while keeping the decoy ready (similar to normal cloaking), all attacks will be brushed off onto the fake allowing the spy to survive the most lethal of attacks while only taking a few points of damage. This 90% damage reduction continues while you are cloaked.
You can only prepare the watch when it is fully charged, but ammo pickups will refill it. Turning off the cloak manually will always drop it to at least 40% unless it is already below that. Whenever you uncloak it will make a very distinctive sound.
By all accounts to the player (and his team) it should look like he kills you. Along with the rag doll there will be a death message, points on the scoreboard, potential revenges or dominations, ect. But getting a quick "kill" on you by very light damage will usually tip experienced players off, and any kills after they know what watch your using will mostly be suspect.
Notes:
- Unlocked with 17 Spy achievements (achievement milestone 3)
- All ammo pickups will only fill 35% of your cloak bar except for small ammo boxes which gives 25%
- The Dead Ringer's cloak does not flicker on when you bump into enemies like other watches.
- Works with friendly disguises, e.g. if you are shot with your Dead Ringer deployed while disguised as a friendly pyro it will look like they killed a pyro.
Ambassador (Replaces the Revolver)
Description:
The AmbassadorA large ornate revolver with the ability to get critical hits on headshots. This is possible due to it's normally pinpoint accuracy, which momentarily becomes poor every time you fire. It also suffers from a slightly lower base damage and firing rate than the normal revolver so making your shots count will certainly pay off.
Statistics:
The Ambassador does 15% less damage than the Revolver per shot.
- Base: 34
- Max Ramp Up: 150% (51 damage)
- Max Fall Off: 52% (18 damage)
- Point-Blank: 46-56
- Medium Range: 31-37
- Long Range: 15-19
- Mini-Crit: 45
- Critical Hit (headshot only): 102
Cloak and Dagger (Replaces the Invisibility Watch)
Description
The Cloak and DaggerThis wrist watch allows the spy to potentially remain invisible indefinitely, as the cloaking ability is only drained whilst moving. When stationary (and only when stationary), the cloaking ability slowly regenerates. You cannot use ammo sources to refill the cloak bar as with the other watches, and you cannot move fully cloaked as far as the default watch.
Notes:
- Unlocked with 11 Spy achievements (achievement milestone 2)
- The watch's energy will drain slower if you move slower than your normal gait, but will not drain faster if you move faster.
- If you fully drain your energy while moving around cloaked your invisibility will not fully dissipate like the other watches, as long as your watch is activated you will only show a semi-transparent outline similar to when you bump into someone.
Description
The Big KillEither he befriended him and borrowed it, or pretended to be his friend and totally murdered him to steal it; either way the sidearm of choice of Sam the dog is now yours to serve your own brand of justice with.
Statistics:
- Base: 40
- Max Ramp Up: 150% (60 damage)
- Max Fall Off: 52% (21 damage)
- Point Blank: 55-60
- Medium Range: 35-45
- Long Range: 20-25
- Mini-Crit: 54
- Critical Hit: 120
Notes:
- Available only to those that bought Sam & Max Season 3 within a week of it's release on Steam.
- Functions identically to the default revolver.
L'Etranger (Replaces the Revolver)
Description:
The L'EtrangerThe L'Etranger is a craftable weapon for the Spy class. It is a stylish Revolver with an ivory handle design.
Statistics:
- Base: 32
- Max Ramp Up: 150% (48 damage)
- Max Fall Off: 50% (16 damage)
- Point Blank: 44-48
- Medium Range: 28-36
- Long Range: 16-20
- Mini-Crit: 43
- Critical Hit: 96
Description:
The DiamondbackThis Magnum variant, part of the Manno-Technology Update (for Deus Ex: Human Revolution) denies the spy random critical hits and gives him a 15% damage reduction, but lets him store up a critical hit for every building he saps, for a whopping maximum of 35 crits.
Statistics:
- Maximum ramp-up: 51
- Base damage: 34
- Maximum fall-off: 18
- Point blank: 46-56
- Medium range: 31-37
- Long range: 15-19
- Critical Hit: 102
- Mini-crit: 46
Description:
Your Eternal RewardFunctionally identical to the Butterfly Knife. A successful backstab will cause you to instantly disguise yourself as that player. The spy will also be unable to use the disguise kit with the Reward equipping, meaning a backstab is the only way to disguise yourself.
Statistics:
- Base: 40 (28-54 damage).
- Mini-Crit: 54.
- Critical Hit: 120, but only during Humiliation, charged via Kritzkrieg or during crit boost given after capturing intels.
- Backstab: 600% of the enemy's current health resulting in an instant kill if stabbed in the back.
The Enthusiast's TimepieceDescription:
Re-skin of the normal Invisibility Watch. Can only be acquired by getting the achievement "Special Item: Tycho" while playing Poker Night at the Inventory.
Description:
The Conniver's KunaiThe Conniver's Kunai is a melee weapon for the Spy. It is based off the Japanese ninja kunai, originally used as a farming tool.
Statistics:
- Base Damage: 40
- Point blank: 28-54
- Critical Hit: 120
- Mini-Crit: 54
- Self-healing: ≤180
Tips and Tricks
- You are unable to move through enemies, or enemy buildings when you are disguised or cloaked, as teammates can normally move through each other bumping into people is probably what will give you away the most.
- Whenever possible, try to act like the enemy. Avoid looking at your target until you are ready to strike.
- Learning how to use the revolver well can greatly increase your chances of survival in combat situations.
- Backstabs don't necessarily need to be aimed at the back, even if someone has their back to a wall you can take them down a bit to the side or even on an enemy’s head, which can be the only way to get at an engineer setup in a corner. Just watch for the knife to raise then strike.
- Players are very wary of the spy's ways at this point. Valve has done a lot to blur the line between an ally and a disguised spy, but being in a place that people won't look towards at all will always be safer. Find spots where you can watch someone pass below and practice landing right behind them.
- Try to gauge the flow of reinforcements, even if a medic heavy combo passes you, it might be better to wait if a pyro is just going to be in line behind you. Always try to be behind, or out of the focus of most everyone.
- Catching up to your target usually takes time as your often both running in the same direction.
- Always stay disguised! Get used to hitting your "last disguise used" key right after every back-stab.
- Unless you know your in a very advantageous position, or no one will see, you should often cloak and run immediately when you make your attacks. If your not too greedy you can often be a ghost by the time people realize what happened. This can set yourself up to do it again right away, instead of having to die, lose a tail, or heal up.
- Because the Dead Ringer works on all damage, you can put out your own fire by activating it, as long as the pyro isn't still hitting you.
- When discovered don't panic, know when to fight and when to run, and most importantly where to run. If you cloak heading down a hallway most people will chase down it, try sticking to the corner or wall as soon as the cloak finishes, sending your enemies off on a goose chase. You always want to be in the least predictable spot when they are hunting you down. Sometimes standing in the middle of a big room will give you better chances than a corner.
- As an example of blending in, if an enemy starts shooting you and they don't have a concrete reason to know you are a spy just keep doing what you are doing and don't react at all, it's the only way to put their fears to rest. Someone spy checking on a hunch often won't keep shooting for too long anyhow.
- When setting up in an area with the Cloak and Dagger learn what is going to be the least traveled path. Jumping up on piles of stones or crates or anything high and out of the way will usually keep enemies from bumping into you.
- Don't always sap something just because you can, if it's a teleporter with no exit, it's not going to help much, and will probably just attract attention.
- On the other hand, if you have an engineer holed up with way too many sentries, or a similarly difficult situation, you can often either pickup a flag, or go sap something out of the way, only to drop what your doing, cloak past whoever comes investigating hoping to find you, and hit your real target.
- If you want to be devious after taking out an engy you can try leaving his teleporter up, and simply wait behind it to instantly kill anyone who comes through.
- If you encounter a Razorback, it's often best to just shoot him instead, get in a free Ambassador headshot or just plug away with the normal revolver. You can often deal lethal or near lethal damage before he fully reacts. Alternatively you could break it and immediately cloak and hide, giving him nothing to do but go back to sniping.
- Always have a plan.
Advanced Techniques
The Flick Stab
The flick stab (also known as the quick stab or side stab) is a move all aspiring spies should learn, it is the extremely useful. A Flick stab is a stab, where the player will quickly move their mouse one way or another, and back stab enemies moving parallel to them.
How to do a flick stab:
- Wait for an enemy to be moving parallel with you in the opposite direction
- Wait ‘till he leaves your field of vision
- Quickly flick the mouse in his direction (left or right) and attack with your knife at the same time
If done correctly, you will have back-stabbed your enemy.
The Jump Stab
The jump stab, if mastered can give you the upper hand on any sort of incline.
To do a jump stab:
- Get to a higher point than your enemy (usually on any sort of stair or ramp).
- Wait till he gets close enough and jump
- Look down, crouch over his head and quickly attack, if done right, will give you a backstab.
This is one of, if not the hardest technique to master as a spy. It will take a lot of practice to get the timing and execution right, so be patient. For some video footage of this, and all techniques talked about on this page, check out OMFGninja’s advanced spy tutorials.
The Sap and Stab
Sap stabbing is another staple technique for the spy, allowing him to take out sentry placements quickly and easier than normal.
To do a sap-stab:
- Place yourself behind the enemy engineer
- Backstab the engineer
- Quickly take out your sapper, and sap the gun, if done correctly, you will be able to sap the gun before it has time to turn around.
Notes on sap-stab:
- If the sentry is level one, you can be relatively far away and still get away with it, of course you will assuredly lose health.
- When sap stabbing level 3 sentries, you have to do a little sentry strafing. wait until the gun has rotated to one end fully, then stab the engineer,quickly move the opposite way the sentry is looking towards (if looking far left, strafe around it right) and sap it. This is much harder than sap-stabbing level 1, and level 2 sentries.
- When a gun is in the middle of upgrading between levels, there is a downtime of several seconds, this is an ideal time to execute a sap-stab.
- Sometimes you can set the engy up for an easier sap/stab by putting an obvious sapper on the sentry first to make him go fix it, turning his back to you. Possibly assisted with the Dead Ringer.
Hats
Below is a list of every hat the Spy can equip in the head slot.
Miscellaneous items
Below is a list of every item the Spy can equip in the two misc slots.
- Camera beard - A fake brown beard with a camera hidden inside of it. This was originally a hat, but was moved to the misc. slot with the WAR! Update so it could be worn with other hats.
- Le Party Phantom - A masquerade mask with gold trim. This was released as part of the Australian Christmas update.
- Noh Mercy
- Made Man
- Rogue's Col Roule
- Spectre's Spectacle
- Intangible Ascot
- Griffin's Gog
- Dr. Whoa
- Sneaky Spats of Sneaking
- Doublecross-Comm
- Business Casual
- Triad Trinket
- Distinguished Rogue
- Exorcizor
- Scarecrow
- Voodoo-Cursed Spy Soul
- Cut Throat Concierge
- Dapper Disguise
- Megapixel Beard
- Blood Banker
- Rogue's Brogues
- After Dark
- Macho Mann
Log in to comment