
As an approachable level editor, Mario Maker allows us an inside look at what makes stages tick. As we decide the correct arrangement of platforms and how often we should be plying the player with powerups, we learn how designers construct obstacle courses. For that reason, playing Mario Maker isn't just entertaining but can enrich our time with other games by training us to recognise the effects of level design decisions.
Today, I want to autopsy one of my Mario Maker 2 levels and discuss using environmental design to provoke player reactions. While I'll be talking a little about some decisions in this level I think I did work, and some I think didn't, by and large, my statements about how players react to design elements will be broad. I can't assume what the reception from any one player will be; I can only talk about what I was going for and the likely response from my perspective. If you want to play the stage yourself, the code is:
69H-238-V0H
The level is chock full of puzzles, and I'm about to spoil their solutions. So, if you're planning to test drive it, it's better to do it before reading this rather than after. I'm also assuming that you'll be familiar with the rules and enemies of the Mario games. Let's get started.
Gratifying levels often open by introducing the mechanics that they're going to reuse and recombine throughout. That introduction acts as a thesis statement and lets the player rehearse and learn any tricks they'll need moving ahead. Designers typically let that early studying happen in a safe environment: one where there is low or no risk of failure. There's also something compositionally satisfying about seeing a pattern established and then evolved, regardless of medium. A lot of music opens with the chords that it's going to loop until its end and many poems start by declaring a rhyme scheme for the whole piece. By the same rationale, video game stages often start by letting you know the nature of the upcoming interactions.
Section 1

I themed my level, Thwomp's Switch Fortress, around three mechanics: Thwomps, Shells, and On/Off Switches. So, it opens with this Thwomp crashing down onto a Donut Block outcropping. The breakaway bridge, tackled with a Fire Flower, presents the illusion of threat without risking killing the player: if the Thwomp hits them, they'll just downgrade to Super Mario. The Thwomp makes an emotive villain because of its imposing form and infuriated facial expressions. It even aesthetically matches the level; it looks like a castle.
Section 2

After brushing up against their first Thwomp, the player must grab a Koopa Shell and throw it at an On/Off Switch to activate a path ahead. I wish I'd made this portion of ground a little longer; players can easily bump into Koopas while holding a Shell, knocking it out of their hands. It's an annoying inconvenience. There's a similar problem with the block on the right side of the platform. This foothold gives the player a spot safe from Koopas from which to throw their Shell, but it being one space wide means that the user must make a precise jump early in the level, and one that's fiddly at that.
Section 3

As the player heads to the following zone, I tease them with a door and a few coins they can't get to yet, seen at the top of the frame. There's a lot of room for jumping in this zone; I'm leaning on the philosophy that, out of the gate, the player wants to leap about and feel out Mario's movement before stopping and thinking too long. I also believe that it's thrilling to jump off of a platform when there's only empty air in front of you and that the player generally prefers building their own safety nets instead of having the designer hand them to them.
Section 4

The level up to now has featured a few soft hazards, so the fourth section is the first to have a reasonable chance of failing the player. If they get within spitting distance of the nearby Thwomp, it will hit the On/Off Switch, destroying the floor beneath Mario but materialising a platform on the other side. The player can't help but activate the Thwomp because they must pass below it as they make their way right through the level. They must time a jump to the next platform exactly as the swap occurs. The Donut Blocks under the Thwomp give the user some extra time to realise what's about to happen before the enemy drops down.
Lots of fun puzzles are deceptively simple; they make us fall for tricks that we realise we should have seen coming a mile off, or we feel smart because we didn't fall into their trap. I was hoping that's what this puzzle would do; the player has had ample time to pick up on the on/off mechanic, but could still find themselves falling towards doom, thinking, "Oh right, On/Off Switches destroy On/Off Blocks". This area acts as a check to ensure the player has fully grasped that concept before moving ahead.
While we're at this stop, I want to point out my attempt at combining mechanics to create new experiences. The stage opened with a jump and later showed the player how to use On/Off Switches. Section 3 mixes those ideas together to let the player use a jump to activate an On/Off Switch. Section 3 taught the player they may have to jump between On/Off Blocks at the right moment, but they can safely control when the moment is; Section 4 gives them a situation where they don't entirely control the timing of that swap, and so, it is more dangerous for them. Implementing a single design element in myriad different ways lets the player see depth in those elements. Conversely, implementing a feature only one way and then moving on will make it feel shallow.
Section 5

Let's start the level moving again. Once the player is back on terra firma, they are at risk of being hit by a Buzzy Beetle falling from the Pipe above. Here, they must lure the Shell into the Switch on the right, activating the next section of ground and resealing the Pipe. While each previous section had some breathing room at the end to allow the player to relax, here, the player stays under threat from one cell into the next. I'll respond by cooling down the tension in the following area, but I meant this more sustained threat to amp up the stage's intensity.
Note that it's having the Thwomp hit the Switch that unblocks the Pipe, letting the Buzzy Beetles out. There's the novelty of the player putting themselves in danger here, and they get to feel unconventional triumph over an enemy by cutting off their spawn. The previous section increased the difficulty by preventing players from controlling the On/Off timing. This area bumps it up by giving them a version of the Shell puzzle, but in which they can't control when the Shell begins sliding. The player may not even realise that the Shell will follow them into the Switch and might just be running for safety, making for a fun surprise when baiting the Shell right turns out to be the solution.
Section 6

Having the player move in some direction other than right is a simple technique to spice up a Mario stage, and here the player must move up and to the left, positioning them right under another On/Off Switch. It's so intuitive to hit the On/Off Switch here, not thinking about the consequences. Whenever the player has seen the On/Off Switch up to now, they've needed to hit it to progress, and the blue platforms above suggest they'll have to do the same now. However, the staircase under them is also made of Red Blocks, so if the player hits the button, they'll fall back down again. The trick is not to activate the Switch. The On/Off Switch is placed quite low to the staircase, increasing players' chance of hitting it and encountering this little joke. I could have had the player fall into the lava when they made this mistake, but that seemed a little cruel, and remember, I'm trying to bring them down from the panic of the previous couple of sections.
As I've twice shown the player areas of the level they cannot yet access, I think it's time to talk about backtracking. Some games use linear level layouts, giving the player an ability and then later presenting them with a challenge that they can use that ability to overcome. Maybe the player gets the grapple hook and then moves into a canyon of high ledges. Perhaps they get the power to shoot fire and then enter an ice cave where they can melt walls. It's a fine game design method, but consider what happens when we put the obstacle before the power you need to overcome it.
If I show the player an area they can't yet access and then let them later acquire the power they need to do so, I have created a couple of new emotions. Upon seeing the locked area, the player may feel anticipation and intrigue until they can access it. When they find the ability to open up that area, the audience hopefully feels excited and intelligent because they remember where they needed to use that ability before and immediately know of an application for it. Creators in Mario Maker can use P Switches, On/Off Switches, and Keys, among other items, to generate these feelings. When done right, having a player backtrack through a level can also increase its depth by using the same areas for more than one route.
Section 7

The solution to the puzzle here is to turn off the bridge, making the Thwomp slam down onto one of the On/Off Switches from Section 3, reactivating the bridge and allowing us a way across. As with the Buzzy Pipe, I want the player to feel that they've outsmarted the enemy by trapping it, and it's a new concept to see a Thwomp do this to itself.
There are a few problems with this section. Firstly, the player will later backtrack through here and have the option of taking the Mushroom on the return if they haven't already. However, the player doesn't know there'll be a Mushroom in the ? Block and may collect it on the first pass when they don't need it, only to find they'd benefit from it later. If I remade this level, I would put the Mushroom in a container that let the player see it. Secondly, the player doesn't technically need to defeat the Thwomp to continue; it just makes them a little safer. It's a small detail, but I wish I had forced the player to overcome this enemy to progress. Thirdly, think about the consequences of it being a block from Section 3 that the Thwomp hits to trap itself. When the player passes through Section 3, there is a small chance of them lingering in front of that block and a Thwomp suddenly appearing out of nowhere to smash it and drop them into the lava. The Donut Blocks under the Thwomp help but don't entirely solve this issue. Having the Thwomp hit a different On/Off Switch could have prevented this unfair endangerment of the player.
The other problem is harder, perhaps impossible, to eliminate. I think that the line of spikes under the bridge makes the screen messy and is not a subtle way of gating progress, but without it, the player can climb on top of the On/Off Switches from Section 3, jump up to this section, and skip a good portion of the level.
What does work about this area, in my eyes, is the reuse of an old element of the level. I wanted to create depth by showing the same types of enemies and items displaying a lot of new behaviour and using individual instances of elements for multiple jobs. Notice how the Buzzy Pipe is both a source of enemies and a platform, or how players hit one On/Off Switch both from above and below for different purposes. The staircase extending up and to the left allowed me to wrap the level around on itself. Tracking back over items from a different perspective meant that the player could view and access the same elements from different angles. I'll use that technique more later on.
Section 8/ Section 7 Revisited

The player may now cross the bridge, getting the chance to stretch their legs after some confined areas. On the other side, they can't do much but jump onto the platform, which causes the Thwomp to dash right and smack into the Switch. Here, the player sees another new Thwomp behaviour: lateral movement. They'll need to remember this for an obstacle later on, but this area lets them witness this behaviour in a safe environment as the Thwomp can't actually hit them. However, as it's tough to see coming and the player's jump arc lands within its general vicinity, they may not realise this and feel that they got away by the skin of their teeth.
Above, the player can see a currently inaccessible compartment: Section 16. Note that I show the player a lot of these mysterious areas long before they can open them up to draw out the anticipation. If the player keeps following the level leftwards, they'll encounter that door they saw above Section 3. It is barred from above by layers of Red and Blue Blocks. An experienced player will feel knowledgeable for knowing how to pass through the layers and enter the door, even if they can't do it yet. However, for the typical player, it presents a mystery. The level state must always be on or off, so one layer of those blocks must always be blocking the door. How could it ever be accessible?

The player has no choice but to hit the ? Block, winning them the Key. They must then turn back and get the sideways Thwomp to hit the Switch deliberately where they may have done it before accidentally. The bridge extends again, and the player must bop the On/Off Switch on the other side to get onto the blue platform with the locked door. Running across the bridge, hitting the button, and continuing onto the Blue Blocks has this breezy flow that I really like. Note that by placing On/Off Blocks underneath the locked door, I could have the player climb up the stairs from Section 6 without being blocked from above by these platforms. On/Off Blocks let you pack more platforming into a small space; they're off when they could be an obstruction but on when the player needs them.
Section 9

This is another module in which the player needs to turn off the blue blocks underneath them, and jump to the red, at just the right time. The challenge is comparable to the Thwomp/Switch puzzle from Section 4, but the solution is slightly subtler. If you look through the gap in the floor, you can see the On/Off Switch that the player had to refrain from hitting in Section 6. The player must now knock it with a Koopa Shell. Again, I'm recombining earlier concepts and reimagining them with a more daunting difficulty. Section 9 is like Section 3 in that it involves timing your jump from one set of On/Off Blocks to another. It's harder because there's a much longer delay between initiating the change of blocks and them switching. Section 9 is like Section 2 in that it involves hitting a Switch with a Koopa Shell but more demanding in that the Switch is hidden. With any luck, the player will earlier have dismissed this On/Off Switch as a red herring, making it tougher to work out that they must use it here.
Section 10

With the threat of Buzzy Beetles and straight drops into the lava, the level intensity reaches a new peak before the player relaxes into the safety of a checkpoint.
Section 11
This section is a breather between more intense encounters. It performs the same job as some previous screens as it teases a couple of more inaccessible routes through the level: the "P door" next to the checkpoint and the corridor up and to the right. It also allows the user to manipulate a Thwomp in a new manner. They can progress by dropping down into this capsule made of blue blocks beneath both a Thwomp and an On/Off Switch. The first hit the Thwomp makes on the Switch causes them to drop into a lower container, and it will eventually hit the Switch again, releasing them.
Section 12

Now, we return to fast movement and high-stakes play. The player cannot loiter on the Blue Blocks, or the Thwomp above will hit its Switch a third time and drop them into the lava. However, if they attract the attention of the Thwomp ahead, it will make a bead for them. The player must bait the Thwomp ahead in their direction, then jump at the right moment, so it hits the Switch behind them. I've tasked the player with tricking a Thwomp into hitting a Switch at least six times now, but this is the first time that mechanic has put them directly in the line of danger. The player must also react faster than they've had to before if they want to live. If they do, they are rewarded with a new consequence for outsmarting a Thwomp: it hits an On/Off switch, turning on squares in the space it occupies, defeating itself. We are building to the scariest part of the whole level.
Section 13

All the way up to this section, coins were lighting the path to progress. Now they trace a long jump the player must take, right to the bottom of the stage. What the audience can't see before jumping is that there's a Thwomp near the top of the level. Their jump arc will bait the Thwomp into striking the buttons next to it, turning on the blocks below and saving them. Still, even once they see the Thwomp, there's the tension of whether it will solidify the platform under them in time, saving them from plunging into the lava. The player must make a leap of faith, and of course, I timed the mechanism so that the ground only pops in at the last second.
Section 14

The scenery changes as the lava comes back into view. In this zone, the player must get a Koopa Shell and throw it onto the surface underneath the Pipe. It will bounce between the concrete block and the On/Off Switch, turning the coloured blocks on and off at a set interval. With keen timing, the player can now jump up the set of platforms to the right. This is far from a new mechanic in a Mario Maker level, but I love how it allows the player to set up the platforms' timing mechanism instead of the designer just flipping a lever in the background.
Within this context, I'm also inverting the player behaviour Section 2 demanded. There, the player needed to toss the Shell away from the ground under the Pipe to activate the On/Off Switch; here, they need to throw it inward. They may even be tricked into trying to throw the Shell at the Switch from the other side of the lava, remembering the solution to Section 2. Above the lava pit, there is a small jetty of On/Off Blocks the player can stand on and use to jump to the other side. In truth, this is a bit of a red herring with more severe consequences if the player falls for it than those earlier. The player can use this pier to jump over the lava, but the timing is tight, and if the user is paying attention, they'll see that the gap is small enough for them to make the leap without it. The setup rewards the player for having a keen sense of their jump distance.
Section 15

Hopefully, this section creates the simple illusion of a tower just by placing a platform climb in a castle level and surrounding it with some stone blocks. The tower is a light architectural attempt to make the player feel like they're in a fortress that goes beyond slapping a skin on the level and walking away. In the bottom right of the tower, there is a P Switch that the player will need to carry with them to unlock the door in Section 11. Arguably, I should have used a Key instead of a P Switch as P Switch Doors are just a dotted outline, and inexperienced players are unlikely to work out that signal means they need a P Switch to open them. Novices may climb the tower without the Switch.
You may notice that Section 15 is the one area that doesn't use coins to show the player the path through the level. I found that trying to stuff coins and platforms into the tower's limited space made it look too cluttered. The player could also potentially use the P Switch to turn the coins solid and climb out of the pit without setting up the bouncing Shell. So, I took the money out, and by coincidence, that shook up the level's reward structure. As I don't place currency anywhere in the tower, I can then justify giving the player one token worth 30 coins at the top. Such a large prize stands out when the player hasn't seen any money in a while.
I'm very fond of this moment of Mario diving headfirst into the guts of the level to rise back out, carrying a figurative key. You may also have observed that the tower is another instance of me allowing for the player to practice a skill in a safe environment and bringing back an old challenge but making it harder by decreasing the player's control over it. The player has already had to time their jump to the alternation of platforms, but they've not needed to do it with this precision. And before, they were the ones hitting the On/Off switch, and so, they decided when they had to jump. Not so in this instance. However, there are no hazards at the bottom of the tower, so the player can test timing their jump as much as they need without risking their neck. The sound of the Shell bashing into the Switch also helps guide players in that timing, giving this part of the level a slight rhythm game vibe. Hopefully, a refreshing change from more straightforward platform sections.

If you're thinking of creating one of these On/Off platforming sections yourself, you might be interested in noting the relationship between the timing of the platform switches and the length of the ground the Shell has to travel across. The further the Shell has to travel to hit the Switch, the longer the period between platform swaps, and the shorter the distance, the shorter the period. As the player climbs the tower, the stakes naturally get higher, as, with each successive platform, they'll have more to redo if they fall. This builds to them having to jump across a series of vertical platforms above the previous section. If the player falls from here, they may have to repeat the whole tower section or could even fall into the lava.
Section 11 Revisited

The player may now emerge from the one-way gate and use their P Switch to summon the door. Again, they return to a familiar location, but with a twist: while previously, they had to backtrack purposefully, here just following the path of the level brings them full circle. It gives the area a pleasing completeness, and if the player doesn't realise they're about to drop back into Section 11, it may be a pleasant surprise. On a more functional note, let's look at the wall in the top-left of this zone. It's to stop the player flying out from behind the one-way gate and their momentum carrying them over the section into the lava. Because the player is encouraged to move at speed back into Section 11 and because the section's return can sneak up on them, the player can be halfway towards the lava before they've realised what they've done. Making the player repeat the last four sections because they failed on this technicality seemed cruel.
We're heading into the home straight of the level. I now need to get the player from Section 11 back to the mystery exit door above Section 3. This is where I had to make a drastic change in the direction of the stage. Originally, setting up the On/Off alternation in Section 14 would be how the player unlocked the end door. Because the level state is switching between off and on, the player can effectively drill their way down through the alternating blocks to reach the exit. It was a simple concept that turned out to be impossible to implement. The game only processes objects within a set radius of Mario. By travelling the majority of the way across the level, to the door, the player effectively erases the Shell, stopping the alternation that would unlock the gate.
I could have relocated the door so that it was near enough to the Shell for this not to be a problem. However, that would mean you don't get the prolonged anticipation of seeing a door at the start of the level that you can't unlock until right before the end. This is why Section 16 is necessary. The player again needs to set up a spinning Shell knocking into a Switch, but close enough to the door that it won't despawn.
Originally, I had a moratorium on doors, at least before the final area. I thought that teleporting the player across the level would make them feel less connected to the environment and wouldn't represent an economical use of space. For that reason, I wanted to build additional sections that would route the player from Section 11 back to the door. Yet, there was little space to construct that course, and while I could have put in a mostly featureless corridor to do the job, it would have wasted the player's time. So, the P Switch Door exists.
Section 16

Section 16 is, unfortunately, an area that doesn't meaningfully iterate on an earlier challenge, but it shouldn't waste much of the player's time. The exit to this section being on the left guides the player in the locked door's general direction. That exit is blocked by alternating blocks so that the player cannot run out of the capsule without setting up the Shell, which would leave them completing half the level over.
Section 17

The blocks above the spikes flashing on and off are meant to suggest the route to success. The player knows by this point that they can traverse flashing platforms, and the strobing gets their attention. I had further planned to place the door right above the starting area of the level, but attempting to extend the second floor that far back was difficult to do without the player being able to clamber up to it from the early areas.
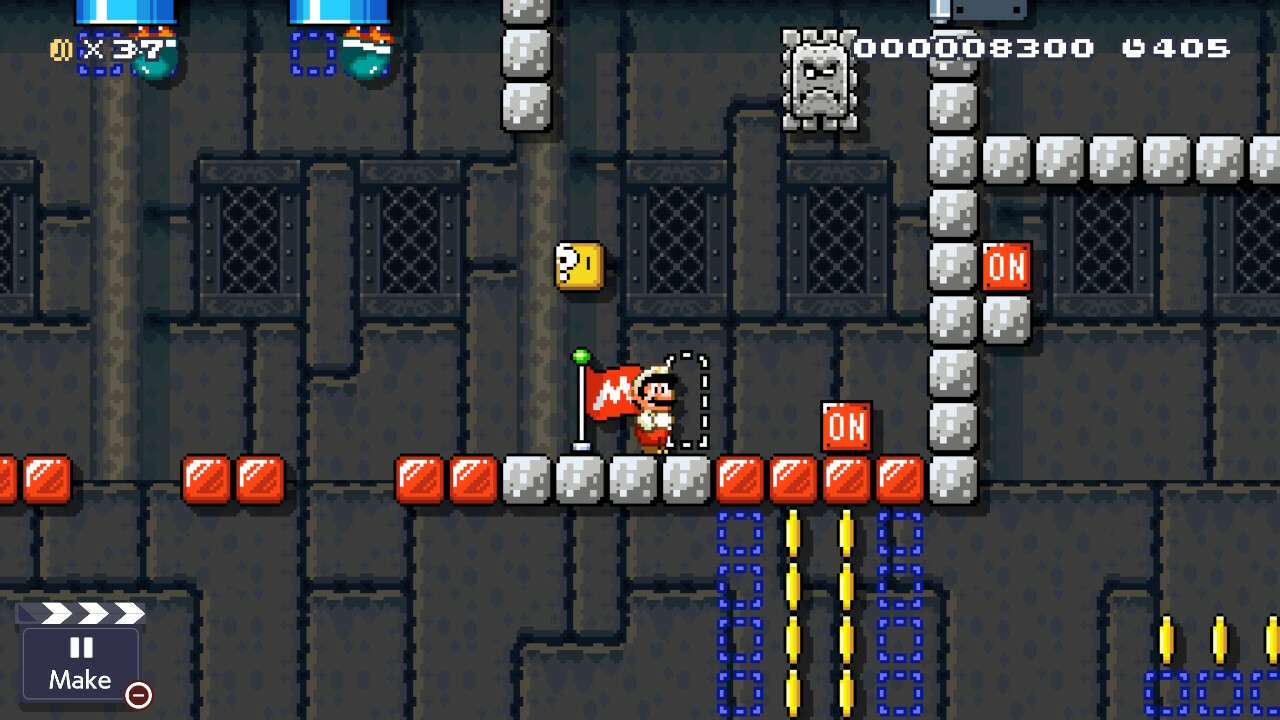
Section 18

The player is right next to the level exit, they can taste victory, but it's just out of their reach. To clear it, they have to see one more way to use the On/Off Switch. They must hit the Switch to unblock this Pipe at the right moment, dispensing a Bob-Omb as the flamethrowers blaze. The bomb will then fall in front of a stone wall, blowing through it, and letting the player hit the axe. When they do, a troop of the enemies they've faced in the level: Thwomps, Koopas, and Buzzy Beetles, drop into the lava. You could reasonably hold it against this section that it uses two elements that I didn't establish earlier in the level: Bob-Ombs and Flame Spouts. On the plus side, it's again, the player who opens the route to success instead of me lazily handing it to them.
___
And that's Thwomp's Switch Fortress. It's certainly not a flawless level, but it's one I'm proud of, and there are a few takeaways from it that I want to keep in mind. Maybe they can help you too.
- A level with this flow and tuning cannot exist without respect for the audience. I want to challenge the player, but never to cheat them.
- Planning how you're going to use space and having a robust knowledge of a game's logic help prevent you from making changes and compromises later in a stage's creation.
- Fun levels often rhyme, reusing the same elements in creative ways, with just the right timing.
Thanks for reading.
Notes
- Super Mario World Font by David Fens.
Log in to comment