Story
Taking place following the events of the first
Bard's Tale, the party that is presumably the same that had saved the city of Skara Brae receives a desperate letter from a mage called Saradon who implores them to come to his aid. An evil and powerful archmage named Lagoth Zanta and his hordes threaten the cities of the Realm and it is his hope that the player's party will be able to stop him. But the only relic that could unite the cities and give the party the power to stop his invasion has been shattered. The fabled Destiny Wand that has maintained seven centuries of peace is gone and with it, the hopes of an entire land.
However, Saradon has managed to discover where the pieces of the wand lay hidden. Broken into seven pieces and hidden within seven deadly Snares of Death throughout the land, the party is challenged to reforge the Destiny Wand, call upon the powers of the Destiny Knight, and ultimately confront and destroy Lagoth Zanta.
The players begin their quest in Tangramayne, the capital city of the Realm, a land where six other cities lay scattered across a large, open wilderness. From there, they must gather the clues needed to unravel the locations of several other dungeons, each containing a vital clue to lead the party on to their next destination. There are no cinematics within the game to help tell the story, although there are occasionally small events in the form of text that help describe some of the key elements within the game. The Snares of Death, in particular, had "magic mouths" which would present their challenges in the form of riddles filled with the clues needed to survive each one.
The hint guide, bearing the title "Dream Quest", for the game was particularly noteworthy for its narrative approach in guiding the player. Taking on the form of a fictional story centered around a party of adventurers that sought the services of an old wizard and his young apprentice, they would embark on a "vision quest" into the possibilities offered to them of a quest for a certain "golden fleece" or that of the Destiny Wand. The young apprentice would invisibly accompany the party into the vision and the journal that he would carry would magically write itself with their experiences and his own thoughts creating the story journal. The hint guide was illustrated with artistic sketches alongside maps and would describe the ending of the game as well as that of its own story.
Overview
Players must assemble a band of adventurers and track down the seven pieces of the Destiny Wand to confront and defeat the evil Archmage, Lagoth Zanta. Once all seven pieces are recovered, the scepter must be reforged, unifying the Realm and winning the game.
The Destiny Knight is the sequel to the first Bard's Tale as initially released on personal computers such as the Apple and the Commodore 64. According to the box text, it features various improvements over the original system such as:
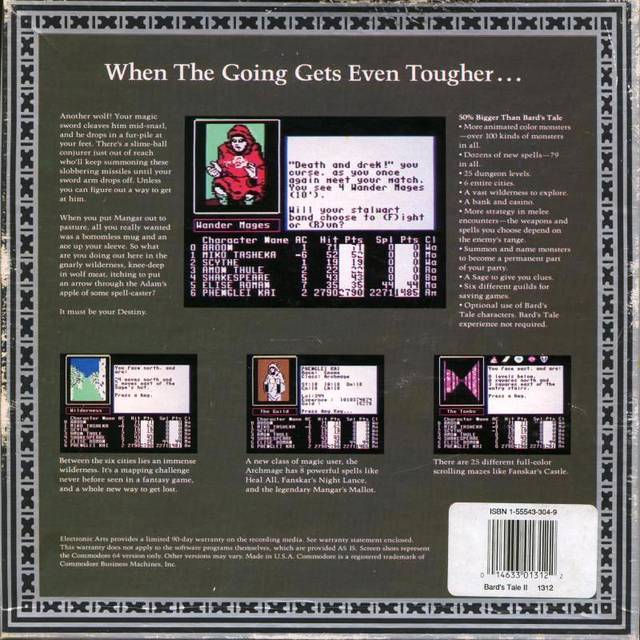
- 50% larger than the first Bard's Tale
- Six new cities and an overland wilderness
- The ability to summon and name monsters to become a permanent part of your party
- Ranged combat
- A bank and a casino
Six cities expanded the scope of the adventure acting more as locations for specific dungeons than as living, breathing, politically driven entities. They are:
- Tangramayne
- Ephesus
- Philippi
- Colosse
- Corinth
- Thessalonica
The game continues to use the
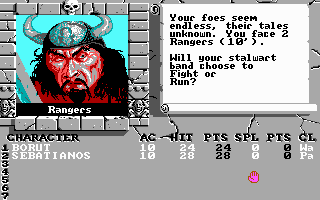
grid-based, 3D system wherein the world is viewed from a first-person perspective with 90° turns and movement spaces. Within the persistent interface, a small window on the upper left quadrant of the screen displayed the world as in the first with the party listed below and a text box in the upper right quadrant of the screen displaying messages and encounter options. Random enemy encounters would provide combat opportunities within the game against mixed groups of foes which would now use ranged attacks.
Destiny Knight was also notable for its use of an open wilderness between the six cities of the Realm, the land in which the story takes place. Predating similar efforts such as that found in Bethesda's
Elder Scrolls series by several years, the wilderness contained several dungeon areas that were necessary to complete for the main quest.
Puzzles were also given a high priority this time around in the form of Death Snares, trap rooms in which the pieces of the Destiny Wand were hidden and which could kill the entire party if they failed to solve it within a certain time limit. A rough map was included with the game showing the locations for several places but leaving the mapping of each interior to the graph paper tablets RPGers at the time used often to keep from getting lost.
Gameplay

Beginners were given a break in the form of a pre-made party that they can use to jump right into the game with. The adventure starts at the Adventurer's Guild, a location in each city where the player can save the game, form their party, and save their characters to disk just in case the worst happens. Across from the initial Guild is a starter dungeon which should get them up to speed on both the game systems as well as toughen their characters up for the trials ahead. The manual suggests that the characters should reach level 14 before venturing anywhere else in the game.
As with most RPGs of this type, party setup and character selection were left entirely up to the player. A party is limited to seven characters, although the manual suggests leaving one slot open for summoned monsters or special encounters that may occasionally join the party. This was particularly important within one of the dungeons of the game as a particular NPC would be required to help solve a puzzle.
Time also plays a factor in the game as it cycles from day to night, night bringing out the more dangerous creatures that roam the Wilderness.
Veterans can transfer character data from the first
Bard's Tale,
Wizardry I, or
Ultima III if they want to start off with a solid group of characters, although items and the like are not brought over.
The game did not make use of an outside license for its statistics and rules, although it shared many similarities with TSR's Dungeons and Dragons ruleset with significant differences that set it apart. In particular, mages were not required to maintain a memorized "pool" of spells as in D&D and instead cast their spells by using spell points which represented their inner strength and power. The types of spells that any one mage could cast were also dramatically different, although a character's
general statistics would reflect some of the traditional mentality that TSR's influence over RPGs at the time had made an impression with.
Races
Seven races are available for players to choose from and is the first step in creating a new character and a party of seven adventurers with which to go out and save the world.
- Human: As in most RPGs, their statistics and abilities are fairly average across the board with no distinctive bonuses.
- Elf: Fair haired, fair skinned, and more agile than humans, their specialities are focused on both magic and war although they tend to do better as spellcasters.
- Dwarf: Short, gruff, and strong if not very smart, dwarves excel as solid warriors in the Bard's Tale.
- Hobbit: Small, nimble, and wise, they make ideal rogues.
- Half-Elf: Thanks to their mixed ancestry, they are able performers as fighters although not as good as spellcasting as their elven peers.
- Half-Orc: Part human, all ugly, they also make decent fighters but offer no other significant bonus other than variety to the party.
- Gnome: Resemble dwarves but are better at using magic. If you are looking for a little toughness to go with your mages, this is one race to consider.
Classes
Picking a class for a new character is one of the important decisions that the player will make in a game like this one. Using a combination of different skills is the key to building a solid party that will be able to return home and sing of their adventures. On the party screen, characters are represented by their name and abbreviated class for quick reference along with all of the requisite attributes such as
hit points (HIT PTS) and Spell Points (SPL PTS) in columns and lines.
- Warrior (WA): The consummate fighter, they can use nearly every weapon that they find. For every four levels of experience after the first, they gain the ability to dish out an extra attack.
- Paladin (PA): These are fighters dedicated to smiting evil wherever it may be. They can perform multiple attacks at higher levels, use most any weapon including certain ones that other fighters can't, and have a greater resistance to evil magic. Unlike in other systems, such as Dungeons & Dragons, the player does not have to pick a deity for them to worship nor can they cast any spells of their own at higher levels. They are a pure fighter with bonuses making them a staple of any party in the Bard's Tale.
- Rogue (RO): The professional thieves of the Realm, what they lack in fighting ability they make up for being sneaky. They can hide in shadows (thus avoiding damage from enemies) and are able to search for and disarm traps of which there are many especially within the Death Snares.
- Bard (BA): They are warriors that have learned to sing. Although they don't have multiple attacks at higher levels as a true warrior class would, their songs are capable of spell-like effects that can aid the party in a variety of ways. Unlike spell casters, the Bard's songs bestow important buffs on the entire party for the duration of the song. Their songs can often work even within anti-magic zones. If combat interrupts a song, it will pick up again when it is completed even if another song is performed during the fight. An instrument is needed for a Bard in addition to whatever weapons they have. The Bard can play as many tunes in his repertoire until his throat dries, thus necessitating a visit to the local tavern for a tankard of fine ale to get them going again.
- Hunter (HU): They can use most weapons and have the ability to often instantly kill an opponent by striking a vital nerve center, an ability that improves as they gain experience levels.
- Monk (MO): They use traditional fighting weapons and gain more effectiveness at fighting with their bare hands at higher levels becoming devastating warriors.
Magic users were divided into several classes with a few of these requiring a pre-requisite in ability. Mages had to meet those requirements before graduating to the higher classes which are initially unavailable to a starting party. It was also a one-way class change. Once a character chose to be a particular class, they were locked into that decision and could not learn any spells that they chose not to.
- Conjurers (CO): One of the first classes that a magic user can start with. They can create fireballs and compasses to help defend and guide the party and have a smattering of healing spells for support.
- Magicians (MA): This is another class that new magic users can start off with. They can enchant items with temporary effects and user their spells as buffs to aid the party in combat, such as improving their armor class.
- Sorcerors (SO): They can create illusions including illusory party members and aid in the perception of the world around the party with spells enabling them to see in the dark. Most of their offensive spells tend to be mind based. These are not initially available to new characters until they have earned three levels of experience as either a Conjurer or a Magician. In other words, if a Magician character class has leveled far enough to cast third level spells, they can become a Sorceror.
- Wizard (WI): As with the Sorceror, a mage must learn at least three spell levels of their starting class before they can become a Wizard. Wizards are the summoning specialists and have the ability to raise the dead making them extremely valuable.
- Archmage (AR): This class can only be attained after learning three spell levels from each of the preceding classes, although the manual suggests that a true Archmage is one that has learned all seven from each. Archmages have the smallest number of spells to choose from, but make up for this thanks to the sheer power vested within each one. They are able to heal an entire party, resurrect multiple characters at once, crush enemies with incredible magic, and summon powerful allies. Lagoth Zanta, the main antagonist of the game, is an Archmage.
Locations
There are a variety of locales in the game that provide a number of important services, listed both in the manual and within the game itself:
- The Sage: He lives out in the Wilderness and is a valuable treasure trove of knowledge. The player must make use of his services in order to ask for the location of certain places to which he will point the way, but only for a price. As the player journeys through the world, they will encounter new clues that they must barter with the Sage on in order to continue the quest, entering certain key words into the parser that comes up when conversing with him.
- Temples: Provide valuable healing services for when your mages aren't powerful enough yet to do the healing themselves. They are also the only places tha can cure withered characters (old age) or ones that have been turned to stone. The manual says that the resurrected character may need to sell their soul in order to come back to life, but in terms of the game, that doesn't happen.
- Roscoe's Energy Emporium: Roscoe is a mage who had opened a chain of energy emporiums in order to cash in on the sorcereal energy crisis of '27. Even after it had passed, Roscoe's emporiums continue to provide a valuable service by recharging the spell points of wealthy mages. His services don't come cheap, but if you can't wait for spell points to regenerate, his emporiums are worth a visit.
- Unmarked Buildings: While exploring the cities of the Realm, the player can barge into unmarked buildings. This also tends to trigger a combat encounter. For the most part, there is nothing to see in any of these structures except the exit, although the party will be running into several of these in searching for hidden dungeon entrances leading to the next part of their quest.
- Adventurer's Guild: This is the "union hall" where unemployed characters hang around hoping to join the next expedition. This is where it all begins and one is located in each of the major cities. Saves are handled here along with party formation. You can't save while in the middle of a dungeon or out in the wilderness, so knowing where these are located in each city is an important part of the game. You can also remove characters from your party and keep them here in case you need to free up an extra slot for a special character. One or two puzzles require the use of a special character in the party.
- Garth's Equipment Shoppe: Garth retired from adventuring and his deeds are sung far and wide. He now sells his knowledge of weapons and artifacts as a part of a string of stores that lie spread across the Realm, providing basic equipment to everyone as well as a few particularly rare and powerful pieces for those with enough gold. He can also identify unknown items thanks to his extensive knowledge, for a price, Selling rare items to Garth will not appear in his shoppe, though, so be careful about getting rid of items that you might need later on. Fortunately, quest items cannot be sold. Garth is everywhere and in every shoppe, so you don't need to worry about trekking back to one particular branch.
- Review Board: Shadowy figures representing all of the classes in the game sit in judgement over characters that come to them for advancement. If you have enough experience, you'll get your level. Mages learn their spells in batches, so once they gain a spell level, all spells in that tier are learned. These are not marked on any map and must be discovered. The good news is that they typically have a unique facade so turning and facing a building is all that is needed to know what it is.
- Casinos: Players can gamble their ill gotten gold in these halls for the chance to score big, although the dealers have been known to cheat if stiffed for a tip.
- Bedder's Bank for the Bold: An old-half elf who had reputedly sold his own mother to a band of lonely orcs to finance his first branch, Bedder will deposit your gold for safekeeping in case anything...tragic...happens to the party. There's no interest and withdrawals must be made for the entire amount, but gold can be added at any time in any amount. Good for making sure that there's a nest egg out there available for any set of characters that you might create.
- Taverns: The rest stop for the Bard in your party and a place to hear pieces of gossip.
There were also the seven major dungeons that could only be found with the help of the Sage scattered throughout the Realm. Each dungeon would consist of several levels and sometimes possessed a
boss fight or two in addition to the Death Snare within. They would take the form of tombs, crypts, castles, and even a tower.
Combat
Fighting in the game is handled through random encounters and is required to earn those valuable
experience points and grow the party into an unstoppable force capable of facing the dangers ahead. A list of foes (broken down by the number in each group) is given at the start of the fight. The maximum number of foes is up to four groups of monsters. Any group of monsters within 10' (feet) of your party are within melee range. Some monsters, however, will also use ranged attacks such as breath weapons or spells to deal damage, or summon monsters to block your advance. Combat is divided into a series of rounds and it is up to the player to decide what they should do next.
Party arrangement is also important. The first four characters can be physically attacked and can dish out the same leaving the last three to resort to ranged attacks.
Combat actions are triggered by hitting the appropriate key when a character's turn comes up, allowing the player to time certain attacks for when it is a particular character's turn to act in that round. They are:
- (A)ttack foes: Orders a character to physically assault the enemy. This applies to the first four chraacters only.
- (P)arty attack: Orders a character to beat down a fellow party member or special character. Sometimes necessary.
- (D)efend: This reduces the damage a character may recieve in case you suspect that they can do nothing else at the moment.
- (U)se an Item: Allows a character to use a ranged weapon or a magic item.
- (B)ard Song: Tells the Bard to play a short tune during the fight. Typically lasts for only one round.
- (C)ast a Spell: This is where mages get to work their magic. When selected, the player must enter the four digit code for the spell in question and specify a target if required.
- (H)ide in Shadows: Tells a rogue to hide in the shadows, avoiding damage during that turn since the enemy can't see them. They can also avoid spell effects this way.
All of the results are calculated in the background. Certain statistics, such as dexterity and luck, determine who will strike first in a fight. The character in the first party slot is designated as the leader and the chance of running into danger is heavily determined by the statistics of that leader.
Log in to comment