Overview
L.A. Noire is an action-adventure open world game developed by Team Bondi and published by Rockstar Games. It was released for PlayStation 3 and Xbox 360 in May, 2011, and PC in November, 2011, following a development period of more than 6 years.
The game centers on the character of Cole Phelps as he rises through the ranks of the LAPD, solving cases and arresting criminals. The game features an open world rendition of 1947 Los Angeles and uses motion scan technology to produce facial models on the game characters capable of expressing nuanced realistic emotions.
Gameplay
The gameplay is more or less described as an adventure game, rather than the usual Rockstar open world killfest. In this sense, it's more like Bully--still free roaming but with a stronger set of rules over the player. While searching for clues and interrogating,occasional gunplay sequences crop up. Unlike most games, the player's health is not displayed by an HUD. Instead, when the player takes damage, the game screen fades into a black and white tone. The player recovers health by taking cover and waiting a few seconds.
The first mission revealed to the press was called "The Driver's Seat". It involved the police finding an abandoned car that had its interior covered in blood. In order to carry out the investigation, the player must find clues. Unlike other games, clues don't just pop up on the HUD, but it is up to the player to search for them. Different people can find different clues, a detail that changes the way the investigation plays out. This will also affect the length of certain investigations.
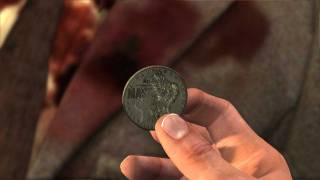 Discovering clues is an important gameplay element in L.A. Noire
Like your cellphone in GTA 4, the player always carries around a little notebook. Each clue, testimony and anything related to the investigation is added to the detective's little book. It will also serve as a way to display the current objectives and, like in Uncharted 2, players are able to flip through it in order to pull out viable information during testimonies, for example.
During cases the player will always start off at a crime scene. There, the player must find clues and interview victims. Most clues usually lead up to the next event in the case. Some clues can further progress the case's finish. One major clue can change the outcome of the case.
As the player progresses through the ranks, they earn "intuition points". With this they have the option to, remove an answer, show all clues, and "ask the community" (online connection required). The "show all clues" option usually can help by highlighting evidence at a crime scene. The "remove an answer" option removes wrong answers to give more chances at succeeding in interviewing a person.
Crime Desks
As the character progresses through the game, Phelps will be assigned to new desks and partners.
- Patrol: The Patrol desk is a department of the LAPD concerned with monitoring assigned areas in Los Angeles. Phelps starts off as a police officer in this department as a "beat cop". Phelps is partnered with Ralph Dunn at the Patrol Desk.
- Traffic: The Traffic desk is a department of the LAPD concerned with hit-and-run, felony driving, car burglaries, and car thefts. "The Fallen Idol" is one case that hits the traffic desk. This is also where Phelps is partnered with Stefan Bekowsky.
- Homicide: The homicide desk is one of the most brutal and harrowing desks within the game, dealing with homicide. "The Silk Stocking Murder" is one of the cases at the homicide desk. Rusty Galloway is Phelps' homicide partner.
- Vice: The Vice desk is a department of the LAPD concerned with offenses involving prostitution, drugs, lewdness, lasciviousness, and other related obscenities. Phelps is partnered with Roy Earle at the vice desk.
- Arson: The Arson desk is a department of the LAPD concerned with maliciously, voluntarily, and willfully setting fire to another's property, or of the act of burning one's own property for an improper purpose, such as to collect the insurance. Phelps is partnered with Herschell Biggs at the arson desk.
Story
Overview
In a departure from previous Rockstar games, the main protagonist of L.A. Noire is righteous, and regularly finds himself in conflict with others who are less inclined to follow the rules. Cole Phelps is an honest detective, out to solve crimes and let the law do what it does best -- prosecute the offenders. In spite of that, he's not perfect. He has his failings, like any man, and it is they that drive him to try to hold himself and the world around him to the highest possible standard.
Cole doesn't start the game as a successful detective. His beginnings lie in the role of a street cop working the beat, responding to everyday crimes whenever they happen. The more he works, though, the more opportunities he has to hone his investigative skills and impress his superiors, earning him progressively nicer desks back at Police HQ. With each promotion comes new responsibilities in new areas of police expertise, taking him from traffic all the way through arson. Each change in desk also brings a new partner, some of who are more trustworthy than others.
Setting
L.A. Noire is set in 1947 Los Angeles and draws heavily from both plot and aesthetic elements of film noir--stylistic films from the 1940s and 1950s that shared similar visual styles and themes including crime, sex, and moral ambiguity, and were often shot in black and white with harsh, low-key lighting. The game uses a distinctive coloring-style that pays homage to the visual style of film noir. A post-war setting is the backdrop for plot elements that reference the detective films of the '40s, such as political corruption and drugs, with a classic jazz soundtrack.
Ninety percent of Los Angeles' buildings and signage are recreated in the game, with design and typography choices hearkening back to the advertising of the time period. Additionally, even the jingles playing on the car radios are authentic to that time, advertising products and offering public service messages one would have heard while listening to the radio during the 40's.
Cases
Patrol Desk
 Cole Phelps, before he becomes a detective.
Cole Phelps starts out as a beat cop, working the streets after being awarded the Silver Star during the second World War. This part of the game serves as a tutorial, teaching players about the game's different mechanics.
Buyer Beware
A shooting happens in broad daylight in front of a shoe store, and Phelps takes the Case. The victim is Everett Gage, the owner of the shoe shop. After interrogating one of the clerks, Clovis Galletta, it is revealed that a man by the name of Edgar Kalou may be behind it. After a short chase sequence, Phelps catches Kalou and proceeds to interrogate him. It is revealed that Galletta was about to buy something at Kalou's jewelry store before Gage sent her back to work. That Gage had just ruined his sale paired with Gage's reputation for being anti-jewish, Kalou murdered him in cold blood. It is implied that Kalou is sentenced to the gas chamber.
Impressed by Cole's skills, James Donnelly, captain of the homicide division, promotes Phelps to the traffic division.
Traffic Desk
Promoted to Traffic, Phelps is paired with Stefan Bekowsky.
The Driver's Seat
The case begins with an abandoned, blood-filled vehicle found in a train yard. After some research, Phelps discovers that the car is owned by one Adrian Black. His research also yields a bloody pipe and a receipt for a live hog. Phelps and Bekowsky go and visit the owner's wife, Margaret Black. There the two officers discover that the couple have a miserable marriage and that Mr. Black is having an affair. It's also made clear at this point that the bloodied pipe actually came from the house. The two detectives then go to interrogate Frank Morgan, the man who sold the hog to Black. Here players learn that Adrian Black is not dead, but instead faked his own death by covering his car in swine blood with plans to flee town. Phelps catches Black before he can leave town, and jails him for wasting police resources.
Consul's Car (PS3 Exclusive)
Phelps and Bekowsky must investigate on the disappearance of L.A.'s consul of Argentina's car.
A Marriage Made in Heaven
A hit and run is reported at Ray's Cafe. A married man, Lester Pattison, is found dead after being hit by a car. After snooping around, Phelps finds a an insurance letter inside the man's coat and a bloodied knife in a garbage can. He also learns that Lester and his wife, Lorna, were having an argument just before the accident. The detectives visit Lorna Pattison who seems unfazed with the news of her husband's death. Phelps eventually hunts down the driver who killed Lester who reveals that Lester was already dead before the car hit him. The morgue confirms that Lester's cause of death was from knife wounds. Phelps goes back to the Pattison residence and deduces that Lorna killed her husband with another man, Leroy Sabo, so the two could get the insurance and start a joint business venture. Sabo kills Lorna after she spills the beans, but is either arrested or killed by Phelps.
A Slip of the Tongue (DLC)
 One of the pre-order DLC cases (also available for separate purchase)
A stolen car is spotted and Phelps and Bekowsky are sent to intercept it. After a short car chase, the detectives manage to stop the car, owned by a young man named Cliff Harrison. He assures the police that he legally bought the car at a used car dealership and produces the pink slip to prove it, but fled because of drugs stored in the glove compartment. Phelps investigates the used car dealership where he finds out that the car was sold by a woman named Jean Archer, and that the pink slips were made by the Marquee Printing Company. The car sold by Jean was also registered to an empty lot. A man named Belasco is arrested for grand theft auto and it becomes clear that he and Jean belong to the same car smuggling ring. Phelps later finds and arrests Jean who was trying to scam the smuggling ring by selling the cars. She tells the detectives where the cars are stored and after a shoot out, they find and interrogate the chief of the warehouse who reveals that Marquee Printing Company is behind the smuggling ring. Due to the fact that the company's boss, Levitol, is neck deep in gambling debts, he started to sell pink slips to the mafia for profit. He is later arrested for fraud.
The Fallen Idol
The case opens with a car being driven over a cliff. The two passengers, B-movie actress June Ballard and 15 year old Jessica Hamilton, survive the crash. June tells the detectives she thinks that movie producer Mark Bishop is behind the murder attempt since he didn't want to cast her in his new movie. Jessica also points at Bishop as the culprit, but she adds an accusation of rape to June's attempted murder allegation. Phelps goes to the Hamilton residence only to find it ransacked, the wife explaining that she does not know the whereabouts of her husband. The detectives go to prop set where they discover that Bishop is running an underground pornographic network. Before they can learn more, Roy Earle from Ad Vice intervenes, saying that the owner of the prop shop is in fact an informant. Phelps isn't the only one looking for Bishop, but so is the local mafia. Bishop is finally found on the set for a movie titled "Intolerance" and after a shoot out with the mob, he's arrested for rape.
Due to Phelps' successes, he is promoted to homicide.
Homicide Desk
A grisly murder scene.The cases on the homicide desk share the same theme, centering around a single serial killer who focuses on drunk women. In the process of murdering his victims, the killer also strips them of their clothes and leaves weird writings on their bodies. Nicknamed the "Werewolf", this killer is based on a real life serial killer who terrorized L.A. in the late 40's. He was also commonly referred to as the Dahlia killer.
Phelps investigates the murder of 4 women during the cases "The Red Lipstick Murder", "The Golden Butterfly", "The Silk Stocking Murder", "The White Shoe Slaying" and "The Studio Secretary Murder". Each time the victims are women who were having conflictual relationships with their husbands, and were murdered late at night while drunk. Because the murder weapon is always found, Phelps always convicts someone. He is pushed by Donnelly to convict communists and child molesters to grab headlines, while the evidence usually points more towards the husbands of the victims. It is worth noting that enough evidence exists for a conviction to go either way.
The murder mystery ends with the case called "The Quarter Moon Murders". The killer, to show his power and cunning, as well as test both the mental and physical skills of Detective Phelps, leads him through L.A. with poems and personal items that belong to each of his victims. He leaves these things in dangerous, difficult to reach places in famous Los Angeles landmarks, such as the Hall of records and the Westlake Tar Pits. The case ends in the Christ Crown of Thorns church, where it's revealed that a bartender, who worked at different jobs through a temp agency and had been interviewed briefly by Phelps earlier in the investigation, is in fact the murderer. He studied each of the victims before murdering them, a process that allowed him to pin the crime on someone else. The killer is shot dead by Phelps but Donnelly arrives and tells Phelps that the public can not know who the real killer was as the killer was the son of an important politician running for election.
At the personal request of vice detective Roy Earle, Phelps is moved off the homicide desk to administrative vice where he becomes Earle's partner.
Vice Cases
Another investigation.The Black Caesar
Two junkies are found dead after taking army surplus morphine and seemed to have been engaged in illegal rackets. Phelps tracks the morphine back to a popcorn stand just outside the Hotel and gets into a small chase when the owner decides to make a run for it rather than answer some questions. After a short interrogation the stand owner fingers his supplier as Jermaine Jones a talent agent. In addition to giving up his supplier when put under a bit more pressure he also mentions the owner of the racketeering business as a slick fellow by the name of Merlon. Phelps and Roy visit the talent agency and find out Jermaine Jones buys his morphine from Merlon Otis who runs an illegal betting operation for a Jewish mobster by the name of Finkelstein. They also find out that Ramez Removals has close links to Vinny the Fink and clues Phelps onto another line of investigation. Next they visit Merlon Otis who also makes a run for it and has to be to chased down before they can interrogate him. Otis says that he moves the dope that Jose Ramez brings around who in turn gets the dope from the mob. The next stop is Ramez Removals where the detectives pick up some clues leading them to an ice company. The ice company in turn is just a front for the local mob, and is run by Mickey Coen's brother in law, Finkelstein. Phelps kills all the mobsters and finds the stash of army surplus morphine that was stolen off the navy ship in the beginning of the year, putting an end to the illegal morphine distribution.
The Set-Up
Boxer Albert Hammond wins a match that he was originally supposed to lose. He quickly takes flight, and Phelps must try to find him before the mob guns him down. Through some detective work at Hammonds hotel Phelps makes a connection between the boxer and a Candy Edwards with whom he had been having relations. Upon visiting the girl the two detectives find her in an altercation with an Italian gangster that Phelps knocks out in a fist fight. A quick sweep of the room reveals travel tickets, a packed suitcase and a list of possible bookies found in the jacket of the unconscious goon, along with a nasty looking knife. The duo question Candy, but as she proves uncooperative they decide to tail her instead hoping she'll lead them to Hammond. It's revealed that Candy visits all the bookies in town and cleans them out. She is the one who planned on Hammond throwing the match, and bet the other way. After tailing Candy to a bus station Cole observes her from afar while Roy suggests he had seen Hammond and goes after him. Shortly after she walks into the station bathroom a gunshot is heard . Quickly arriving at the scene Candy is found bleeding profusely from a chest wound and shortly after dies - an open window suggesting the way of the killers getaway. The two suspect that Hammond got greedy and used his girl as a baglady then killed her to collect all the winnings for himself. While heading towards the last clue pointing to Hammonds location, the coroner radios Cole to let him know that Candy died as a result of a knife wound, making the pistol found at the scene hers and pointing out the killer as a certain Italian goon with a knack for beating women and carrying switchblades. After a quick gun fight with the Italian mob intent on killing Hammond and making off with all the money themselves the detectives confronts Albert who explains his past in the military and how his honor, the last thing he had left, wouldn't let him lose. Having experienced a similar situation himself in the past, Phelps understands how important second chances are to a man and decides to let him go, ending the case.
The Naked City (DLC)
Phelps and Earle must investigate the death of Julia Randall, a beautiful model who appears to have overdosed on morphine. However, the bruises all over her body lend a suspicion of murder, and despite being single she wears a suspicious looking ring on her hand. After learning that Randall was on medication, Phelps and Earle pay a visit to her physician, a Dr. Stoneman who at first lies about her prescription, then reveals that Julia was one of the self-destructive types who tried to live life fast and make a name for herself in the City of Angels. The detectives then visit a tailor where Julia did modeling. Heather Swanson, one of the employees at the shop reveals that Julia was modeling for her fiancee, Henry Arnett. After interrogating Henry, it's revealed that Julia was both having an affair with Henry, and she was murdered. Phelps decides to tail Henry and finds out that he's trying to pawn contraband and leave for New Mexico. The contraband used to belong to Mrs Evestrom, who is also Heather Swanson's mother. Her things were robbed from her home while she was at Dr Stoneman's party. Phelps senses that something is wrong and goes to Arnett's apartment just in time to see a man who goes by "Willy" first beat up Arnett and then escape. Arnett spills the beans, explaining that he, Julia, Stoneman and Willy were all part of a robbery ring. The doctor would organize parties while the 3 others would rob the guests' homes. However, Julia wanted out, leading Arnett and Willy to murdering her, and Willy beating up Arnett in fear that he would give him up. Arnett is arrested, Stoneman commits suicide and Willy is killed by Phelps.
Manifest Destiny
A shooting occurs in the 111 Club where a former squadmate of Phelps who had just purchases the establishment is shot dead. Here it is revealed that the morphine is still in circulation and has started a war between the gang controlled by Mickey Cohen and a former marine unit. It's discovered that the morphine was in fact stolen from the army by a soldier named Courtney Sheldon and a group of his former squadmates from Okinawa. Through the manipulation of Dr. Harlan Fontaine, Sheldon gives up the morphine thinking Fontaine will use it to aid returned soldiers by building homes for them where they can rest after the horrors of war. However, he wound up involved with crime boss Mickey Cohen who wishes to turn a profit by watering the morphine down and selling it on the streets. Through the course of the early investigation Phelps meets and questions Elsa Lichtman whom he becomes enamored with leading to an affair. Meanwhile Sheldon enacts the help of his former squadmates as well as that of Jack Kelso to scare off the mobsters from moving in on the morphine - which prompts the mob to put out a hit list on all the former servicemen. Phelp's former squad mates begin getting killed off by mobsters one by one and through various clues picked up along the way he's able to make a connection back to Sheldon with proof to pin the morphine heist on him. Meanwhile a man by the name of Stoker is leaking information about LA's famous madame Brenda and the services she provides for both the LAPD and high officials alike. In a secret meeting with the chief of police and district attorney among others, Roy proposes to make Phelps the sacrificial lamb for the press by airing his infidelity with the German singer Elsa Lichtman which would draw the heat away from the LAPD and other officials involved in the prostitution Brenda scandal. Just as Phelps is about to crack Sheldon and get a confession out of him he's summoned by top ranking LAPD officials and suspended for adultery, stating that a criminal cannot be an LAPD officer. The information is leaked to the journalists and his wife throws him out of the house, leaving him no other place to turn to than the source of all this trouble - the apartment of Elsa Lichtman. While awaiting a peer review Phelps is demoted to the undesirable arson desk assignment and partnered with Herchel Biggs, who much like the rest of the LAPD that has found out about his infidelity with a German woman treats him with open hostility and disregard.
Arson Desk
The Gas Man
Phelps and BiggsPhelps investigates the burning of two houses. He learns that both houses were in the way of a redevelopment fund planning to build houses for GIs. Both houses also used the same gas filters that came from Instaheat factory. While investigating at the factory, Phelps learns that Instaheat is hiring criminals and that one of the employees burned the houses by reversing the gas filters and mosquito coils. Phelps arrests Walter Clemens and Matthew Ryan. Both are anarchists and both have a criminal past. The player must choose which of the two criminals that he wants to convict.
A Walk in Elysian Fields
Another house fire is assigned to Phelps and looks extremely familiar to the last two arsons. Like before, the house was supposed to be bought by Elysian Fields for the redevelopment fund. Phelps decides to go and investigate Elysian Fields and meets Leland Monroe, the CEO. He denies trying to chase away the final home owners by burning their houses. Meanwhile, the police department presses Cole to stop following the Elysian lead. Cole ends up killing the arsonist after an epic tram chase. However, he is unable to link the arsonist to Elysian.
After the case, Roy visits Phelps to tell him to stay away from Elysian. Frustrated, Phelps discovers that one of Elsa's friends died while working for Elysian on the GI redevelopment fund. Because Elsa was his beneficiary, she received a large sum of money from the insurance company. Phelps decides that Elsa should go see Jack Kelso, a private investigator working for an insurance company called California Life and Fire to discover how her friend died, and why such a big sum of money was offered to her. At this point, the player plays as Kelso.
House of Sticks
Jack makes an investigation into the houses built by the redevelopment fund and discovers that they are constructed from bad wood found in an abandoned movie studio. Jack also discovers that many of L.A.'s top men are involved, including the mayor, Kelso's boss Curtis Benson, the chief of police, and Dr. Harlan Fontaine. As he is investigating however, Jack is kidnapped by Benson's men but he manages to escape before they can execute him.
Nicholson Electroplating (DLC)
At 9:45 in the morning, a thunderous explosion rocks Los Angeles. City blocks are flattened while smoke and ash fill the air. Detectives Phelps and Biggs race to the site of the former Nicholson Electroplating plant to find a pile of unanswered questions. What caused the explosion? What was the current project being worked on by Nicholson's employees? And where are chief chemist Dr Harold McLellan and his mysterious female assistant?
A Polite Invitation
Jack KelsoJack pays a visit to Benson and discovers the conspiracy behind the redevelopment fund. The houses are being built out of crap wood so they can then be burned down. Thanks to an extremely high insurance rate, Elysian Fields hits the jackpot each and every time. They hand the money out to their stock owners, who just happen to be the mayor, Benson and the other top men. The redevelopment fund was financed thanks to the stolen morphine given to Dr. Fontaine by Courtney, who entrusted him with it to avoid trouble with the mob. Kelso enlists the help of Phelps and together, they plan to stop the dastardly plan and save Elsa, who's been kidnapped by Elysian's arsonist. The arsonist also also kills Dr. Fontaine.
A Different Kind of War
Jack attempts to find the person who kidnapped Elsa. He goes to Westlake Pest Control to find the address of the kidnapper. The story then switches to Phelps' investigation on the kidnapping of Elsa, which occurred on the day before Jack's investigation. During the investigation, Phelps learns that the matchstick houses are being built along the patch of the to-be-built freeway. He realizes that the housing fraud is not about insurance, it's about eminent domain.
The story then switches back to Jack, as he arrives at the kidnapper's house in Rancho Rincon. Jack investigates the empty house and discovers the kidnapper-arsonist is Ira Hogeboom, a former war buddy. Jack calls Phelps, telling him to rendevous at the LA river tunnels where Ira is hiding out. Phelps meets up with Jack en route to the tunnels, as Jack is being hunted by the police. Together they escape their pursuers, and then split up to search the tunnels for Ira and Elsa. Shortly thereafter, the assistant DA arrives, followed by the police chief who confronts him. The assistant DA threatens the chief over being potentially involved in the ballooning scandal, to which the chief offers to make a deal. The assistant DA steps in to listen.
Meanwhile, once caught up with Ira, Jack understands that Ira, still wearing his full combat gear, is suffering from uncontrollable flashbacks from the Battle of Okinawa. Cole then arrives and leads Elsa to safety, while Ira consents to let Jack shoot him dead to put him out of his misery. As the sewer begins to rapidly flood with torrential rainwater, the group manage to locate a manhole above them. Cole refuses to leave until he has helped everyone else climb out of the flooding tunnel, and then having no one left to lift him to safety, only looks up and says goodbye. He is then swept away by the water for good.
At Cole's funeral, Roy, barely able to supress his snear, gives a speech full of phony condolences and tributes to the late Cole Phelps, as though Cole were his dear friend. Unable to stand it, Elsa jumps to her feet, curses Roy, and storms out in tears and disgust. The Chief of Police, the new DA, Roy, and the other conspirators comfortably disregard her. Biggs rises to go after her, and Jack can only sit and watch.
After the credits end, a flashback plays depicting the fateful scene where Courney comes upon the idea of stealing the Army morphine to profit him and his unit, a group of men who otherwise have little to look forward to in civilian life. Courtney excitedly proclaims that the drug money will "give them the future they deserve". Jack is the only one among the group to reject the plot as betrayal of their honor, foreshadowing the eventual conflict that the drugs would bring, destroying nearly all of the men.
Street Crimes - Unassigned Cases
Along with the Crime Desks that are explained above, players have the option to respond to radio calls that allow them to go to crimes in progress throughout the open-world environment. Some may remember this mechanic from the True Crime series. This allows players to take on extra side missions that can be completed while they are also heavily involved in the story. Each case is usually resolved within about 5 minutes and vary from shoot outs to chase sequences.
Unlike the story cases, players are not graded according to performance, but just have to finish the case to gain 15 XP. All the cases can be done again in free roam and the different desk assignments have different cases. There are 40 unassigned cases in all. Cases can be replayed at any point and will remain on the map with a white street crime icon; but unplayed cases appear with a red icon. After completing all street crime cases on a desk while in Free Roam mode, a message will appear saying the desk is complete.
Traffic Desk
Homicide Desk
| Name | Details | Location | Image |
|---|
| Bank Job | Armed Robbery | Seventh and Olive (Bank of America) | ![<img src=]() <img src="http://static.giantbomb.com/uploads/scale_small/17/171291/2469832-bank+job.png"> <img src="http://static.giantbomb.com/uploads/scale_small/17/171291/2469832-bank+job.png"> |
| Bowling Lane Robbery | Armed Robbery | Ninth and Grand (Rawling's Bowling Alley) | ![<img src=]() <img src="http://static.giantbomb.com/uploads/scale_small/17/171291/2469833-bowling+lane+robbery.png"> <img src="http://static.giantbomb.com/uploads/scale_small/17/171291/2469833-bowling+lane+robbery.png"> |
| Canned Fish | Suspicious Activity | 111 South Almeda | ![<img src=]() <img src="http://static.giantbomb.com/uploads/scale_small/17/171291/2469834-canned+fish.png"> <img src="http://static.giantbomb.com/uploads/scale_small/17/171291/2469834-canned+fish.png"> |
| Cop Killer Shot | Shot Fired | Sixth Street and Lindley Place | ![<img src=]() <img src="http://static.giantbomb.com/uploads/scale_small/17/171291/2469835-cop+killer+shot.png"> <img src="http://static.giantbomb.com/uploads/scale_small/17/171291/2469835-cop+killer+shot.png"> |
| Death Plunge | Suspicious Activity | Eighth and Hope (First Methodist Church) | ![<img src=]() <img src="http://static.giantbomb.com/uploads/scale_small/17/171291/2469836-death+plunge.png"> <img src="http://static.giantbomb.com/uploads/scale_small/17/171291/2469836-death+plunge.png"> |
| Honey Boy | Disturbance | 313 Bunker Hill Avenue | ![<img src=]() <img src="http://static.giantbomb.com/uploads/scale_small/17/171291/2469837-honey+boy.png"> <img src="http://static.giantbomb.com/uploads/scale_small/17/171291/2469837-honey+boy.png"> |
| Killer Bandits | Suspicious Activity | 943 South Broadway (Levine's Liqour Store) | ![<img src=]() <img src="http://static.giantbomb.com/uploads/scale_small/17/171291/2469838-killer+bandits.png"> <img src="http://static.giantbomb.com/uploads/scale_small/17/171291/2469838-killer+bandits.png"> |
| Misunderstanding | Suspicious Activity | Union and Rockwood Street | ![<img src=]() <img src="http://static.giantbomb.com/uploads/scale_small/17/171291/2469839-misunderstanding.png"> <img src="http://static.giantbomb.com/uploads/scale_small/17/171291/2469839-misunderstanding.png"> |
| Running Battle | Armed Robbery | 391 Broadway (Mallory's Cafe) | ![<img src=]() <img src="http://static.giantbomb.com/uploads/scale_small/17/171291/2469840-running+battle.png"> <img src="http://static.giantbomb.com/uploads/scale_small/17/171291/2469840-running+battle.png"> |
| Thicker Than Water | Burglary | Lucas Avenue | ![<img src=]() <img src="http://static.giantbomb.com/uploads/scale_small/17/171291/2469841-thicker+than+water.png"> <img src="http://static.giantbomb.com/uploads/scale_small/17/171291/2469841-thicker+than+water.png"> |
| Unsuccessful Holdup | Armed Robbery | 410 South Flower Street (Scott's Garage) | ![<img src=]() <img src="http://static.giantbomb.com/uploads/scale_small/17/171291/2469842-unsuccesful+holdup.png"> <img src="http://static.giantbomb.com/uploads/scale_small/17/171291/2469842-unsuccesful+holdup.png"> |
| Vengeful Ex | Disturbance | Olvera Street Plaza | ![<img src=]() <img src="http://static.giantbomb.com/uploads/scale_small/17/171291/2469843-vengeful+ex.png"> <img src="http://static.giantbomb.com/uploads/scale_small/17/171291/2469843-vengeful+ex.png"> |
| Would Be Robber | Person with a Gun | Grand between Fourth and Fifth Streets | ![<img src=]() <img src="http://static.giantbomb.com/uploads/scale_small/17/171291/2469844-would+be+robber.png"> <img src="http://static.giantbomb.com/uploads/scale_small/17/171291/2469844-would+be+robber.png"> |
Vice Desk
| Name | Details | Location | Image |
|---|
| Against the Odds | Theft | Sunset and Ivar | ![<img src=]() <img src="http://static.giantbomb.com/uploads/scale_small/17/171291/2469846-against+the+odd.png"> <img src="http://static.giantbomb.com/uploads/scale_small/17/171291/2469846-against+the+odd.png"> |
| Bad Date | Homicide | Union and Seventh | ![<img src=]() <img src="http://static.giantbomb.com/uploads/scale_small/17/171291/2469847-bad+date.png"> <img src="http://static.giantbomb.com/uploads/scale_small/17/171291/2469847-bad+date.png"> |
| Camera Obscura | Lewd Conduct | Fountain and Bronson | ![<img src=]() <img src="http://static.giantbomb.com/uploads/scale_small/17/171291/2469848-camera+obscura.png"> <img src="http://static.giantbomb.com/uploads/scale_small/17/171291/2469848-camera+obscura.png"> |
| Commies | Armed Robbery | Hollywood and Highland (Hollywood First National Gun) | ![<img src=]() <img src="http://static.giantbomb.com/uploads/scale_small/17/171291/2469849-commies.png"> <img src="http://static.giantbomb.com/uploads/scale_small/17/171291/2469849-commies.png"> |
| Daylight Robbery | Armed Robbery | Third and Union | ![<img src=]() <img src="http://static.giantbomb.com/uploads/scale_small/17/171291/2469850-daylight+robbery+%282%29.png"> <img src="http://static.giantbomb.com/uploads/scale_small/17/171291/2469850-daylight+robbery+%282%29.png"> |
| Fatal Plunge | Disturbance | Seventh and Central | ![<img src=]() <img src="http://static.giantbomb.com/uploads/scale_small/17/171291/2469851-fatal+plunge.png"> <img src="http://static.giantbomb.com/uploads/scale_small/17/171291/2469851-fatal+plunge.png"> |
| Secret Keepers | Suspicious Activity | 6201 Santa Monica Boulevard (Southern California Auto Club) | ![<img src=]() <img src="http://static.giantbomb.com/uploads/scale_small/17/171291/2469853-secret+keepers.png"> <img src="http://static.giantbomb.com/uploads/scale_small/17/171291/2469853-secret+keepers.png"> |
| The Badger Game | Theft | 3155 West Fourth Street | ![<img src=]() <img src="http://static.giantbomb.com/uploads/scale_small/17/171291/2469854-the+badger+game.png"> <img src="http://static.giantbomb.com/uploads/scale_small/17/171291/2469854-the+badger+game.png"> |
| The Blue Line | Suspicious Activity | 1825 North Highland Avenue | ![<img src=]() <img src="http://static.giantbomb.com/uploads/scale_small/17/171291/2469855-the+blue+line.png"> <img src="http://static.giantbomb.com/uploads/scale_small/17/171291/2469855-the+blue+line.png"> |
| Zoot Suit Riot | Shootout | 539 South Los Angeles Street (The Valor Tobacco Co.) | ![<img src=]() <img src="http://static.giantbomb.com/uploads/scale_small/17/171291/2469856-zoot+suit+riot.png"> <img src="http://static.giantbomb.com/uploads/scale_small/17/171291/2469856-zoot+suit+riot.png"> |
Arson Desk
| Name | Details | Location | Image |
|---|
| Accident Prone | Suspicious Activity | Sixth and Alvarado | ![<img src=]() <img src="http://static.giantbomb.com/uploads/scale_small/17/171291/2469857-accident+prone.png"> <img src="http://static.giantbomb.com/uploads/scale_small/17/171291/2469857-accident+prone.png"> |
| Bus Stop Shooting | Suspicious Activity | Beverly and Union (Intersate Bus Station) | ![<img src=]() <img src="http://static.giantbomb.com/uploads/scale_small/17/171291/2469858-bus+stop+shooting.png"> <img src="http://static.giantbomb.com/uploads/scale_small/17/171291/2469858-bus+stop+shooting.png"> |
| Cafe Holdup | Armed Robbery | 522 South Hill Street | ![<img src=]() <img src="http://static.giantbomb.com/uploads/scale_small/17/171291/2469859-cafe+holdup.png"> <img src="http://static.giantbomb.com/uploads/scale_small/17/171291/2469859-cafe+holdup.png"> |
| Hot Property | Burglary | 38 North Catalina | ![<img src=]() <img src="http://static.giantbomb.com/uploads/scale_small/17/171291/2469860-hot+property.png"> <img src="http://static.giantbomb.com/uploads/scale_small/17/171291/2469860-hot+property.png"> |
| Paper Sack Holdup | Armed Robbery | 253 Main Street | ![<img src=]() <img src="http://static.giantbomb.com/uploads/scale_small/17/171291/2469861-paper+sack+holdup.png"> <img src="http://static.giantbomb.com/uploads/scale_small/17/171291/2469861-paper+sack+holdup.png"> |
Missions
Patrol Desk
- Upon Reflection
- Armed and Dangerous
- Warrants Outstanding
- Buyer Beware
Traffic Desk
- The Driver's Seat
- A Marriage Made in Heaven
- A Slip of the Tongue
- The Fallen Idol
Homicide Desk
- The Red Lipstick Murder
- The Golden Butterfly
- The Silk Stocking Murder
- The White Shoe Slaying
- The Studio Secretary Murder
- The Quarter Moon Murders
Vice Desk
- The Black Caesar
- The Set Up
- Manifest Destiny
Arson Desk
- The Gas Man
- A Walk in Elysian Fields
- House of Sticks
- A Polite Invitation
- A Different Kind of War
Collectibles
Like Grand Theft Auto's hidden packages, L.A. Noire also has collectibles. There are 4 categories of collectibles: gold film canisters, landmarks, newspapers, and police badges, which is a Gamestop pre-order bonus.
Newspapers:
Newspapers are a vital source of information in Los Angeles in the era when L.A. Noire takes place.
Newspapers give the player access to side missions, ambient events, and will report on gameplay events associated with player choices. Newspapers will also give the player a cutscene. There are 13 newspapers to collect in the game.
| Newspaper Title | Case Found In | Location |
|---|
SHRINK SAYS:
"The Mind is the Final Frontier" | Patrol:
Upon Reflection | In the Alleyway crime scene. On top of a crate to the right before the bloody door. |
ALIENIST FONTAINE:
Provides Help to Troubled Vets | Traffic:
The Driver's Seat | In the Black's Residence on the dining table. |
SHRINK TO THE STARS:
Promises Mental Breakthrough | Traffic:
A Marriage Made in Heaven | Inside Ray's Cafe on the bar near Dudley Lynch. |
DOPE FLOODS STREETS:
Cops Chase War Surplus Contraband | Traffic:
The Fallen Idol | In the Silver Screen Prop Store on the workbench near the shrunken heads in the storage alley. |
FAMILY BURNT TO DEATH:
Cops Say House Fire Deaths Are Suspicious | Homicide:
The Red Lipstick Murder | Right in front of the door in the Henry Residence. |
MISSING MORPHINE:
Cops Say: Goons Fighting Dope War | Homicide:
The White Shoe Slaying | On a crate inside Stuart Ackerman's shack at the Hobo Camp. |
MICKEY COHEN:
Heir Apparent to Bugsy Siegel | Vice:
The Black Caesar | Inside Ramez Removal warehouse, across from the desk with the ledger. |
ALIENIST FONTAINE:
Working Selflessly to Help the Infirm | Vice:
The Set Up | Inside the American League Stadium on the training table in the locker room. |
LAPD VICE SCANDAL:
Could Go All the Way to the Top | Vice:
Manifest Destiny | In the alley near Haskell's Finest Men's Wear. Near the first dead gunmen. |
HOUSING DEVELOPMENT BURNS:
Ex Servicemen Irate as GI Houses Razed | Arson:
A Walk in Elysian Fields | On the lawn to the right of the Morelli house fire, near the privacy fence. |
SUBURBAN REDEVELOPMENT:
Fund Promises 10,000 New Homes | Arson:
A Polite Invitation | On Leland Monroe's desk. |
CRUSADE AGAINST CORRUPTION:
Peterson Pledges to Clean Up LAPD | Arson:
A Different Kind of War | On the front counter inside the Rapid Exterminators' store. |
THE FACE OF PROGRESS:
Says Mayor of Developer Leland Monroe | Arson:
A Different Kind of War | On Harlan Fontaine's desk inside Doctor Fontaine's Surgery center. |
Police Badges:
Police badges are exclusives to the Badge Pursuit Challenge, which was pre-order bonus at Gamestop/Game, but has since become DLC as well.
Police Badges are hidden around L.A. Noire's beautiful recreation of 1947 Los Angeles. There are 20 police badges to find and collect. Finding all 20 badges will reward the player with the dapper Button Man suit which provides extra ammo for all weapons. Each badge also provides 5 additional XP, which will help further unlock intuition points.
Landmarks:
Landmarks are special types of locations in L.A. Noire. There are 30 landmarks to discover in the game. Finding landmarks grant players an intuition point per landmark. Finding all 30 landmarks earns the Star Map achievement/trophy.
| Landmark | Location |
|---|
| The Mayfair Hotel | Along 7th St., near Columbia Ave. and Witmer St. |
| The Good Samaritan Hospital | South of 6th St., between Witmer St. and Lucas Ave. |
| Intolerance Set | Corner of 8th and Francisco St. |
| Christ Crown of Thorns | South of 9th St. and west of Francisco St. |
| LA Public Library | Along 5th St., between Flower St. and Grand Ave. |
| Pershing Square | South of 5th St., north of 6th street and between Olive and Hill St. |
| RKO Theatre | Corner of Hill and 8th St. |
| Los Angeles Examiner | Corner of 11th and Broadway |
| Main St Terminal | On 6th and Los Angeles St. |
| The Bradbury Building | Corner of 3rd and Broadway |
| Angels Flight | On 3rd and Hill St. |
| Hall of Records | Along Broadway, east of 2nd St. Approximately one block northeast of the Central Police Station |
| El Pueblo de Los Angeles | Between Main and Los Angeles St. Easily found by it's distinctive circle on the map |
| Union Station | Along Alameda St. Just south of El Pueblo de Los Angeles |
| Chinatown | Far southeast of the map. Along Broadway |
| LA Cold Storage Cold Co. | Between Central and Alameda Ave. South of 3rd St. |
| 4th Street Viaduct | On the 4th St. bridge crossing the Los Angeles River. |
| 6th Street Viaduct | On the Whittlier Blvd. bridge crossing the Los Angeles River. |
| National Biscuit Company | Corner of Industrial and Mateo St. |
| MacArthur Park | On Wilshire Blvd. between Park View and Alvarado St. Easily located by its big, distinctive square |
| Park Plaza | Corner of 6th and Park View St. North of MacArthur Park |
| Westlake Tar Pits | South of San Marino St. |
| LA County Art Museum | On Hoover St., south of 8th St. |
| Bullocks Wilshire | Corner of Wilshire Blvd. and Westmoreland Ave. |
| Brown Derby | South of Hollywood Blvd. and west of Argyle Ave. |
| Crossroads of the World | Along Sunset Blvd. and east of Las Palmas Ave. |
| Musso & Franks | Along Hollywood Blvd. and southeast of Las Palmas Ave. |
| Max Factor Building | Corner of Hollywood Blvd. and Highland Ave. |
| Grauman's Theater | Along Hollywood Blvd., between Orchid and Orange |
| Hotel Roosevelt | Corner of Hollywood Blvd. and Orange Dr. |
Gold Film Canisters:
Gold film canisters are collectible items in L.A. Noire. There are 50 canisters scattered around Los Angeles, all of them with names of films from the 40s and 50s. Finding all of them reward with the Hollywoodland achievement/trophy.
| Movie Name | Description |
|---|
| Notorious | 1946 thriller directed by Alfred Hitchcock starring Cary Grant |
| Double Indemnity | 1944 film noir directed by Billy Wilder starring Fred MacMurray |
| Body and Soul | 1947 film noir starring John Garfield |
| Detour | 1945 film noir starring Tom Neal |
| Scarlet street | 1945 film noir directed by Fritz Lang |
| Gun Crazy | 1950 film noir directed by Joseph H. Lewis |
| House of Bamboo | 1955 film noir that's in color |
| Pickup on South Street | 1953 film noir directed by Samuel Fuller |
| Leave her to Heaven | 1945 film noir starring Gene Tierney |
| Key Largo | 1948 film noir starring Humphrey Bogart |
| The Maltese Falcon | 1941 detective film starring Humphrey Bogart |
| Angels with Dirty Faces | 1938 gangster film starring James Cagney |
| Strangers on a Train | 1951 thriller directed by Alfred Hitchcock |
| The Big Heat | 1953 film noir starring Glenn Ford |
| Touch of Evil | 1958 crime film directed by Orson Welles |
| The Asphalt Jungle | 1950 film noir directed by John Huston |
| Out of the Past | 1947 film noir directed by Jacques Tourneur |
| The Big Carnival | 1951 drama film starring Kirk Douglas |
| Mildred Pierce | 1945 drama film starring Joan Crawford |
| This Gun for Hire | 1942 film noir directed by Frank Tuttle |
| Rififi | 1955 french crime film |
| Sweet Smell of Success | 1957 satirical film noir starring Burt Lancaster |
| Murder, My Sweet | 1944 film noir starring Dick Powell |
| Night and the City | 1950 film noir directed by Gerald Kersh |
| The Big Clock | 1948 film noir directed by John Farrow |
| The Naked City | 1948 film noir on which the DLC is based off. |
| Shadow of a Doubt | 1943 thriller film directed by Alfred Hitchcock |
| The Killing | 1956 film noir directed by Stanley Kubrick |
| The Set-Up | 1949 film noir on which the case of the same name is based off. |
| Laura | 1944 film noir starring Gene Tierney |
| The Lady from Shanghai | 1947 fim noir directed by Orson Welles |
| The Third Man | 1949 british film noir |
| The Killers | 1946 film noir based off a short story by Ernest Hemingway |
| M | 1951 thriller starring David Wayne |
| Crossfire | 1947 film noir starring Robert Young |
| Thieves' Highway | 1949 film noir directed by Jules Dassin |
| White Heat | 1949 film noir directed by James Cagney |
| The Narrow Margin | 1952 film noir starring Charles McGraw |
| Sunset Boulevard | 1950 film noir directed by Billy Wilder |
| The Woman in the Window | 1944 film noir directed by Fritz Lang |
| The Spiral Staircase | 1946 thriller film starring Dorothy McGuire |
| The Night of the Hunter | 1955 thriller film starring Robert Mitchum |
| Odd Man Out | 1947 film noir starring James Mason |
| In a Lonely Place | 1950 film noir starring Humphrey Bogart |
| Where the Sidewalk Ends | 1950 film noir starring Dana Andrews |
| Gilda | 1946 film noir starring Rita Hayworth |
| The Letter | 1940 film noir directed by William Wyler |
| Brute Force | 1947 film noir starring Burt Lancaster |
| Nightmare Alley | 1947 film noir starring Tyrone Power |
| The Big Sleep | 1946 film noir starring Humphrey Bogart |
Weapons
There are a total of nine weapons available to players. Using all nine weapons (excluding pre-order exclusive weapons) while killing bad guys, at least one guy per weapon, rewards with the Roscoe and Friends achievement/trophy.
| Weapon | Description |
|---|
| Colt M19171 | The Colt M19171 is the first weapon used by Phelps as an LAPD patrol officer. Use it on the Patrol case, Armed and Dangerous. In order to use this weapon, the player must drop the shotgun they take before entering the bank. The thugs here seem to also use M1917 revolvers, though with 'snub-nose' barrels instead of the version Cole Phelps uses. | Colt M19171 |
| Star Model P | The Star Model P is the standard pistol Phelps uses as a detective. | Star Model P |
| Ithaca 37 (Shotgun) | The Ithaca 37 is the standard shotgun for LAPD officers. It is always accessed by opening the trunk, although times that players can open the trunk of the patrol car are restricted. Typically the trunk can only be opened during a hostile situation where shots have already been fired. The shotgun is the only weapon in the vehicle trunk unless the player downloads the Chicago Piano, which is free. | Ithaca 37 (Shotgun) |
| M1 Garand | The M1 Garand is a rifle used primarily in the army. It can be found in the street crime, "Death From Above" or in the Arson case, "A Different Kind of War". It is accurate, powerful, and probably the best choice for quick progression through the mission as it regularly kills with a single shot. Should it not, it is easy to follow up with a second shot, though a third shot is rarely, if ever, necessary. It has a clip capacity of eight rounds. | M1 Garand |
| M1A1 Thompson | The M1A1 Thompson is a machine gun used primarily in the army. It is the most common sub-machine gun used by criminals and is also known as the "Tommy Gun". While being known as the "Tommy Gun", the name is more commonly used to refer to the iconic M1 Thompson with a Round Drum, made famous by mafia films. | M1A1 Thompson |
| Colt .45 | The Colt .45 is Jack Kelso's primary pistol. Use it in any case where the player gets to take control of Kelso. | Colt .45 |
| M1 Thompson | The M1 Thompson is basically the M1A1 Thompson with a round drum. It can be found in the Vice case, Manifest Destiny. | M1 Thompson with barrel |
| Browning Automatic Rifle (BAR) | The Browning Automatic Rifle can be found in the Arson case, "A Different Kind of War" and in the street crime "Army Surplus". It can be found during the "Cafe Holdup" street crime, but cannot be used there. In this street crime it is depicted as being incredibly powerful, killing Cole in a second when exposed. This is to stop players simply shooting the target from the ground - in other cases, the gun is not as absurdly powerful. It boasts a 20-round magazine capacity. | Browning Automatic Rifle |
| Flamethrower | The flamethrower can only be found and used in the Arson case, A Different Kind of War. Used by Jack Kelso, should the player choose the weapon. It is often the final weapon players need to use in order to attain the 'Roscoe and Friends' achievement, for killing an enemy with every weapon in the game. Ira Hogeboom also makes use of the M2 Flamethrower, to deadly effect. | Flamethrower |
| Chicago Piano Gun | The Chicago Piano is a pre-order exclusive from HMV and Gamestop's PowerUp Rewards members. Visually, it shares a lot of similarities to the M1 Thompson, though is incorrectly depicted as having a magazine capacity of 100 rounds, despite using a 50-round drum. The Chicago Piano is available on both the PlayStation Store and the Xbox LIVE Marketplace for free, after Rockstar chose to release the weapon. It will be in the trunk of your patrol car, ready to be accessed when needed. It is generally much more useful than the Ithaca 37 due to its longer range of effectiveness. | Chicago Piano Gun |
| Nickel Plated Pistol | The Nickel Plated Pistol is a pre-order exclusive from Best Buy / Zavvi, and visibly appears to be a Colt M1911 or another derivative of it. It becomes Cole's standard weapon when wearing the downloadable suit 'The Broderick'. | Nickel Plated Pistol |
Vehicles
There are 95 vehicles appears in the game. These are the usable vehicles.
| Name | Class | Year | Power | Top Speed |
|---|
| American LaFrance Fire Truck | Service | 1941-1946 | 160 hp | 80 mph |
| Buick 2DR Sedanette | 2 Door | 1947 | 110 hp | 100 mph |
| Buick Ambulance | Service | 1947 | 144 hp | 100 mph |
| Buick Business Coupe | 2 Door | 1936 | 93 hp | 86 mph |
| Buick Coupe | 2 Door | 1941 | 125 hp | 95 mph |
| Buick Custom | 2 Door | 1941 | 125 hp | 110 mph |
| Buick Eight Convertible | 2 Door | 1939 | 141 hp | 105 mph |
| Buick Eight Coupe | 2 Door | 1939 | 141 hp | 105 mph |
| Buick Super | Police | 1947 | 110 hp | 96 mph |
| Cadillac LaSalle Series 50 | 4 Door | 1935 | 150 hp | 95 mph |
| Cadillac Series 61 | 4 Door | 1942 | 150 hp | 95 mph |
| Cadillac Series 61 Touring Coupe | 4 Door | 1947 | 150 hp | 95 mph |
| Cadillac Series 62 Convertible | Police | 1947 | 150 hp | 95 mph |
| Cadillac Series 75 Limousine | 4 Door | 1942 | 150 hp | 90 mph |
| Cadillac Town Car | Bonus | 1936 | 135 hp | 93 mph |
| Cadillac V16 Convertible | Sport | 1934 | 185 hp | 90 mph |
| Chevrolet Civilian Van | Service | 1949 | 60 hp | 80 mph |
| Chevrolet Coroner's Van | Police | 1949 | 85 hp | 90 mph |
| Chevrolet Fleetmaster 2DR | 2 Door | 1947 | 90 hp | 86 mph |
| Chevrolet Fleetmaster 2DR (Police) | Police | 1947 | 90 hp | 96 mph |
| Chevrolet Fleetmaster Convertible | Sport | 1947 | 90 hp | 86 mph |
| Chevrolet Pickup | Service | 1947 | 90 hp | 72 mph |
| Chevrolet Pickup #2 | Service | 1940 | 85 hp | 70 mph |
| Chevrolet Sedan | 4 Door | 1940 | 85 hp | 78 mph |
| Chevrolet Styleline | 2 Door | 1949 | 90 hp | 87 mph |
| Chevrolet Tow Truck | Service | 1947 | 140 hp | 85 mph |
| Chevrolet Van | Service | 1937 | 85 hp | 70 mph |
| Chrysler Airflow | 4 Door | 1934 | 115 hp | 90 mph |
| Chrysler Town and Country | 2 Door | 1946 | 135 hp | 110 mph |
| Chrysler Woody | Bonus | 1946 | | |
| Cisitaalia Coupe | Bonus | 1939 | 69 hp | 109 mph |
| Cord 810 Softtop | Bonus | 1936 | 170 hp | 130 mph |
| Cord Harptop | 2 Door | 1936 | 115 hp | 92 mph |
| Davis Deluxe | Bonus | 1948 | | |
| Delage D8 120 | Bonus | 1937 | | |
| Delage D8-120 S Poutout | Bonus | 1937 | 120 hp | 110 mph |
| Delahaye 135MS Cabriolet | Bonus | 1947 | | |
| DeSoto 2DR Custom | 2 Door | 1946 | 109 hp | 96 mph |
| DeSoto Custom Suburban Taxi | Service | 1946 | 95 hp | 90 mph |
| DeSoto Suburban | 4 Door | 1946 | 109 hp | 92 mph |
| Dodge Fuel Truck | Service | 1939 | 150 hp | 65 mph |
| Duesenberg Walker Coupe | Bonus | 1934 | 265 hp | 140 mph |
| Ford 2DR | 2 Door | 1947 | 90 hp | 90 mph |
| Ford Ambulance | Service | 1948 | 110 hp | 75 mph |
| Ford Business Coupe | 2 Door | 1940 | 60 hp | 80 mph |
| Ford Convertible | 2 Door | 1936 | 85 hp | 80 mph |
| Ford Custom | 2 Door | 1940 | 90 hp | 87 mph |
| Ford Deluxe Convertible | Sport | 1939 | 85 hp | 80 mph |
| Ford H Boy | Bonus | 1932 | 130 hp | 115 mph |
| Ford Police Special | Police | 1947 | 100 hp | 95 mph |
| Ford Tudor Convertible | 2 Door | 1947 | 100 hp | 95 mph |
| Ford V8 Sedan | 2 Door | 1940 | 90 hp | 85 mph |
| Frazer Manhattan | 4 Door | 1947 | 112 hp | 106 mph |
| GMC Pickup | Service | 1947 | 93 hp | 76 mph |
| Heil Colecto-Pak | Service | 1947 | 95 hp | 70 mph |
| Hudson Commodore | Police | 1948 | 129 hp | 91 mph |
| Hudson Super Six | 4 Door | 1947 | 92 hp | 88 mph |
| International D Series | Service | 1939 | 82 hp | 75 mph |
| International D Series Sedan | 4 Door | 1939 | 82 hp | 75 mph |
| International KB5 | Service | 1946 | 100 hp | 82 mph |
| International KB6 | Service | 1946 | 100 hp | 82 mph |
| International KB8 | Service | 1946 | 100 hp | 80 mph |
| International KB8 (Polar Bear Ice Truck) | Service | 1947 | 96 hp | 76 mph |
| International Metro KB1M | Service | 1949 | 84 hp | 70 mph |
| International Police Wagon | Police | 1940 | 110 hp | 75 mph |
| LaSalle V8 Sedan | 2 Door | 1939 | 125 hp | 88 mph |
| Lincoln Continental Convertible | Sport | 1946 | 120 hp | 118 mph |
| Lincoln Continental Coupe | 2 Door | 1942 | 130 hp | 118 mph |
| Lincoln Model K Convertible Roadster | Sport | 1937 | 150 hp | 122 mph |
| Lincoln Zephyr Touring | 4 Door | 1939 | 110 hp | 95 mph |
| Mercury Custom | Sport | 1941 | 110 hp | 105 mph |
| Nash Deluxe 600 Army | Service | 1942 | 99 hp | 90 mph |
| Nash La Fayette Convertible | Sport | 1939 | 115 hp | 95 mph |
| Nash Super 600 | 2 Door | 1948 | 112 hp | 104 mph |
| Nash Super 600 (Police) | Police | 1942 | 112 hp | 98 mph |
| Oldsmobile Hydramatic 88 | 4 Door | 1948 | 110 hp | 100 mph |
| Oldsmobile S98 | Sport | 1947 | 110 hp | 100 mph |
| Oldsmobile Sedan | 4 Door | 1940 | 110 hp | 92 mph |
| Packard Clipper Eight | 2 Door | 1946 | 165 hp | 120 mph |
| Packard Clipper Eight (4 Door) | 4 Door | 1947 | 130 hp | 102 mph |
| Packard Clipper Six | 2 Door | 1948 | 130 hp | 104 mph |
| Packard Custom | 2 Door | 1940 | 140 hp | 132 mph |
| Phantom Corsair | Bonus | 1938 | | |
| Pontiac Sedan Six | 4 Door | 1937 | 105 hp | 92 mph |
| Pontiac Torpedo Six | 2 Door | 1941 | 90 hp | 84 mph |
| Plymouth P5 | 4 Door | 1937 | 95 hp | 85 mph |
| Plymouth Sedan | 4 Door | 1939 | 82 hp | 76 mph |
| Plymouth Special Deluxe Six | 4 Door | 1947 | 95 hp | 89 mph |
| Stout Scarab | Bonus | 1936 | 85 hp | 75 mph |
| Studebaker Commander | 2 Door | 1947 | 94 hp | 86 mph |
| Studebaker Commander (Police) | Police | 1947 | 94 hp | 90 mph |
| Talbot GS26 | Bonus | 1948 | 190 hp | 125 mph |
| Tucker Torpedo | Bonus | 1948 | 166 hp | 120 mph |
| Voisin C7 | Bonus | 1938 | 93 hp | 89 mph |
| Willys Overland | 4 Door | 1939 | 61 hp | 55 mph |
Other
These are non-usable vehicle
- Cessna 195 Airplane
- International Harvester TD-9 Crawler Tractor Bulldozer
- Pacific Electric Baldwin V-1000 Locomotive
- Pacific Electric Railway Streetcar
- Union Pacific EMD F3 Locomotive
- White Model 798 Bus
Outfits
Standard
| Beat Cop Uniform | Golden Boy | Sword of Justice | Sunset Strip | The Outsider | Hawkshaw |
|---|
![<img src=]() <img src="http://static.giantbomb.com/uploads/scale_small/17/171291/2466701-standard1.png"> <img src="http://static.giantbomb.com/uploads/scale_small/17/171291/2466701-standard1.png"> | ![<img src=]() <img src="http://static.giantbomb.com/uploads/scale_small/17/171291/2466702-standard2.png"> <img src="http://static.giantbomb.com/uploads/scale_small/17/171291/2466702-standard2.png"> | ![<img src=]() <img src="http://static.giantbomb.com/uploads/scale_small/17/171291/2466703-standard3.png"> <img src="http://static.giantbomb.com/uploads/scale_small/17/171291/2466703-standard3.png"> | ![<img src=]() <img src="http://static.giantbomb.com/uploads/scale_small/17/171291/2466704-standard4.png"> <img src="http://static.giantbomb.com/uploads/scale_small/17/171291/2466704-standard4.png"> | ![<img src=]() <img src="http://static.giantbomb.com/uploads/scale_small/17/171291/2466705-standard5.png"> <img src="http://static.giantbomb.com/uploads/scale_small/17/171291/2466705-standard5.png"> | ![<img src=]() <img src="http://static.giantbomb.com/uploads/scale_small/17/171291/2466706-standard6.png"> <img src="http://static.giantbomb.com/uploads/scale_small/17/171291/2466706-standard6.png"> |
Bonus
There are 4 bonus outfits that are unlocked when purchased pre-order bonuses or downloadable content.
- The Sharpshooter
- The Broderick
- Button Man
- Chicago Lightning
Downloadable Content
L.A. Noire has a variety of DLC for purchase, from new cases, to alternate weapons & outfits.
Released May 31, 2011
- The Naked City (Vice case)
- Slip of The Tongue (Traffic case)
- Broderick Detective Suit
- Sharpshooter Detective Suit & Gun
- Chicago Piano Machine Gun
- The Badge Pursuit Challenge
Released June 21, 2011
- Nicholson Electroplating Disaster (Arson case)
Released July 12, 2011
- Reefer Madness (Vice case)
"L.A. Noire Rockstar Pass"
Rockstar is offering the "L.A. Noire Rockstar Pass," which allows players to buy all the DLC at once for a discounted price. If players purchased the pass by June 21st, the price was $10. After that, the Pass went up to $12, which is still less expensive than buying all the DLC individually.
Pre-Order Bonuses
Certain major retailers offered different preorder bonuses. All of these items later became available to purchase as DLC:
| Retailers | Pre-Order Bonuses |
|---|
| Walmart (US)/Play.com (UK) | - The Traffic desk case "A Slip of the Tongue"
- Downloadable Soundtrack
| A Slip Of The Tongue Case |
| Amazon | The Broderick suit, which boosts your resistance to damage and the damage you cause during fist fights. | The Broderick Detective Suit |
| GameStop/EB Games/Game (UK) | - The Vice case "The Naked City"
- The "Badge Pursuit Challenge": the player must find 20 police badges around town. Each badge awards XP, finding all badges unlocks the "Button Man" suit, which provides extra ammo for weapons.
| The Naked City Case |
| Best Buy/Zavvi (UK) | Pre-ordering from Zavvi or Best Buy results in receiving the Sharpshooter Detective Suit. The pack also includes the nickel-plated pistol, which will temporarily replace Cole's pistol until you select a different suit. | The Sharpshooter Detective Suit |
| Rockstar Warehouse | L.A. Noire T-Shirt | L.A. Noire t-shirt |
Development
Announcement and Release
L.A. Noire was officially announced on September 25, 2006 by a short teaser trailer and an announcement that Rockstar would be teaming up with Team Bondi to release it. The game was originally announced as a PS3 exclusive and a second trailer for the game was released on October 5, 2006.
Early Teaser ImageThe game then disappeared, its continuing existence only attested to in shareholder announcements by Take-Two, who continued to state that the game was still in development despite the fact that barely anything about the game had been revealed in nearly 4 years. The silence was finally broken by the March 2010 issue of Game Informer, which revealed that the game still existed and that it would be coming to both Xbox 360 and PS3 in late 2010. The game was then subsequently delayed and on November 11, 2010, a new trailer revealed cinematics, but no actual gameplay. A second trailer revealed that the game would be released on May 17, 2011 in the United States, while Rockstar Games' official website, announced Europe's release date to be May 20, 2011.
Attention to Detail
Team Bondi set out to develop a fully realized 1940s Los Angeles. Team Bondi used over 140 000 photos from the era to recreate certain streets and most of the important landmarks from the Chinese Theater to the Hollywoodland sign. The clothes are all era specific as well as the slang used by certain characters. In order to correctly model the clothes, clothing from the sets of King Kong and Saving Private Ryan were loaned to Team Bondi. Furthermore, the radio that plays during the game features songs from the era as well as ads that were played in the 40s. Furthermore, the cars in the game are all from the era and were modelled in game thanks to Jay Leno, who let Team Bondi into his private car collection.
The cases that Cole solves throughout the game are all based on real cases that happened during the 1940s and 50s around Los Angeles. The game even provides resolutions to previously unsolved cases such as the Dahlia murders.
Motion Scan
Motion ScanTeam Bondi began to conduct research on motion scan technology 5 years before the game's release (which may explain why L.A. Noire was constantly delayed). The technology is said to let players see animations that traditional animation is unable to render. Motion scan focuses on rendering an extremely realistic face where cheekbones move as a character speak and eyes focus on points in the environment. Scenes were shot in two parts: first with motion capture, in order to render the body movements, and then with motion scan to render the dialogues (which was handled by sister company Depth Analysis). Shooting of the motion scan scenes was done in the "depth analysis room" where actors would wear make up in order to look like their 1940s character and recite their lines in front of cameras that were filming the front, the back and the top of their heads.
L.A. Noire uses motion scan during the game's lengthy interrogation sequences where players must determine if a suspect is lying or not.
The interrogation scenes as well as the detective scenes were handled by Team Bondi while Rockstar developed the shooting sequences.
Working Conditions at Team Bondi
In June 2011, several employees began speaking out about the allegedly horrible working conditions at Team Bondi, largely due to Brendan McNamara's poor management skills. According to the employees, they were forced to work overtime with no additional pay, and they were lied to about release dates in order to keep them working overtime. In addition, one source described McNamara as "the angriest person" he's ever met.
Furthermore, one source explained that management made excuses for creating new positions for the purpose of hiring new employees for less money. On paper the new positions were of less importance, but in reality they were essentially identical to the ones they supposedly fell under. The result was new hires doing the same job as those in higher positions but for less pay.
One source even offered an explanation as to why some critics described the game environment as "boring". According to this source, only one animator worked on gameplay during large parts of production, and Team Bondi literally had no one in their Lead Animator position from January 2008 all the way through until the final release date.
Music
The L.A. Noire soundtrack is full of 40's jazz and blues music. The official soundtrack was released on May 17, 2011.
Recorded at Abbey Road by composer Andrew Hale, the soundtrack includes "modern takes on the classic torch songs of the period," as said by Rockstar's announcement of the soundtrack. Throughout the game itself, music helps notify players that clues are around; as they explore, players will hear more than 32 classic jazz tracks from musicians such as Billie Holiday, Dizzy Gillespie, Ella Fitzgerald, Louis Armstrong, and Thelonious Monk.
| Track No. | Title | Artist | Length |
|---|
| 1. | "Main Theme" | Andrew Hale | 3:06 |
| 2. | "New Beginning, Pt. 1" | Andrew Hale & Simon Hale | 1:06 |
| 3. | "New Beginning, Pt. 2" | Andrew Hale & Simon Hale | 1:25 |
| 4. | "New Beginning, Pt. 3" | Andrew Hale & Simon Hale | 3:18 |
| 5. | "Minor 9th" | Andrew Hale | 2:50 |
| 6. | "Pride of the Job, Pt. 1" | Andrew Hale & Simon Hale | 2:38 |
| 7. | "Pride of the Job, Pt. 2" | Andrew Hale & Simon Hale | 2:32 |
| 8. | "Noire Clarinet" | Andrew Hale | 2:33 |
| 9. | "Temptation, Pt. 1" | Andrew Hale & Simon Hale | 1:14 |
| 10. | "Temptation, Pt. 2" | Andrew Hale & Simon Hale | 2:12 |
| 11. | "Temptation, Pt. 3" | Andrew Hale & Simon Hale | 0:52 |
| 12. | "J.J." | Andrew Hale & Fly | 1:30 |
| 13. | "Redemption, Pt. 1" | Andrew Hale & Simon Hale | 1:07 |
| 14. | "Redemption, Pt. 2" | Andrew Hale & Simon Hale | 2:28 |
| 15. | "Redemption, Pt. 3" | Andrew Hale & Simon Hale | 1:21 |
| 16. | "Slow Brood" | Andrew Hale & Simon Hale | 2:20 |
| 17. | "Use and Abuse, Pt. 1" | Andrew Hale & Simon Hale | 1:26 |
| 18. | "Use and Abuse, Pt. 2" | Andrew Hale & Simon Hale | 0:49 |
| 19. | "Use and Abuse, Pt. 3" | Andrew Hale & Simon Hale | 0:38 |
| 20. | "Use and Abuse, Pt. 4" | Andrew Hale & Simon Hale | 1:21 |
| 21. | "Fall from Grace, Pt. 1" | Andrew Hale & Simon Hale | 1:44 |
| 22. | "Fall from Grace, Pt. 2" | Andrew Hale & Simon Hale | 1:13 |
| 23. | "Murder Brood, Pt. 1" | Andrew Hale & Simon Hale | 2:34 |
| 24. | "Murder Brood, Pt. 2" | Andrew Hale & Simon Hale | 2:18 |
| 25. | "Main Theme (Redux)" | Andrew Hale | 1:25 |
| 26. | "(I Always Kill) The Things I Love" | Claudia Brücken & The Real Tuesday Weld | 2:55 |
| 27. | "Guilty" | Claudia Brücken & The Real Tuesday Weld | 2:14 |
| 28. | "Torched Song" | Claudia Brücken & The Real Tuesday Weld | 4:12 |
| Total length: | 55:21 |
L.A. Noire: Remixed
L.A. Noire: Remixed is a remixed EP of six jazz standards reinterpreted by modern DJs, producers and remixers.
| Track No. | Title | Artist | Length |
|---|
| 1. | "Stone Cold Dead in the Market (Ticklah Remix)" | Ella Fitzgerald & Louis Jordan | 4:16 |
| 2. | "Hey-Ba-Ba-Re-Bop (Midnight Sun Remix)" | Lionel Hampton & his orchestra | 5:56 |
| 3. | "A Slick Chick (On the Mellow Side) (Maximum Balloon Remix)" | Dinah Washington | 2:57 |
| 4. | "Ain't Nobody Here But Us Chickens (DJ Premier Remix)" | Louis Jordan | 2:36 |
| 5. | "Sing Sing Sing (Truth & Soul Remix)" | Gene Krupa | 4:19 |
| 6. | "That Ol' Devil Called Love (Moodymann Remix)" | Billie Holiday | 4:15 |
PC Version
L.A. Noire's PC version, titled L.A. Noire The Complete Edition, was released on November 8th and contains all the DLC released for the console version up to that point. The Complete Edition was also released for PlayStation 3 and Xbox 360.
System Requirements
- OS: Windows 7 / Windows Vista Service Pack 1 / Windows XP Service Pack 3
- Intel CPUs: Core 2.2 GHz to Quad Core 3.2GHz
- AMD CPUs: Dual Core 2.4Ghz to Quad Core 3.2Ghz
- RAM: 2GB to 8GB
- Hard Disk Space: 16GB
- Video Card: NVIDIA GeForce 8600 GT 512MB to NVIDIA GeForce GTX 580 1536MB or Radeon HD3000 512MB to Radeon HD 6850 1024MB
- Sound: 100% DirectX 9 Compatible
Addition Requirements
- Initial activation requires internet connection and Rockstar Social Club (13+ to register); software installation required including GameShield IronWrap & Patcher; DirectX, and Microsoft's Windows .NET Framework, and Microsoft Visual C++ 2008 SP1 Redistributable Package (x86).
2017 Versions
In September 2017, Rockstar Games announced new versions of L.A. Noire would be coming to current consoles and the HTC Vive VR headset. All versions are being handled by Virtuos Ltd.
A Nintendo Switch version features contextual touch-screen controls for portable mode, a JoyCon mode with gyro-based gesture controls, HD-rumble support, and new wide and over-the-shoulder camera angles.
A remastered PS4 and Xbox One version featuring 4k support on PS4 Pro and Xbox One X contains new high resolution textures, new lighting and clouds, new cinematic camera angles and more.
On PC, L.A. Noire: The VR Case Files will let HTC Vive owners experience seven of the original game's cases rebuilt to specifically take advantage of the VR headset.
Log in to comment