Introduction
Welcome to the Shadow Complex guide to Master Challenges, Speed Runs, Achievements, and Other Secrets.
This guide is intended to uncover all of the details on how to fully master Shadow Complex inside and out. It will cover everything you need to know about getting the full 200 gamer points, completing the Master Challenges, and making your way toward the top of the leaderboards.
This guide is the winner of the weekly Golden Guide award given by the Giant Bomb Community Spotlight.
Giant Bomb staff approved! Brad says:
"Wow, fantastic use of the guides feature. Nice job with the images and videos and so on. I'll definitely use this when I finish my
100% run."
Recent Edits
- Restructured guide to allow for future expansion
- Added Maps, Leveling Up, Golden Weapons, and Achievements sections
General Tips, Tricks, and Info
Consider this section your primer on surviving the dimly lit corridor's of the Restoration's underground lair. Maps of the complex, stats, and leveling up are just few of the basic topics covered here.
Shadow Complex Maps
A good map is one of the most invaluable tools you can have at your disposal for learning all the secrets of every nook and cranny of Shadow Complex. Luckily there are several very good ones available online right now.
Links:
- Joystiq's great map shows you where every last upgrade pack and item is located.
- IGN has maps and screenshots of the location of every upgrade pack.
- Giant Bomb's own Vinny also has a small guide to show you where the three most difficult to find upgrades are located.
- Someone over on GameFAQs has also put together a pretty good map showing where all of the items are located.
Leveling Up
By defeating enemies and exploring the Restoration's underground facility, you'll gain experience and level up. Each time you level up, one of your core stats will increase by one. The core stats are as follows:
- Stamina - Along with the armor upgrades, this stat increase your damage resistance.
- Accuracy - Increasing this stat will decrease the amount of spread firing your gun.
- Precision - This stat increases the chance of getting headshots and will slightly improve your auto-aim.
At every tenth level, up to level 50, you will receive a special bonus:
- Level 10 - Permanent +100 Health Boost
- Level 20 - Complete Map Revealed
- Level 30 - Infinite Foam Ammo
- Level 40 - Infinite Grenade Ammo
- Level 50 - Infinite Missile Ammo
Since your level carries over into new games, these bonuses along with the stat increases can greatly improve your efficiency in moving through the compound on subsequent plays, and they are essential for completing the Master Challenges and achieving good times on speed runs.
Aside from the level bonuses, you can get infinite ammo for the remainder of a particular play through of the game by getting all of the upgrades for that particular weapon. Unlike the level bonuses, this does not carry over when you start a new game.
It is possible to continue leveling up beyond level 50. Your core stats will continue to increase, but you will not receive any additional bonus upgrades.
Golden Weapons
One of the many collectible items hidden throughout the game are 12 gold bars. Upon collecting all of them, a secret room will open up and be marked on your map. The room is adjacent to the room where you receive the pistol at the start of the game, and it contains a gilded version of every weapon in the game. These weapons differ only in color and grant no additional bonuses. Also, it is not possible to pick up one of the standard weapons while carrying a golden gun. Thus, if you initiate the cut scene where Jason would normally pick up a new weapon, Jason will still be carrying the golden weapon after the cut scene.
On subsequent new games, the golden gun room will be open right from the start allowing you to immediately get the best weapon in the game, the Inertial Element.
Gamer Pictures
There are two unlockable gamer pictures in Shadow Complex which you get for:
- Beating the first Spider-Tank boss
- Getting the helmet and completing the Omega Armor
Achievements
Master Challenge: Insurgent Run (The Ultimate Speed Run)
This section is the reason this guide exists. It's purpose is to get you all the way through the Insurgent Run in the Master Challenges of Shadow Complex. In addition, this will also fulfill the requirements for the Minimalist achievement, and is also the fastest known way to finish the game. So, if you're going for a straight speed run, this is the way to do it. It's quite possible that the other two Master Challenges can use the same sequence breaking described here. While it's not yet known, we hope to update this guide to fulfill all your Master Challenge needs.
By following this guide you should be able to complete a very fast play through of the game with only 3% of the items collected.
This will not help you with a normal play through of the game. You are doing some serious sequence breaking and will be doing things way out of the order that they were originally intended to be completed. There may be SPOILERS in here so read at your own risk. You shouldn't even bother reading this if you haven't already beaten the game at least once anyway.
The Map and The Game Plan
Here's a basic map and a run down of what you're going to be doing. By way of one little secret sequence breaking passageway, you're going to skip essentially well over half of the game while also collecting only 3% of the items. Every speed run from this point forward is sure to be some variant of what is described in this guide. This is also the only known way to complete the Insurgent Run Master Challenge and is probably the fastest and easiest way to complete the Minimalist achievement.
This map shows the basic route that you'll be taking through the complex:
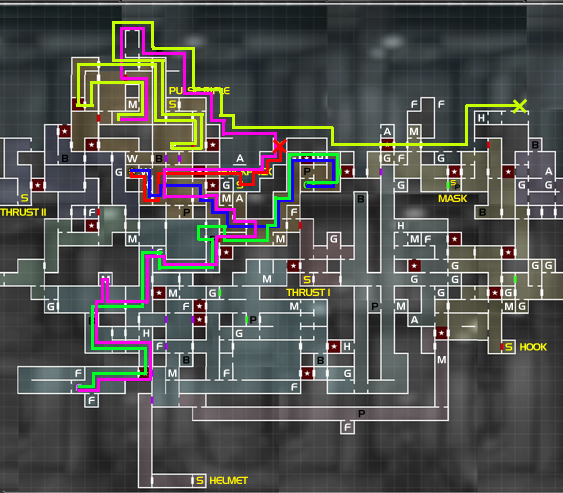
The RED X marks where you'll start the game. From there you'll pick up the backpack and follow the RED line to the golden gun room (bypassing the pistol). Then you'll follow the BLUE line to the grenade pick up and the encounter with the spider-bot. The GREEN line then leads you through the secret and magical passage that makes this insurgent run possible and onto the foam gun. This is the same place where you would typically pick up the foam gun in a typical play through of the game, but you're just getting there much earlier. The PINK line goes from there through the missile pack you'll need to pick up, back up through the complex to where you started the game, and then onward over the mountain and to the point where you'll lower the bridge. The YELLOW line then leads through the explosion escape sequence and then on to the encounter with the final boss at the YELLOW X.
Part Zero: Before You Start
Prior to beginning your insurgent run you'll need a few things:
- Level 30+ - Infinite foam is a must for getting around without the double/triple jump or hookshot. Also, the additional health boost will be invaluable. The level 40 and 50 bonuses, while not required, certainly won't hurt your chances of making a good run. It's also rumored that you need to be at least level 30 to even open the secret door that's the key to this run.
- Golden Weapons - Obtained by collecting all the gold bars in any previous play through. You'll be able to pick up the gold version of the best gun right at the start and bypass the pistol and the associated cut-scene.
- Patience, Skill, and a Little Luck - You're not going to get through this flawlessly on your first attempt. This stuff is seriously tricky.
Part One: The Sequence Break
Start a New Game. It is highly recommend that you only use this method on Casual. It is far more difficult (i.e. nearly impossible) on some of the higher difficulties because of how quickly you'll lose health during the heat exposure in the secret sequence breaking passageway and in the explosion escape sequence.
As soon as you begin the game hit pause immediately and select skip cut-scene. You will want to do this for all except possibly one cut-scene which will be pointed out later in the guide.
Just roll through the little intro sequence as quick as you can. Don't forget that you do have missiles available, and they are probably the fastest way to take down the chopper.
IMPORTANT!!: Before we go any further remember one thing. The only items you will have at the end of this run are: The Flashlight (which you start with), The Backpack, One Golden Gun, The First Grenade Pack, The Foam Gun, and a Single Missile Pack. DO NOT PICK UP ANYTHING ELSE. Specifically DO NOT PICK UP THE PISTOL.
From the start you'll basically play like normal. Go down into the cave and collect the backpack then jump over the gap and fall into the hole. Skip the cut scene and then proceed through the door into the "poorly lit facilities". When you get to the map screen, skip that cut scene. Make sure that you sprint and the camera doesn't spot you as that will lock the door temporarily and slow you down. Continue through the door and the ventilation corridors until you get to the room where you would normally pick up the pistol. DO NOT PICK UP THE PISTOL. Instead head to the left and pick up one of the golden guns. While you can choose to take any of them that you like, it will be very helpful to pick up the Inertial Element (the last gun you would collect in a normal play through).

Once you pick up your golden gun. Drop back into the ventilation shaft and shoot your way through the vent on the right. Slide down the ladder and then shoot through the vent on the right this will take you up above the room where you would normally encounter your first enemies. Don't drop into the room. Just flip from the left side of the opening where you would drop in over to the right side and continue on through the complex. Shoot through the vent drop down and go right into the elevator room. Take the elevator down to the bottom, swim across the pond (jumping up and down out of the water seems to be faster than swimming). Once across the pond head up to the save room. DO NOT PICK UP THE HEALTH CANISTER (NOTE: you can pick up the canister, still be at or below 4% of the items, and still get the achievement, but if you want to only pick up essential items you should skip it).
Take out all of the enemies and drop down to the bottom and go collect your grenades. Now comes the first boss. There is some dispute over this, but some believe that it may be necessary to defeat the boss without taking damage in order to proceed. After you beat it back track to the lake you swam in to get here and take a dive going left. You'll find a small cave with pipes that you can swim through and jump up and out of the water on the other side. There is a missile door here that would normally stop you from going any further, but instead what you should find if you did everything correctly prior to this point is a giant hole in the floor that will allow you to go around the missile door and essentially skip well over half of the game. What triggers the floor to open and/or to stay open is currently a topic of much debate. Here are some things to look out for if you're having problems getting it to open. Try each one and a combination of them until it works out.
- Take less that a minute to run from the battle to the secret door.
- Take less than 30 seconds from the door with the barrels to the secret door.
- Don't touch the green grenade door on the right side above the spider tank (standing on the ledge is just fine).
Once you're in the secret passage don't mess around too long. The heat will immediately start draining your health as soon as you drop into the room. This is a large part of the reason why you will want to be playing the game on Casual. On Hardcore, I was only occasionally able to escape this part with single digit health. On Casual difficulty, you should do much better. Kneel down and hang off the left side of the platform you dropped down onto. When the wall pops up jump over and cling onto it. Pull yourself up and then when the walls start to retract jump up the wall to the left and then get on the ladder and head up. You will need to be careful during these jumps to not touch the floor as that will be instant death. If you do happen to die (which is actually quite likely because this is a fairly difficult jumping maneuver you're attempting here), you'll respawn back in the save room above the grenade pickup. You will suffer a time penalty, but the secret door should still be open and you can make another attempt at making it through the passage without having to restart from the beginning.
The following video is the one originally posted on YouTube that revealed to the the world the secret of how to complete the Insurgent Run. It will take you through everything covered in this section of the guide. The big secret of the Shadow Complex in moving pictures:
With that done, it's time to say congratulations!! You just solved the big sequence breaking mystery! On to the easy part.
Part Two: Foam It Up!
From the sequence break segment, proceed into the adjoining 4x4 room. Underneath you (as you come out from the top) is a platform with a guard and a door leading back to the right. You want to go through that door so go ahead and aim straight down and shoot the guard through the floor and then shoot off a few rounds to the left for good measure to take out those guards. Crouch and walk over the edge, climb down the ladder, grab on to the ledge, and then go through the door. That's the hardest part in this section. If you fall down or die right there, you'll have to reload and redo everything since the save room you passed through after getting the grenades.
At this point I would recommend going into the save room through the door on the right side of this vertical hallway. Unless you're trying to shave off every possible second for a speed run, it can't hurt to take this little safety precaution just in case you have a little accident.
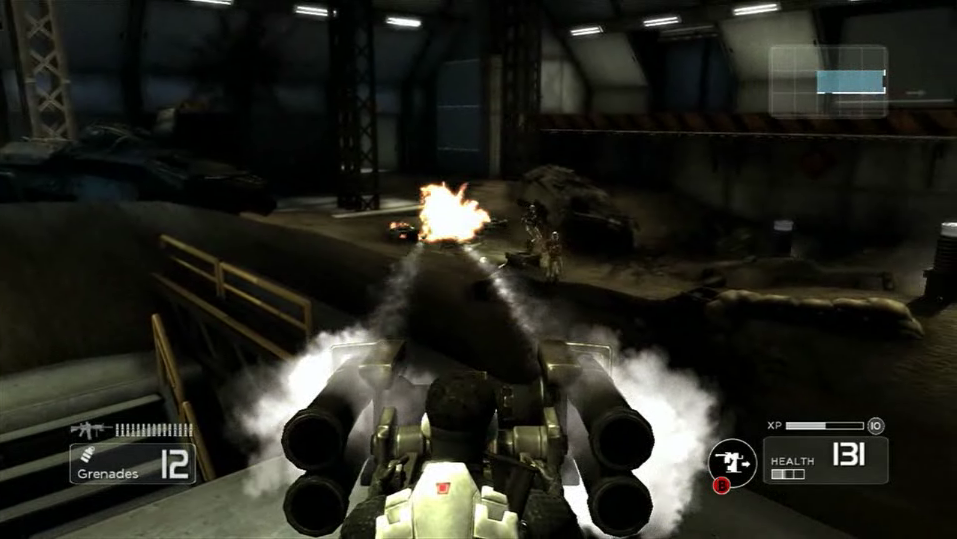
From here you'll proceed to where the regular foam pick up is. Go through the door at the bottom of that shaft. Go all the way through the pitch black room. When you get to the door at the end, don't kill the little foam spewing robot. Trick him into shooting the foam door and opening it for you. Just hang on the top edge of the door and then drop down just as the little robot shoots his goo. After that head to the room with the turret sequence. Apparently it's possible to sneak past the guard and skip having to do the turret sequence, but I couldn't pull that off. Anyway, drop through the hole in the floor under the turret and head to the room where you typically pick up the foam gun and grab it.
Part Three: Missiles!!!
Remember the way you came? Go that way. Use the foam to make yourself bridges and stairways to compensate for the lack of a double jump.
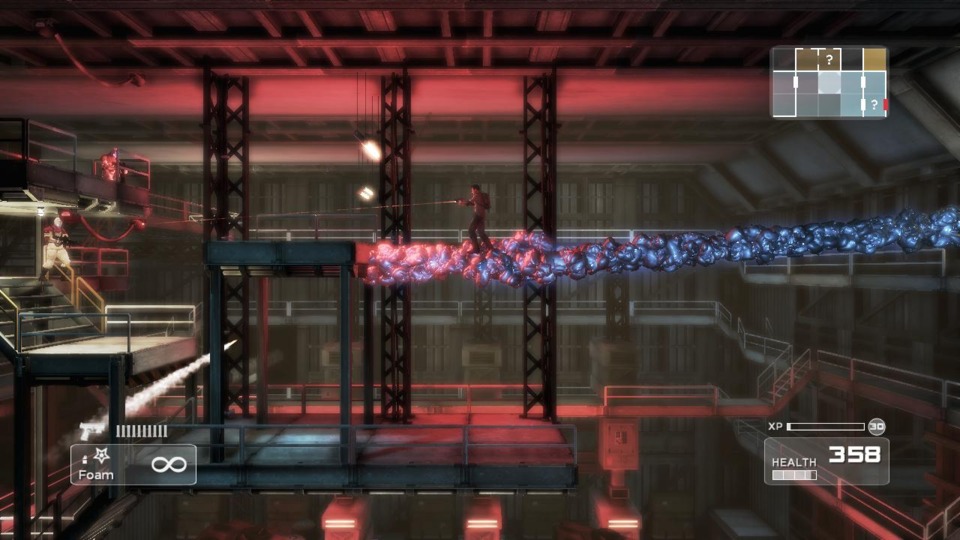
When you get to the rocket turret room, there is a missile expansion through a little fan tube in the ceiling that you need to use your newly acquired foam to get. This is a pretty difficult thing to do, but you've got to use the foam to push yourself up there and get the expansion. There are probably several different ways to do this, but the technique I used was to first shoot all of the boxes in the background so that Jason won't try targeting them while you build your foam tower. Then starting directly below the fan tube, there's a little dip in the ground in just about the right spot, proceed to build yourself a foam tower and push yourself up to the missiles. Shoot straight down at your feet a few times jump up to make sure you're on top of the stack and then repeat. The issue here is that once you get up into the tube in the ceiling there is a force from the fan pushing you down. What I did was just sort of make my way up one foam shot at a time. Shoot down once then make sure you're on top of that bit of foam before you aim down and shoot another time. I made the mistake a couple of times of getting myself stuck in foam which can be very frustrating because it will lead you to have to rebuild the tower all over again.
Once you get this expansion it's time to start heading toward the end of the game! You're halfway done. Congrats!
Part Four: The Final Approach
From getting the missiles continue to retrace your steps back to the place where you magically skipped half the game. You'll notice that secret passageway you went through to get there is now closed off, but luckily you now have the missiles to get you through the door. Beyond there, continue back to the point where you started the game. Proceed to climb the hill on your left using the foam to get up and over it. Once up there, drop down into the hole where the bridge is and go through the door on the right. Go down into the bottom room and lower the bridge. Then run by the two spider tanks and head back up. Use the foam to get across to the door on the left under the bridge. I actually found it was easier to drop down to the bottom and go up rather than to make a bridge across, but do whatever you personally find quicker and easier. Make your way back to the surface, cross the bridge, and take the elevator down. Initiate the explosion escape sequence and make your way back out. This is quite possibly the hardest part of the whole run. With only 200 health, even on Casual, it's hard to make it out a alive but here are some tips to help you pull through.
- Don't Skip the Cut Scene - When you skip the cut scene you seem to get sort of stuck for a second and take a big chunk of damage right away. By not skipping, it could save you a few seconds and precious health.
- Practice - You can't miss a jump or anything. Run to the right, up the ladders, and then wall jump all the way out of the elevator shaft. You can't hesitate for a moment at any time during your escape.
- Get a Health Pack if Needed - Remember that health pack that you skipped near the grenades and that first spider-tank...maybe you should have picked that up. Finishing the run without it will put you at 3% items collected when you are actually allowed to go up to 4%. Many people get the first obtainable health pack. If you're having trouble at 200 health, go back and get it. With 300 health this sequence should be easy as pie.
- Try, Try, Try Again - No one did this one their first time, neither will you. Just keep trying and you'll eventually get it. Don't give up hope.
After the self destruct sequence, it's time to make your way to the final battle.
Part Five: You're Already at the Final Boss
Now that you're past the most difficult part of this whole run, it's time to finish up. Just go back over the tower and start going right. Use foam to cross any gaps you can't jump across. Also, just so you know how much you've really broken the game's sequencing, you'll get the opportunity to see the cut-scene where Claire is taken away in the chopper which you should have seen at the beginning of the game. Moments later you'll be at the final boss fight. The final boss can be a little tricky because of how little health you have and due to the lack of the double/triple jump. Be sure to grab some health from one of the many places it's located in this area if you start to get low. Also, you'll probably have to use the foam to get up to one or two of the missile launchers. This can be a little difficult because Jason might target guys in the background. If that's the case you should be able to just easily kill whatever it is he's aiming at. The infinite rockers help here or a full clip or so from your shotgun (The Inertial Element) is enough to take down even the choppers and spider-tanks. The easiest way I found to get to the middle and right missile launcher is just to take the ladder up into the cabin and then jump to the platform with the missile launcher from up there.
Then, that's pretty much it. Achievement Unlocked!! You just proved yourself to be an insurgent. Enjoy the last cut scene with your sexy, totally not Nathan Drake, half-tucked shirt. Jack Bauer should be on his way to tie you down and torture you for information on your terrorist associates. Be aware that I have assassins in position to kill your family at a moments notice if I hear that you give away any information on me or any of your fellow Giant Bomb comrades.
Congratulations!!
Part Six: Closing Comments
I hope this guide helps, it's really not that hard once you know the one or two little tricks to breaking the game's sequencing (even if they were intentionally put there by the developer).
To answer some inevitable questions...
- No, you don't get anything for doing this, just self satifacton.
- Yes, you can PM the authors of this guide with questions you have and suggestions to make the guide better/clearer. In fact, not only can you do it, but it's also strongly encouraged.
- Yes, you can feel pissed off about Chair putting this in the game. I feel that this is a pity attempt to be too much like Super Metroid when it's fine on its own. Sequence breaking should not be something that a developer intentionally puts in place, but instead it should be a glitch/exploit that users find, maybe even years after the game's release.
Thanks for reading. Stay classy Giant Bomb!
Master Challenge: Status Update: Single (The Secret Ending)
While we're talking about sequence breaking, we might as well bring up the secret joke ending that will end the game before it ever really gets off the ground. Getting this ending will complete the "Status Update: Single" Master Challenge.
It's pretty easy to get. Just play through the game normally until you get to the scene where Claire is taken away on the chopper. After that, instead of proceeding on to the right go back to the left. Run across the bridge, through the save room, and then jump at the last second right before falling into the pit. If you hit the jump correctly, you'll just barely manage to grab a small platform on the other side of the chasm. The jump takes fairly precise timing so if you miss it just make your way back up or just simply press start and reload your last save in the save room up above and try again.
Once you're across the gap just fight your way to the left back to the point where the game began. You don't have much health so be careful of the enemies, especially the missile launching guy that you come face to face with right after that initial gap jumping. Also, be careful not to fall into any other pits along the way or you'll have to go back and do it all over again.
Anyway, once you get back to where you started the game, you'll see the jeep you arrive in sitting in the background. Just stand in front of it and press B to trigger the joke ending. The game won't prompt you to press B. You just have to sort of position yourself in front of the jeep and then press the B button.
Here's a video for anyone that doesn't quite feel like investing the time:


Log in to comment