Overview
All Day Dying is an arcade-style score-attack FPS based around completing objectives in individual maps.
Borrowing very heavily from the career mode in Tony Hawk's Pro Skater, the game is made up of a series of levels that each contain six objectives and a 1-2 minute timer to kill every enemy and complete as many of those objectives as possible. Much like THPS, these objectives don't need to be completed in a single run, and in fact often conflict with each other, requiring the player to replay the level to achieve them all while also building up the familiarity needed to get a high score.
Three of every level's objectives are score-based, owing to the score attack nature of the game. Points are gained by killing enemies in skillful and stylish ways, and there is a combo meter that grows with every kill in quick succession that adds a multiplier to each kill's score. The movement system is similar to the momentum-oriented Titanfall - the player is capable of sliding on the ground and double jumping, which can be combined together to build up speed and perform "long jumps" to cross gaps quickly. These moves also contribute to the "tricks" that give extra points for kills, such as killing an enemy while sliding or in mid air.
There are four episodes (and a planned free DLC), with the prologue having 5 maps and each subsequent episode having 8. Levels and episodes are unlocked by earning objective points by completing the objectives in each map.
The game has an abstract, largely monochrome aesthetic extremely reminiscent of Superhot.
The Basics
Movement
The player moves fairly slowly just running. Pressing the slide button will give a quick boost of speed - holding the button will slide longer. Pressing the jump button during a slide will "long jump," which is the most important skill for quickly crossing distances. Pressing the jump button twice will double jump; this also be combined with the long jump, though the player loses momentum when double jumping. Kicks give a slight forward boost and can be combined with long jumps. There is a flashlight you can turn on, but you won't need to.
Combat
Health is handled though "hits" rather than traditional HP. Each difficulty level allows a certain amount of times a player can be shot before they die, from three at the easiest to one at the hardest. The player can only take damage or die from enemy fire or from falling out of bounds; they cannot damage themselves, even through explosions. An enemy will indicate its ability to hit the player with the Danger Meter - a circle over his head that fills red as he gets a better bead. Once it's filled, almost each shot he fires afterward is guaranteed to hit the player, knocking off a point of health. The meter will fill quickly if the player is easier to aim at, such as if they're standing close to an enemy or moving slowly. Conversely, it will fill slowly if the player keeps their distance and moves quickly, and it will drain altogether when they lose line of sight. When an enemy is very close to full accuracy, an indicator on the HUD will read "DANGER" and will point towards him. Grenades that are launched at the player are indicated by a speech box with a red exclamation mark next to the grenade itself along with message on the HUD that reads "!MOVE NOW!" if the player is within its blast radius.
Every weapon has at least one primary and secondary fire. The player also has a kick will instantly kill most enemies, though it requires a cooldown represented by a red footprint on the screen. (The player can also kill an enemy by landing on his head from the air, but this is fairly rare.) The aim button lets the player aim down the sights, increasing accuracy when firing at the expense of moving slower than normal and being unable to jump. ADS will also greatly slow down momentum from a slide.
The lock-on button highlights an enemy and focuses the player's sight onto it, though it's not static; the player can still move their crosshair, allowing them to still aim for headshots (or miss completely).
The "Pinger" button temporarily reveals the location of every enemy on the map, letting the player quickly determine where to go next.
The "Rage Booster" button becomes available when half of all enemies on a map are dead. When activated, damage dealt is multiplied for a period of time.
There are sometimes barrels that will detonate after being shot enough. They range from red explosive barrels that deal extreme damage, green gas barrels that poison over time, white flashbang barrels that briefly stun enemies, and blue time barrels that temporarily create a sphere which freezes all bullets inside of it. The player cannot be hurt by any of these.
Objectives and Unlocks
Though levels are completed by killing all enemies within the time limit, killing enemies alone won't be enough to progress though the game. Every map has six objectives worth a total of twelve progression points, which are needed to unlock new maps and episodes (along with more enemies to practice against in the Practice Room). Objectives are divided into three "Score" and and three "Contextual."
Score objectives are just what they sound like: scoring a certain amount of points. They are always divided into "Gold," "Platinum," and "Diamond," with diamond scores often involving a full combo across the map or consistently pulling off multiple tricks on enemies.
Contextual objectives are specific to each map, and can vary widely. They can range from limitations on the player (e.g. beat the map with a certain weapon only) to quotas (e.g. kick a certain number of enemies) to entire side-quests in the map that the player has to discover and complete (e.g. complete a killhouse shooting gallery).
The HUD
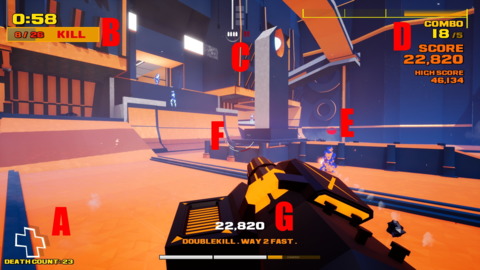
A: Health & Death Count
When the cross is white, the player is able to take a hit. When the player has no more extra hits left, the cross will break apart into a silhouette, meaning that the next hit will kill. The death count keeps track of how many times you've died in that map in total.
B: Remaining Kills & Timer
Shows the remaining number of enemies in the level along with the total. When the box is yellow, the Rage Booster is ready. The timer counts down, and the run is over if it hits zero before you kill all enemies.
C: Secondary Ability Cooldown Timers & Fifth Weapon Ammo
When the player picks up a weapon, the relevant cooldown bar will fill in. If the secondary fire for a weapon is ready to go, its bar and icon will be white. If a weapon's secondary is in cooldown, its icon will be red and the bar will be grey. When a secondary fire is ready, the game will play a resonant beep. The boxes in the middle show the ammo available for the fifth weapon slot - if the player has a fifth weapon, the boxes will fill white from the top box downward. When there is no more ammo, the boxes will flash red and the player's gun will make an "out of ammo" noise, and the player will have to wait for the ammo to begin refilling.
D: Combo Timer, Counter, Starting Minimum Combo & Total Score
When a combo begins, the timer at the top will count down. The sections of the bar determine if the player gets a bonus for the next kill - if the player scores when the timer is in the first section, they'll get a "Way 2 Fast" score bonus; if the timer is in the second section, they'll get a "Fast" bonus. The large number on counter measures the number of kills in the current combo; the higher the number, the bigger the multiplier per kill. The second number indicates the minimum number that a new combo will begin at and increases by one with every headshot on an enemy. Score measures the score on the current run; high score is the highest overall, rather than highest for the difficulty the player is playing at.
E: Enemy Danger Meter
The circle above an enemy indicates how close he is to being able to hit the player. While the circle is filling, the enemy will miss all of their shots; when the circle is full, the enemy is now able to deal damage to the player, and the word "DANGER" will appear in the center of the HUD along with an indicator of the enemy's position relative to the player. The meter's speed is affected by the player's speed and proximity: if the player slides and jumps often and keeps their distance, the meter will fill slowly; if the player is near an enemy and doesn't move quickly, the meter will fill quickly.
F: Crosshair & Cooldown Indicators
Each line represents if a weapon is in cooldown, in order of how they appear on the cooldown timers above: pistol, machine gun, shotgun, and rifle. These indicators are optional, but allow for quick reading of the player's options without needing to look up at the timers.
G: Current Combo Score, Tricks & Score Objective Meter
Like THPS, the game tracks the total score of the player's tricks during their combo and also indicates what their most recent set of tricks were. The meter below measures the progress the player has made to completing each score objective in this run.
Weapons
There are six weapons in the game along with the player's quick kick (the player can also land on an enemy from the air for an instant kill). With the exception of the fifth and sixth weapon (which both appear in the fifth weapon slot), they all have infinite ammo and a secondary "ability" that has a cooldown timer when used.
Pistol
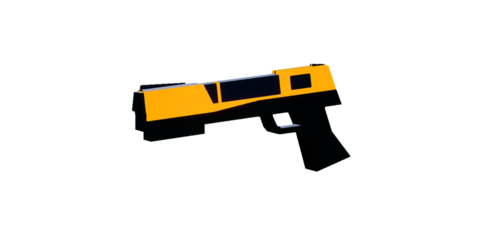
The pistol fires as fast as the trigger can be pulled and is highly accurate. Its secondary drops a teleport beacon that the player can teleport to once by pressing the secondary fire button again. Teleporting will reduce enemies's danger meter. The beacon can be erased by holding the secondary fire button.
Machine Gun

The machine gun sprays relatively weak bullets when the fire button is held, building heat the longer it fires. At maximum heat, the gun fires one large bullet at a time, but with high recoil. The secondary temporarily sends the player into bullet-time and lets the gun shoot with perfect accuracy and no recoil, but the weapon can't be changed while the effect is going.
Shotgun
The shotgun fires a burst of pellets that are more accurate up close (obviously), but it can still handle well at a distance. It has a painfully slow reload. The secondary shoots a shockwave that has a fairly wide spread and deals high damage to enemies the closer they are to it, but dissipates over distance. Firing the shockwave at the floor while jumping (or downward while in the air) gives the player a large upward boost, effectively the same as a rocket jump. The shockwave can also destroy grenades.
Rifle
The bolt-action rifle fires a single hitscan bullet and must reload with every shot, but it can zoom the farthest and is perfectly accurate. Its secondary zooms the camera in and causes two bars to close around the reticle. If there is a laser sight coming out of the rifle, then when the player presses the fire button at the exact moment the bars connect with the reticle, the bullet will ricochet off of whatever surface it hits and instantly hit the closest enemy it can draw a straight line to. This ricochet can occur even off of other enemies, allowing a single bullet to get two kills.
Multi-Use Weapon (MUW)
This complicated weapon essentially has four firing modes. When the fire button is tapped, it shoots a burst of rounds like an assault rifle. If the fire button is then held, it shoots multiple blasts like an automatic shotgun until released. When the secondary is held, a meter will raise in the reticle. If the secondary is released before the meter is maxed, it will fire a grenade. If the meter is maxed, it will fire a very fast rocket. It and the Slicer are the only two weapons that have "ammo," as shown by the three white rectangles at the top of the HUD. Firing the burst rifle or auto-shotgun will drain the ammo bars, while firing a grenade or rocket will deplete a full bar. The ammo slowly regenerates on its own.
Slicer
The slicer is a laser weapon that uses ammo like the MUW. The primary fire is a perfect-accuracy hitscan laser with a fairly far reach. When the secondary is held, a pair of horizontal parallel lines will grow from the center of the reticle. When the lines reach their maximum distance or the button is released, a horizontal hitscan beam the length of the lines will fire out, instantly killing anything caught in its path. Curiously, this beam has no maximum distance, making it effective for sniping. The secondary will also always drain a full bar's worth of ammo regardless of the beam's length and will require 2 seconds of cooldown before it can be used again, regardless of any remaining ammo.
Enemies
All enemies except for the Summoner, Suppressor, Energy, and Grenade Turret have Danger Meters over their heads that will fill the longer and more easily they can target you. Once their meter is filled, their shots will be able to deal damage to the player.
Grunt (100 pts)
The smack-talking rank-and-file cannon fodder. They have a machine gun that will continually fire, and they occasionally try to slide away from the player while firing. Unremarkable.
Rusher (80 pts)
Armed with shotguns and very fast Danger Meters, they will sprint directly at the player and can almost immediately start dealing damage. Thankfully, they're thin skinned and will go down quickly. Glass cannons. (Well, more glass than usual.)
Sniper (140 pts)
They can shoot the player with a hitscan bullet from any distance as long as they are visible. Watch for their telltale lens flares to give away their position. Dangerous.
Juggernaut (200 pts)
These burly, heavy machine gun wielding giants take a while to fill their meters, but once they're locked on, they're hard to lose. They can take a beating compared to everyone else, but they're worth a huge amount of points once they go down. It's good practice to soften them up while taking care of other enemies and then finishing them off when you're ready to cash in. Tanks.
Turret (100 pts)
It's a turret. It's weak, stuck to a wall, and shoots. Haven't you ever played a video game before?
Grenade Turret (100 pts)
Like a turret, but with grenades. There is a little more to them, though. They have no Danger Meter: the moment they know the player exists, they'll start shooting at their direction regardless of sight. The grenades themselves will have little red exclamation marks coming out of them; when the player's close enough to its blast radius, the HUD will read "!MOVE NOW!" until they're clear.
Energy (130 pts)
No Danger Meter here; once they see the player, they'll start sending over a hail of fireballs. The longer the player stays in sight, the more fireballs they'll shoot at a time. It's possible to shoot their fireballs out of the air, but don't take that as a sign that they're not dangerous. They're also liable to slide around like the Grunts. These dudes are real dicks, especially when there's more than one of them.
Suppressor (120 pts)
Winged jackasses whose only purpose in life is to be complete assholes that suck. They don't deal damage, but on sight they'll take flight and start shooting lasers that will slow the player. When slowed, the screen will have a white glow beneath it and the player will be forced to move at a walking pace until the effect wears off. Of course, that effect won't wear off as long as he can still keep replacing it with more slow-lasers. Deal with them as quickly as you can, minding that there are other enemies that actually can hurt you while you waste your time clipping their wings. Debuffing bastards.
Summoner (175 pts)
Upon seeing the player, he will start panicking and raise a perimeter of shields around him. If he isn't killed by the time he stops freaking out, he will teleport away and summon a big gray blob in the sky. This blob will then continually shoot a laser that lays down a line on the ground which will then shoot upward, hitting the player if he is standing on it. The only way to kill this blob is to shoot the smaller orbiting blobs connected to it to knock out its shield and then shoot it repeatedly. As long as the Summoner is alive, however, he will teleport around the area and tend to the blob, regenerating its shield or summoning a new one if the player defeats it. The Summoner will never attack the player directly - only indirectly through creating and protecting the blob. Weirdo.
Scoring and Tricks
Overview
Every enemy has a set point value. When an enemy is killed, the player scores the points for that kill and the combo timer begins to count down. If the player kills another enemy before the combo timer runs out, the combo is increased by one and the value for that enemy is multiplied by that combo. Every trick performed during a kill adds to the multiplier for that kill, meaning that multiple tricks can greatly increase the value beyond what a single kill would be worth. High scoring requires holding as close to a full-level combo as you can, performing as many tricks as you can per kill, and prioritizing killing higher value enemies at higher combos to get the most value from them.
Tricks can be generally understood within two types: "Standard Tricks" and "Time Tricks."
Standard Tricks
| Icon | Name | Value | Description |
|---|
| Unfair Advantage | +1.2 | Kill an enemy using a weapon's ability. |
| Suave | +1.4 | Kill an enemy while sliding. |
| Angel | +1.5 | Kill an enemy while jumping. |
| For The Kicks | +2.0 | Kill an enemy with a kick. |
| Mindblown | +2.0 | Kill an enemy with a headshot. |
Time Tricks
These are really two tricks that can combine into one: how quickly an enemy is killed, and how many times in a row that happens.
| Icon | Name | Value | Description |
|---|
| Fast | +1.0 | Kill an enemy within the first half of the combo timer. |
| Way 2 Fast | +2.0 | Kill an enemy within the first third of the combo timer. |
| Double Kill | +0.3 | Get two Fasts or Way 2 Fasts in a row. |
| Triple Kill | +0.6 | Get three Fasts or Way 2 Fasts in a row. |
| Quad Kill | +0.9 | Get four Fasts or Way 2 Fasts in a row. |
| Fullhand | +1.2 | Get five Fasts or Way 2 Fasts in a row. |
| Rampage | Infinitely scales upward | Get a Fast or Way 2 Fast in a row past Fullhand or Rampage. |
Thus, a Fast or Way 2 Fast can combine with a Double, Triple, Quad, Fullhand, or Rampage kill to get a larger multiplier - for example, a Double Kill Fast would be worth +1.3 multiplier, while a Fullhand Way 2 Fast would be worth +3.2 multiplier. As long as the player keeps a Rampage going, its value will increase by 0.3 each time (e.g. 6-kill Rampage Way 2 Fast being worth +3.5, 7-kill being +3.8, etc).
Bringing It All Together
Imagine killing five Grunts. If you kill them all without even considering combos or tricks, that's worth:
100 + 100 + 100 + 100 + 100 = 500 points.
If you comboed them together without performing any tricks, that's worth:
(100 x1) + (100 x2) + (100 x3) + (100 x4) + (100 x5) = 1500 points.
But if you jumped and kicked the first one;
(Angel + For The Kicks = +3.5)
then quickly used the rifle's secondary fire to shoot the second in the head;
(Fast + Mindblown + Unfair Advantage = +3.2)
which then ricochets instantly into the third;
(Way 2 Fast + Double Kill + Unfair Advantage = +3.5)
then you immediately slid into another enemy and shot him in the head;
(Way 2 Fast + Triple Kill + Suave + Mindblown = +6)
and then finished it by quickly leaping over to the last grunt for another good kick;
(Fast + Quad Kill + Angel + For The Kicks = +5.4)
All of that that would be worth:
(100 x3.5) + (100 x5.2) + (100 x6.5) + (100 x10) + (100 x10.4) = 2910 points.
The same four enemies could be worth almost double their value than if you just comboed them, and almost six times their value than if you didn't think about scoring at all, and even that total could be improved. It's clear, then, what mindset you should be in when interpreting a level: how can these enemies be chained together, how quickly can they be chained, and how many tricks can I do per enemy?
Cheats
Completing all objectives in certain levels will get you a cheat that you can turn on from main menu. As you may expect, cheats will disable achievements and prevent saving high scores. All cheats are hidden until they are unlocked, so avert your eyes if you like surprises.
| Level | Cheat | Description |
|---|
| Facility | Party Mode | Every level turns into a party with lights and dance music. |
| Bullet-Time | Free Aim Mode | Changes the aim to move the gun rather than turning the player, akin to something like Trespasser. |
| Train | Unlock Prologue | Allows all levels in Prologue to be playable. |
| Courtyard | Pistol Spawn | Start every level with a pistol. |
| Dead End | Drunk Mode | Blurs vision and adds dramatic mouse acceleration when turning. |
| Cathedral | Unlock Chapter 1 | Allows all levels in Chapter 1 to be playable. |
| Checkpoint | Spaceman | Low gravity jumps. Press the slide button while in the air to slam into the ground, killing enemies around you. |
| Conception | Machinegun Spawn | Start every level with a machine gun. |
Loading | Third Person Mode | Pulls the camera back into a thoroughly unplayable third person view. |
| Binary | Nightvision | Replaces the flashlight with night vision. |
| Worm | Shotgun Spawn | Start every level with a shotgun. |
| Bypass | Noir | Puts the game though a grainy black and white filter. |
| Brouter | Vintage | Puts the game through a glitchy, low-res filter. |
| Lift | Unlock Chapter 2 | Allows all levels in Chapter 2 to be playable. |
| Lift2 | Rifle Spawn | Start every level with a rifle. |
| Intermission | Supersonic | Aiming at an enemy at any distance and holding the kick button will teleport you directly onto them, killing them instantly. |
| Anarchy | Slo-Mo Kills | All kills will put the game into a brief slo-mo, akin to when an objective is completed. |
| Parallel | MUW Spawn | Start every level with an MUW. |
| Sewage | One Hit Kill | All enemies die in a single bullet. |
| Stairway | Cute Mode | Every enemy's face is replaced with a picture of something cute - babies, kittens, puppies, etc. |
| Complex | Timeless Mode | Makes it impossible to get a time over. |
| Stranded | Slicer Spawn | Start every level with a Slicer. |
| Blimp | Unlock Chapter 3 | Allows all levels in Chapter 3 to be playable. |
| End | God Mode | You know what it is. |
Log in to comment