Overview
Introduced to
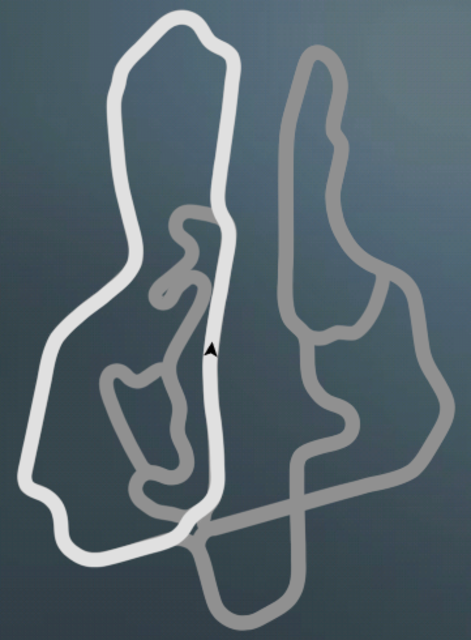
Live for Speed in its S1 release, Fern Bay is a winding track based in Jamaica, with palm trees and sand all around, and the water not much farther away. Most of the configurations Fern Bay offers have tricky turns, at high and low speeds, that will challenge drivers to keep their car balanced and under control. Thankfully, the turns aren't usually hazardous if a driver goes slightly off-track, but some gravel traps or tire barriers may prove problematic.
Fern Bay, according to online statistics, is the least popular raceway in Live for Speed.
Configurations
Fern Bay has six configurations, four road course and two rallycross. The Black configuration was the longest track in Live for Speed S1, although it has since been topped by a configuration on the S2 track Aston. The most popular configuration is Fern Bay Club; the least popular is Rallycross.
 ClubClub
- Distance: 1.0 miles / 1.6 km
- Grid Size: 32 cars
- Laptime Range: 0:29 - 0:57
Fern Bay Club is a fairly short track that offers very little time for drivers to relax, with near-constant turns and elevation changes. The first turn is a right hairpin that opens up as it progresses, making passes slightly easier to complete as the turn begins an uphill climb. A fast chicane follows, which inexperienced drivers often take too fast, causing them to either fly off into the grass or slam into a tire barricade.
The back straightaway is short, and curves upward to the left. Keeping the car stable here is key, as a sharp right-hander follows shortly after the hill crests, requiring a good amount of braking. Faster cars may have to brake during the uphill section, which only increases the risk of upsetting the car's balance and spinning out. A set of downhill s-turns follows, and requires careful braking and acceleration to get the best run back onto the front straightaway.
The front straight and turn 1 are the safest passing opportunities, and the beginning of the front straight may be the only time to relax after working through the rest of the course.
 GreenGreen
- Distance: 1.9 miles / 3.1 km
- Grid Size: 32 cars
- Laptime Range: 0:47 - 1:32
Fern Bay Green is a fast course with many straightaways, and Fern Bay's typical tricky turns. A high-speed chicane comes off the front straight, followed by a shorter straight, before a series of slower s-turns take the driver uphill. At the top of the hill is a small series of s-turns that can usually be taken flat-out, which leads to a deceptively fast right-hand kink that requires some braking to prevent going off-track. The back straightaway leads into a technical s-turn section that starts of slow, but then becomes very fast as it transitions to an old railway road. Once again, the railway leads to another tricky section of s-turns, to which the driver must use caution exiting, as too fast an exit can send the driver careening off-course into a wall at the front straight.
The large amount of straightaways on Green means there is plenty of room for passing on the track; save for the s-turn sections, anywhere else is a decent place for setting up and executing a pass on opponents. The s-turns themselves are good for starting a run at passing opponents, and mastery of these sections is essential to an excellent time on the Green circuit.
 GoldGold
- Distance: 2.2 miles / 3.5 km
- Grid Size: 32 cars
- Laptime Range: 0:58 - 1:52
The Gold track uses the first half of the Club configuration, before extending to a much longer section of track that utilizes some winding road and a railway bridge. After Fern Bay Club's hairpin and chicane, the Gold circuit progresses to a downhill left and right turn that can't quite be taken at full speed in most cars. The slight right turn onto the railway bridge that follows requires extra caution, as entering this turn too fast will easily send a car sideways into the wall. Left hand turns that start off tight and open up over time follow, and once drivers pass under the railway bridge, a series of technical right and left-handers await.
The best chance to pass may come through setting up a run in the turns before the railway bridge, but in general, passing opportunities are hard to come by.
BlackBlack
- Distance: 4.1 miles / 6.6 km
- Grid Size: 32 cars
- Laptime Range: 1:49 - 3:27
Black combines the Green and Gold configurations to create a very long and difficult track. For this reason, the Green section of track is still the best place to attempt to pass other drivers. Also worth reiterating is the length of the track, as any damage to tires or bodywork may require a long trip to pit lane. These factors, combined with the general difficulty of Fern Bay, make it one of the toughest tracks Live for Speed has to offer. Expert drivers will find themselves most at home at Fern Bay Black, while newer drivers will find themselves either learning quickly or crashing out before the end.
RallycrossRallycross
- Distance: 1.3 miles / 2.0 km
- Grid Size: 32 cars
- Laptime Range: 1:10 - 1:25
Fern Bay's main rallycross course is as demanding as the road courses it offers. In addition, it's the longest rallycross track currently in Live for Speed. Part of the Green configuration front straightaway is used, before the track turns left into a special rallycross section. This section includes a mix of dirt and tarmac hairpins and s-turns, with one slightly fast section thrown in between. Knowing how to use hairpins to pass opponents is extremely helpful, beyond the usual need to be able to handle a car on off-road conditions.
RallyX GreenRallyX Green
- Distance: 0.5 miles / 0.7 km
- Grid Size: 24 cars
- Laptime Range: 0:29 - 0:38
- Starts are three cars per grid row
- Does NOT allow for pit stops
The RallyX Green course is a rather unique short course, perfectly tailored for quick rallycross races with friends, or even "banger" style racing with anyone. Using its own special starting grid on tarmac, drivers charge toward an uphill right hand turn, followed by a left, both of which challenge a driver to input just the right amount of acceleration or slide off the racing line. From here, drivers veer onto a wild and fast dirt section that ends with a wide 90-degree bend sure to create plenty of passing chances.
As a side note, the first and second turn were once easy to shortcut by driving straight through grass following turn one to the transfer onto dirt. While this was once discouraged by making the grass especially sluggish for any vehicle, this appears to have been reverted. Rather, cars attempting this questionable shortcut risk hitting a tire barricade, and may also flip due to curb hopping.
Log in to comment