
PART 1 - **NEW** PART 1.1 - PART 1.2 - PART 1.3 - PART 2 - PART 3 - PART 4 - PART 5 - PART 6 - PART 7 - PART 8 - PART 9 - PART 10 - PART 11 - PART 12 - PART 13 - PART 14 - PART 15 - PART 16 - PART 17 - PART 18 - PART 19 FINALE

We have arrived at the final dungeon of Midgar. The Shinra corporate headquarters is massive, containing multiple floors of puzzles and a gauntlet of four powerful bosses waiting at the end. Chat saves just outside the entrance and briefly considers our options. The traditional method is simply storming the gates, but as this forces several extra encounters, we immediately opt for the safer and much more tedious option of climbing the stairs. While not entirely realized at the time, resources are extremely limited at the moment. There hasn't been much shopping or equipping done so far even twenty hours into the run, with chat mostly mainlining the story objectives as quickly as our hobbled movement speed allows.
This staircase is somewhat infamous for it's sheer length, accurately ascending fifty nine floors up the side of the tower. There's no encounters here though, so the only real danger is wrist strain. Twenty five minutes later, chat reaches the top and joins up with the main objective thread, facing a handful of guards before entering the elevator. There's a slight menu boss here, as the first option returns to the lobby level. While accidental it's realized we can use this opportunity to duck back out the front door and save again, firmly discarding stairs boss into the past.

Chat proceeds back up the lift and on to our first challenge of the tower, sneaking past the guards on floor 60. Fortunately this is a trial that can be failed through, getting caught forces a pincer attack but eventually the sequence is just skipped. To repeat from the dusty Part 1, success through failure would become a constant theme throughout the run as there's very little the game actually forces you to successfully complete to proceed. The next task is to retrieve the floor 62 keycard from a patrolling employee on the next level. Our own movement speed is significantly slower than even a walking NPC, so the best solution is to just pause along his route and intercept. Chat were already forced to exercise patience quite often, so simply waiting in place doing nothing could be more difficult than expected.
The next key is received from Midgar's mayor, who's become frustrated with his entirely ceremonial role and is willing to help a few known terrorists mess things up. The intended sequence involves searching the library for clues, but given the amount of tedious movement involved, chat opts to simply guess instead. It's always one of four options anyway, and failing the guess just reduces the bonus reward received. We get it third try, accidentally picking the first option twice due to menu lag, and receive our pitiful ether consolation prize along with the necessary key. The puzzle maze on level 63 is skipped entirely, while not extremely difficult a lot of navigation is required and chat is still mainlining the major objectives. The 64th floor features a blessed opportunity to rest and save, marking our first major checkpoint in the tower assault.
Before chat can proceed to the Midgar diorama puzzle on the next floor, progress is stymied by a particularly obnoxious troll. This was covered in my original Part 1 post and as I repeatedly say throughout this series, trolling deserves no special recognition or praise and will be highlighted extremely infrequently going forward. My original thoughts stand though. If your method of satisfaction comes from being a jerk on the internet, that says some pretty twisted things about the kind of person you are. It's far too easy to say, oh it's just an internet stream. You're interacting with other real people, and how you choose to do that reflects on your morals and values, simple as that. Hiding behind a shield of anonymity does not justify treating others poorly, it just makes you a coward as well as a horrible person. This particular miscreant managed to get themselves banned later anyway, difficult to achieve given the lenient policies.
A half hour of menu spam later, the run finally proceeds to the Midgar Puzzle. This sequence is pretty straightforward, the necessary chests unlock in order as each puzzle piece is slotted in, so it's just a lot of back and forth navigation. There are encounters on this floor though, and present an added difficult as these enemies can temporarily disappear, causing attacks to default target the party instead. Almost three hours after arriving at the tower, chat finally arrives at the 66th floor and the first bit of actual exposition, eavesdropping on a Shinra executive meeting. The president has decided to abandon sector 7 and Midgar as is, intent on reaching the Promised Land and building a new metropolis there. We also get a lead on our captive companion, the party tailing Hojo out of the board room and up to the next floor.
Shinra Tower 67th Floor
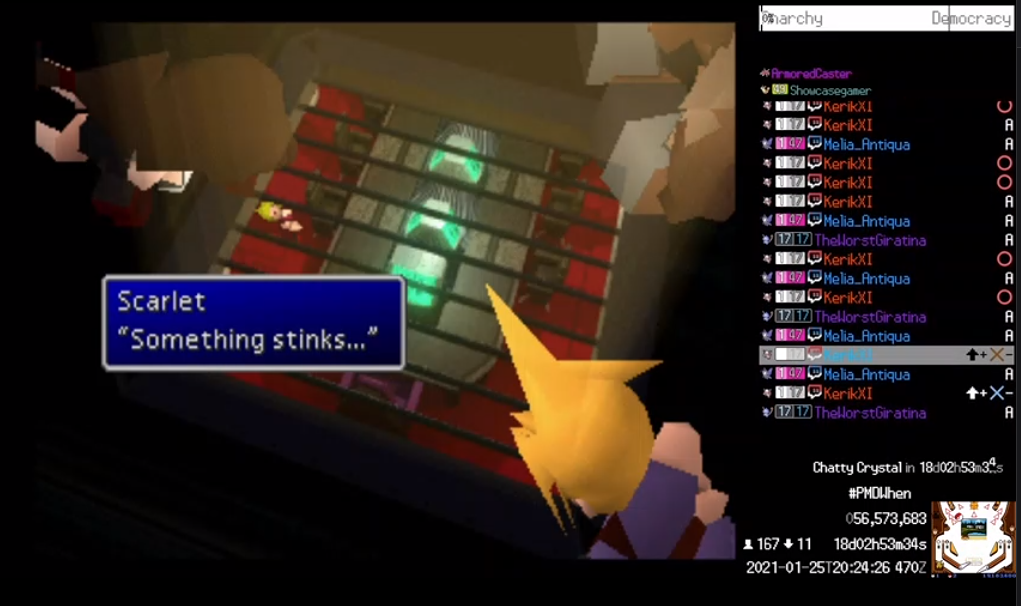
Chat rapidly approaches the end of the tower assault sequence, but there's a particularly nasty encounter standing in our way. We proceed to the save point just before the boss and charge ahead, slamming straight into our next major roadblock. The fight against Hojo's twisted science experiment brings some caveats not yet encountered in the run. The boss begins the fight by poisoning the party, and with the menus involved it is not practical to remove this painful status effect as he will simply recast it. He has three minions he can revive throughout the fight and the boss occupies the back row, boosting his defense and only reached by long range attacks or magic until his lackeys are defeated. This entire setup nullifies the traditional spam circle to win strategy, and our first attempt confirms the reality of the situation.
The second attempt goes as poorly as the first, and also serves to highlight the dangers of fighting in democracy. The battle begins immediately after recruiting Red XIII, and while it is desired to let chat have some meme naming fun, it was impractical in this instance as democracy would carry into the early rounds of the fight, putting us at an immediate disadvantage. Clearly underpowered for this encounter, chat decides to embark on the first ever session of level grinding. Important to note, I forgot about this event in later updates, so it's not included in my overall tally, considering recruiting Vincent the first intentional grind. I'm not going to go back and edit all that now though.

Shortly into the grind session an attempt is made to retreat to the 64th floor to rest when another massive problem occurs. We don't actually have the key to this floor, having followed Hojo through the door left ajar, and it is now locked. We are trapped on floor 67, the only escape through the boss ahead. This manifests a significant resource issue as we quickly learn our supply of phoenix downs is exhausted and other recovery items are dangerously low. Losing a character will require an intentional wipe and reset, as we have no means to to revive them. We're forced to do this four times, erasing some amount of grinding progress with each one.
About two hours after arriving at floor 67, chat does some further research into our options. We can steal various upgrades from some of the encounters here, better armor and a weapon for Cloud, but steal rates are extremely low and remaining in combat this long further strains our limited resources. Some critical menuing is finally done though, the battle speed set to lowest having been fully cranked since the initial bombing mission and the crew outfitted with much needed equipment and materia upgrades. These changes represent a massive boost to our survivability, and after another hour or so of grinding, the boss finally falls in a truly harrowing battle, Cloud desperately solo healing to victory.
We're given the opportunity to reform the party now, which would have allowed us to swap out the dead members, at least long enough to reach relative safety, but malicious inputs leave us only swapping Aeris in, stuck with Red's corpse as literal dead weight. She's also practically naked, carrying no materia or upgraded equipment, and the presence of malevolent actors renders this impossible to remedy. There are still enemies on this floor, and chat are quickly treated to a repeat of the dreaded Reno scenario, wiping in a random encounter and dumping us back to the save before the boss. This also highlighted the impracticality of running from battles. It is technically possible to flee with some luck, but attempting to do so consumes valuable inputs and exposes the party to more danger than it really avoids.
Fortunately, this experience did prove that while difficult the boss was entirely possible at this point and chat swiftly defeats the encounter a second time, wisely retreating down the elevator to the previous save before proceeding. Four hours after arriving on this floor, the first boss of the gauntlet finally lays defeated. The party is shortly captured and can finally proceed with the plot. Sephiroth makes his first implied appearance, retrieving the Jenova sample from Hojo's lab and slaughtering his way up to the presidential suite, leaving his way too long sword symbolically lodged in the boss man's corpse. We're introduced to the president's son Rufus, recent recipient of an automatic promotion and somehow more of a jerk than his old man. Cloud stays to fight the new executive while the rest of the party retreats. We've arrived at the final escape gauntlet.

Shinra Tower Escape
The parties are forced for the first two encounters of this segment. Aeris, Barret and Red XIII flee down the elevator while Cloud squares off against Rufus alone, Tifa waiting for him on the sidelines. Some critical menu work is done to properly outfit Aeris and Red and they proceed to the first encounter. The coming battle has the party dueling across elevator platforms, and only long range or magic attacks will connect, so the crew is also placed in the backrow for added safety. This fight presents little difficulty though, Aeris carrying the party with her powerful bolt spam and healing. The next encounter however is where the true danger begins.
Cloud faces Rufus alone, and our opponent brought his trusty hound along for an entirely unfair fight. The dog will buff himself and his master while tossing powerful magic attacks of his own. This also means the opponents will get two rounds of attacks to our one, so this lackey will have to be disposed of quickly. A classic targeting issue is presented however, as the cursor defaults to Rufus and his dog needs to be deliberately selected each round. Their barriers also severely limit the effectiveness of Cloud's physical attacks, so menus would also be needed to utilize magic. This was definitely the most menu intensive battle of the run so far, but after careful and deliberate driving, Rufus falls on the second attempt. A moment of panic occurs on the retreat to the save point however, as random encounters are still possible and Cloud is alone. The boss music never stopped and chat quickly has to buckle down for Rufus 2.0, but finally the save is reached and the final dramatic sequences can occur.
Highway Escape
The party reconvenes in the tower lobby, but Shinra forces have surrounded the building blocking our escape and an alternate route is hastily decided. One more boss lies ahead, but we have another daunting challenge to face first. Chat has been dreading this segment for some time now, mostly because nobody was quite sure what failure meant. The bike minigame is usually just a fun diversion, but given chat's input limitations we would have little if any hope of positively impacting the outcome. Some careful setup is performed to outfit the party, as materia was stripped during the previous sequence. We're given our choice of members for the first time, so Aeris is joined by our newest companion Red XIII. Red is decent all around, basically a weaker version of Cloud, and joined the party at a slightly higher level than most of the crew. He's a decent backup healer for this particular instance, a much better caster than either Tifa or Barret, but sadly won't see much use beyond this battle.
As expected, the bike minigame goes incredibly poorly, chat flailing ineffectually at empty air as the truck carrying our companions is mercilessly assaulted. Fortunately this isn't a fail state, but the party is left with only 1 HP and are quickly downed by Motorball's initial surprise attack, leaving Cloud alone. Critically some phoenix down's have been acquired along the way and with careful menu driving, the crew gets back on their feet and the boss is swiftly defeated on the first try. Once again, chat has defied all expectations and achieved the seemingly impossible. They doubted us, and we one shot bikes.
With that, the chat has officially cleared the Shinra Tower sequence, nine hours after arriving. 29 hours since the run began, we can breathe deep the fresh air of the world map and the game properly begins. It's here we're provided our initial win condition for the run, stealing the tiny bronco in Rocket Town. Of course, as the incredible length of this blog series attests, we won't be stopping there. With that, our retrospective on Midgar is now complete. I'm glad I took the time to go back and do this right, these segments of the game were woefully underrepresented in the original update. And soon, I'll return to the end and wrap this whole thing up. I hope you've enjoyed the series and as always, thanks for reading!

PART 1 - **NEW** PART 1.1 - PART 1.2 - PART 1.3 - PART 2 - PART 3 - PART 4 - PART 5 - PART 6 - PART 7 - PART 8 - PART 9 - PART 10 - PART 11 - PART 12 - PART 13 - PART 14 - PART 15 - PART 16 - PART 17 - PART 18 - PART 19 FINALE
Log in to comment