The Quest For The Worst Adventure Game Puzzles - Indiana Jones and the Fate of Atlantis (Part 2: Team Path & Act III)
By ZombiePie 1 Comments
Author's Note: This blog is the second part of a two-part series. If you missed the previous episode, here's the link to it:
Also, here are links to previous episodes of this series not related to Indiana Jones and the Fate of Atlantis:
Team Path
Getting The Mask From Omar - 5/10 - The game's Team Path has the same starting locations (i.e., Algiers and Monte Carlo) as the Wits Path, but the tasks at each environment are different. With this route, you drop by Algiers to pick up a mask at Omar's shop before heading back to Monte Carlo to play a trick on Dr. Trottier. The issue here is the same one I had with the Wits Path. The game has a "correct" order with its locations, but it tells you nothing. However, the situation here is a bit more nefarious as you need to pick up exactly one item in Algiers before heading to Monte Carlo. The problem is that the mask you need to pick up almost perfectly blends into the background of Omar's store. This sequence is a pure pixel-hunt and nothing more. Veterans of this game are likely to breeze through it, but first-timers will likely get stuck hence, why this scene was one of the game's most common reasons for people calling the LucasArts Tip Line when it first came out.

Finding And Convincing Trottier to Get In The Hotel- 4/10 - After your brief errand in Algiers, you need to track down Dr. Trottier just as you do in the Wits Path. You can talk to the NPCs coming out of the hotel to build a profile on Trottier, or you can try to spot him as his character model is not randomized. As was when you needed to track down Trottier during the Wits Path, locating him and answering his multiple-choice question, while not hard, is punishing. One wrong answer, and you have to do the entire puzzle over again. Also, he does not like it when you are boastful, which can prematurely end your conversations with him. Still, this isn't too hard; it's just annoying.
Sophia's Séance And Stealing The Sunstone From Trottier - 6/10 - With Trottier in the hotel room, the player has the option of doing things Sophia's way, which is to play out a séance and try to read Trottier's mind or to go things Indy's route and scare the shit out of him. I want to say that I appreciate how there are two possible ways to get Trottier to give up the Sunstone. Unfortunately, Sophia's way sucks shit. If you choose to go with Sophia, you have to answer a series of multiple-choice questions where a single wrong answer fails the entire sequence. The issue is that Trottier never tells you when you have provided a wrong answer. Thus, it is hard to tell which question or questions you got wrong. For Indy's solution, I hate how his sequence is a timed mission. I forgot to pick up the flashlight and the bed cover before hitting the fuse box and failed the task the first time I played it. Also, Indy's solution requires you to combine and use items while it is dark, and it's not the best feeling experience. Nonetheless, Indy's solution is significantly more manageable and less frustrating than Sophia's.
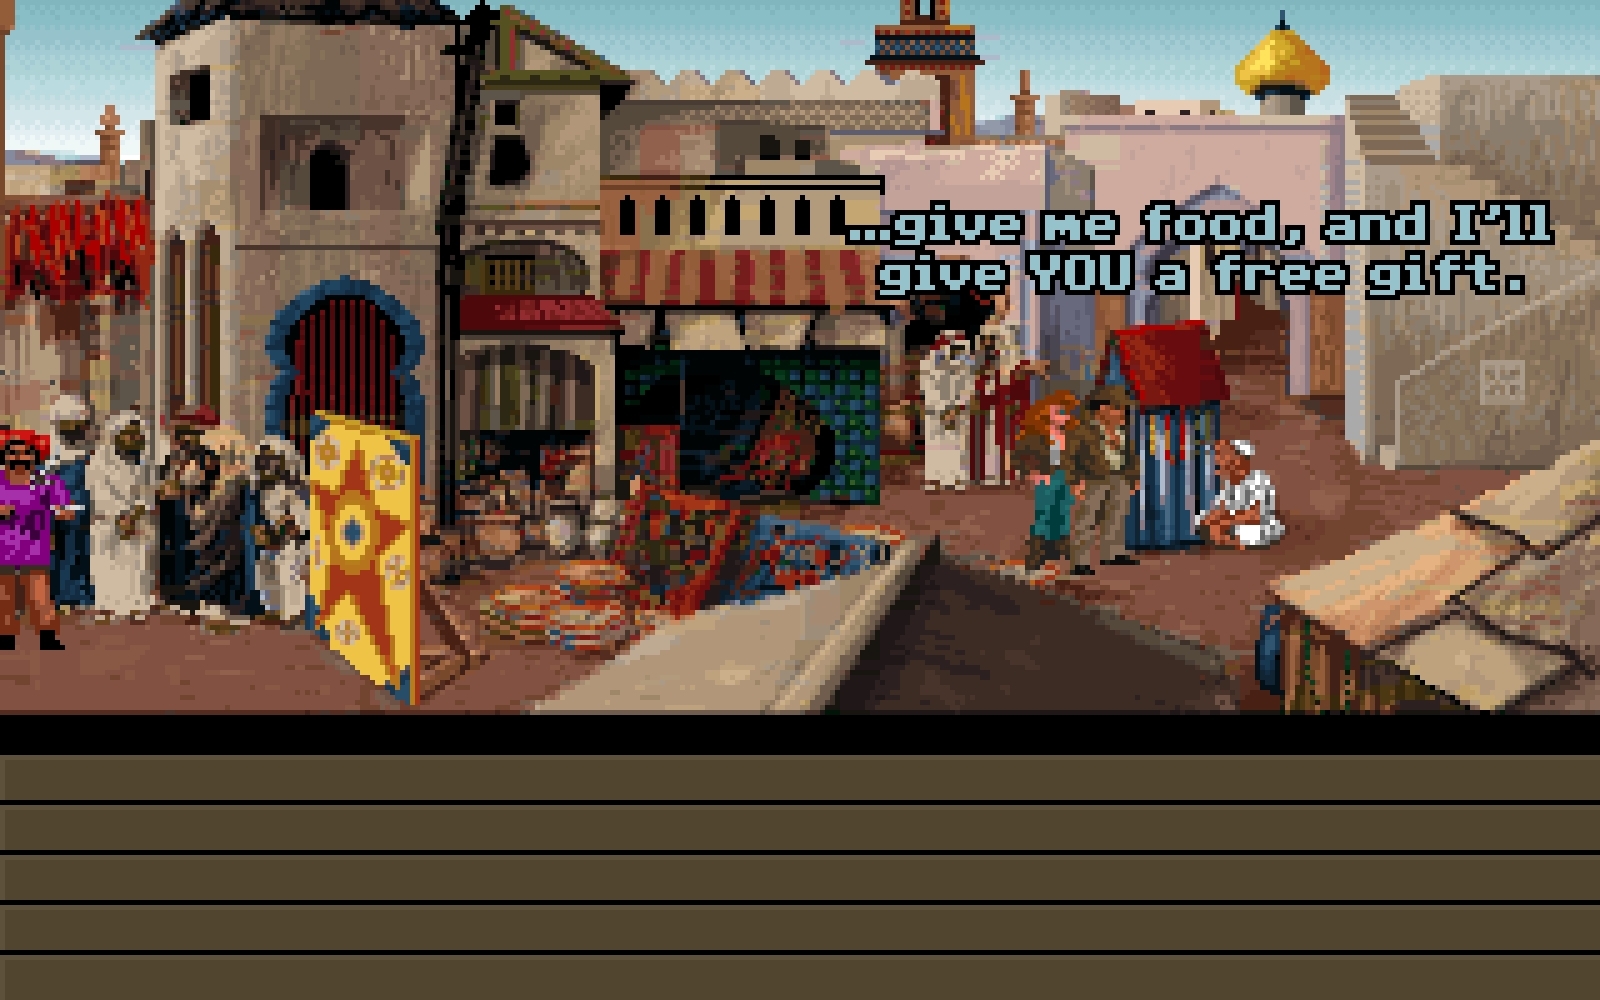
Getting the Squab-On-A-Stick And Trading With Omar - 5/10 - Ah, yes, this puzzle is probably one of the most notorious parts of the game. Indy and Sophia need to get to the dig site at Algiers, but this time will need a ticket to the nearby balloon service. The only person in the city willing to part with a pass is a starving beggar who says they will help if Indy can get him something to eat. With this information, you play a game of telephone between Omar and a grocer. You start by trading the mask from earlier to Omar for a random item and need to check with the grocer if you have the correct thing to get his food. The issue is that what the grocer wants is randomly selected, and Omar has a treasure trove of junk. This puzzle is not challenging, but it is tedious and takes forever to complete, especially if you do not know how to speed up the process. Mercifully, the grocer starts to provide hints about if you are getting closer to delivering the item he wants. Unfortunately, it could take ten to twelve tries before you get your first hint. Luckily, you will EVENTUALLY get to the solution. So, this puzzle is not impossible; it's just a waste of your goddamn time.
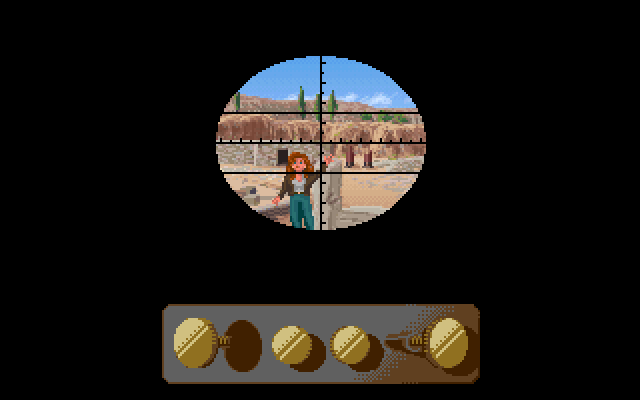
Getting The Knife Using Sophia - 3/10 - When you cash in your ticket for a balloon ride, Indy and Sophia discover the balloon is tied to a post to prevent it from flying away. If they wish to use the make-shift blimp to explore the desert, they will need some sharp object to cut the rope. As a result, you need to meet up with a knife thrower in the marketplace and use Sophia as part of their act. The only tricky step to this puzzle is the small window to push Sophia to trigger the cutscene that progresses the story. Correspondingly, this is one of the few times when you need to use verbs on Sophia to solve a puzzle. Many people who play this game often get stuck thinking they need to use an item on Sophia. Otherwise, it's a fun, albeit sexist, moment.
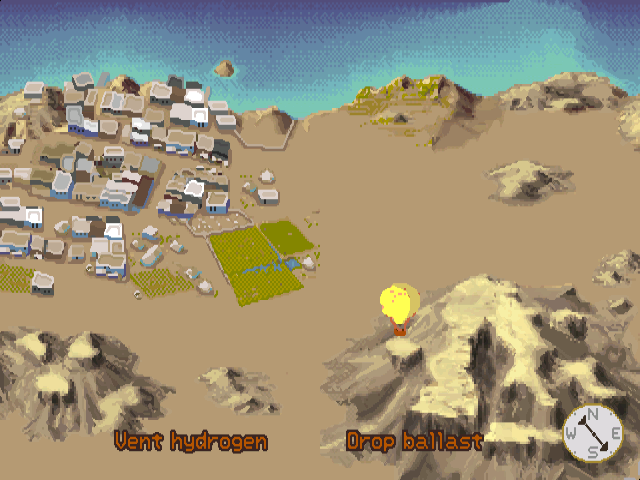
Hot Air Balloon Desert Sequence - 6/10 - As I said in the previous episode, the balloon controls like garbage. Its turning radius is wide, and that's a real issue during this sequence because you need to land on remote nomad camps to collect hints on whether or not you are getting closer to the dig site. The problem is that many of the nomad camps are on the corners of the map, and it is tough to turn fast enough while descending without accidentally transitioning to the next screen or landing on a random desert tile. Luckily, nothing here kills you or resets your progress, as was the case during the Wits Path, but this balloon is still way more frustrating than Indy using a camel. I would not call this "impossible," but it is yet another example of LucasArts' SCUMM engine trying to do things it is not 100% capable of doing reliably.
Turning On The Generator - 4/10 - This puzzle is almost the same as the Wits Path version. So, I'll copy my notes from the Wits Path: I like this puzzle. I understand that it is another pixel hunt, and finding the cap on the generator is the hardest part. However, I respect how the darkened screen slowly gets easier to see the longer you spend in the dark. I can't help but be impressed at this example of graphical fidelity in a game made in 1992. Additionally, it is one of the few times when the Touch command feels entirely justified. Overall, I thought this was a well-designed puzzle.
Finding The Mural For The Sunstone - 3/10 - You need to examine a crumbling wall and then use a ship rib to break apart the façade to reveal a mural. Upon discovering the mural, you need to place a peg in its center. Usually, I would not judge a simple "gather all of your items" sequence. Still, this one is problematic because finding the crumbling wall is a bit difficult because its textures blend with the background. Likewise, knowing to use the ship rib instead of other items in your inventory can be a bit of a leap. Nothing too hard, but some steps here can make first playthroughs a chore.
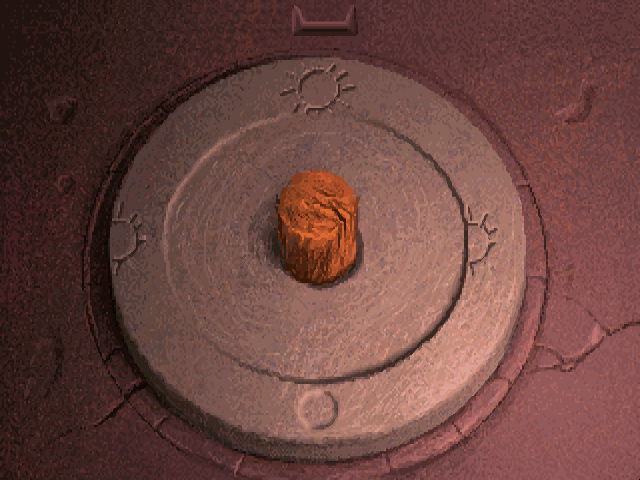
Using the Sunstone on The Mural - 3/10 - Same as with every stone wheel puzzle, the passages in "The Lost Dialogues" make sense once you understand their conventions, but trying to decode what they mean the first time can be a harrowing experience. Nonetheless, as long as you use the same save across multiple playthroughs, the passages are the same.
Finding The Moonstone at Crete - 10/10 - Good GOD! Where do I even begin? After landing on Crete and finding an excavation site, Indy and Sophia must explore dozens of rooms until they discover one with a compass with bull horns. Next, they need to find hidden statues of a bull's head and tail among the ruins. After tracking these down, they need to map the objects using a surveying tool to mark a spot on the dig site to find where the Moonstone is buried. Right off the bat, this puzzle is randomized. Upon entering the excavation site, you need to explore rooms and find one with a mural depicting an abstract compass. Finding a room can be quick or laborious, depending on your luck. Later, you need to have Indy and Sophia explore the exterior of the excavation site and find two stones with statues depicting a bull's head and tail. This part of the puzzle is frustrating as locating the rocks is arduous because it is often tough to tell them apart from the ancient ruins. I found one of the statues quickly but failed to find the second because the stone with the second statue looked like a random pillar. So, I skipped it and got stuck for a solid seven minutes.
The final part of the puzzle is the most infamous: using the surveying tool. Here you need to meticulously align your crosshairs with the horns in the middle of the map while using the tools on each statue's head. However, the signposting here is poor, and the level of pixel perfection you need to have is incredibly maddening. There were a few times when I thought I had the solution but didn't because I was off by a nano-pixel. Overall, this puzzle has an almost fatal amount of randomization and pixel-hunting in its adventure game cocktail.
The Statues In The Labyrinth - 5/10 - Oh, great, it's the same Zelda pressure plate puzzle from the Wits Path! However, at least you have some excellent interplay between Sophia and Indy to break things up from time to time. Again, instead of finding an object to replace the weight of the three statues, which seems like it SHOULD be the solution, you need to use your whip on the last remaining statue in the subsequent screen. While it isn't the most complex puzzle in the game, it is one where there's a distinct step that can be hard to remember. The last time you needed to use the whip to solve a puzzle was way back in the jungle at Tikal.

The Minotaur Statue and Elevator - 5/10 - Indy and Sophia discover a pressure plate next to a giant minotaur statue in the next room. The pressure plate is the key to turning on an ancient elevator. To get the elevator to turn on, you will need to place Indy and Sophia in the correct spots. Getting Sophia to move to the right location is aggravating. I wish the companion directions were more explicit on where you can direct them. Getting back up is a silly but tricky sequence. Knowing to go up the waterfall with Indy and then using the whip on the minotaur statue might stump some newcomers. However, the back-and-forth between Indy and Sophia during this sequence is simply the best.
Getting the Golden Box - 5/10 - If Indy hopes to complete the Labyrinth of Knossos once and for all, he will need to find a golden box. Once again, just knowing where you need to go in the labyrinth is a chore. Using the busts on the shelf to open a door is simple enough, but the many doors that lead to dead-ends or red herrings are endlessly frustrating. The "real" puzzle involves the wedge holding the counterbalance on the elevator. After the two previous puzzles, I thought you would need to use the whip again. Instead, you use Sternhart's staff, which you will need to use on a later statue head. It is also worth mentioning how hard it is to tell what parts of the screen are the background or foreground due to the environment's greyscale nature, which results in a pixel-hunt-rich experience.
The Amber Fish Puzzle - 3/10 - As was the case in the Wits Path, Indy needs to use a device to detect hidden pieces of orichalcum and a secret passageway. This sequence is far easier than using the comb in the Wits Path. Everything is already assembled, and Indy even signposts what you need to do, making this a fun character moment between Indy and Sophia. The same could be said about the last scene wherein Indy needs to push Sophia through a small hole. Overall, just a fun moment only bumped up because the screens you navigate are excessively monotonous.
Using The Sunstone, Moonstone, and Worldstone in the Map Room - 2/10 - At this point, using the stones feels automatic. All I will say is that, yet again, the sections of the notes that are your hints are not the best. They are abstract enough to where I feel you may as well just brute force the puzzle if you don't want to use a guide. Still, it's "doable."
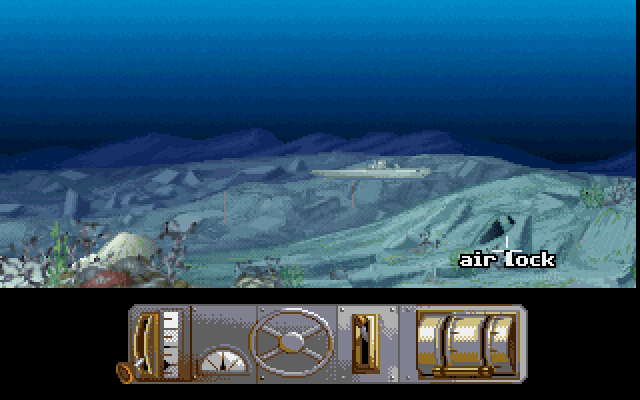
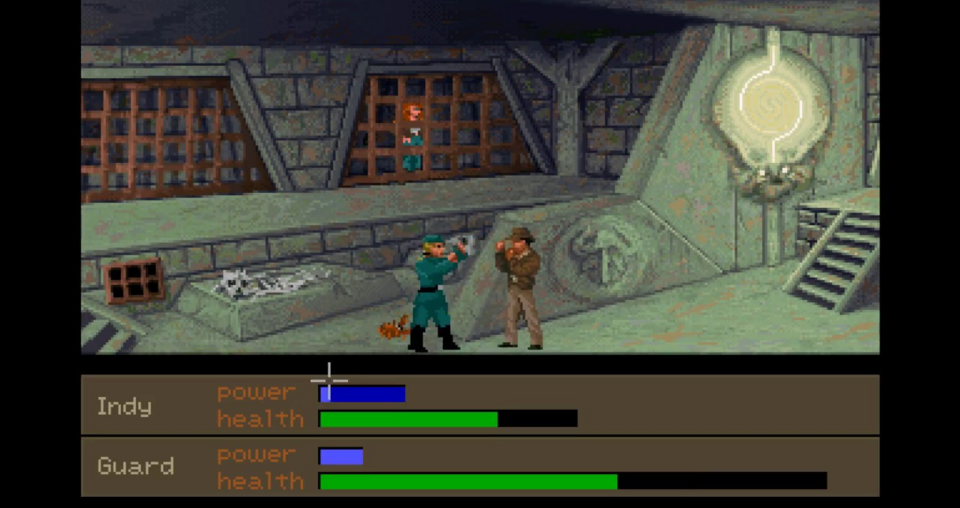
Getting To The Submarine - 2/10 - Right on the heels of Sophia and Indy solving the map room, a Nazi soldier spoils things. After pointing a gun at Indy, he kidnaps Sophia and takes the stones. Locked in a dungeon, Indy needs to find a way out and catch the German U-Boat before it leaves. Dealing with Kerner locking you in a room is easy because there is a marked wall to use the ship's rib on, and the game has already asked you to use the ship rib to dig through dirt. There is a dialogue sequence with an elderly captain when you reach the submarine. He's an easy opponent, and entering the sub is pretty straightforward. I also feel like it is worth mentioning that this is the point when you can die on the Team Path. For example, Kerner will kill Indy if you refuse to give him the stones.
Getting The Stones From The Lockbox - 5.5/10 - With Sophia locked away and Indy dressed in a questionable uniform, you discover Indy is in incredibly hostile territory. First, you will need to rescue Sophia before making an effort to recover the stones. This task requires Indy to use an intercom to move the submarine's crew to a different location before picking up a mug. With that in tow, you meet up with Sophia and knock out the guard blocking her way. After completing this task, the duo will need to overhear a conversation between Ubermann and Kerner before learning which lockbox contains the stones. With this information, Indy will need to use the mug from earlier to collect battery acid and pour the acid on the vault to get them back.
While involved, this submarine sequence is far easier than its Wits Path counterpart. Foremost, while confusing at first, using the intercom is pretty easy, and breaking the lever, while shocking, doesn't immediately hurt your progress. It can be frustrating fanning through your options and not knowing where you are moving the sub's crew. However, it is only something you need to do once or twice. Picking up the ceramic mug, on the other hand, is a bit tricky because it is difficult to locate in the kitchen. The bread and cold cuts, which do not help you progress the story, are far easier to find and click than the mug. Finally, there is an option when dealing with Sophia's guard that results in a Game Over.
Furthermore, listening to Kerner and the doctor to find the lockbox is oddly punishing. You have to be in a specific room and in a particular spot to start their conversation. Equally precise is when you need to use the ceramic mug on a nondescript leaking engine to collect battery acid. This step is the most challenging part of the puzzle and can result in aimless wandering in the submarine. The area where you find the leaking battery acid isn't that obvious. At the very least, the game does not make this a timed mission. So, there's that.
Piloting The Submarine - 9/10 - Like the other vehicles in the game, the submarine controls like absolute dogshit! The good news is that Sophia is free, and you have the stones. All that needs to be done now is for Indy to park the submarine in an underwater dock. Unfortunately, the controls to the U-boat are fucked, and you will need to find items to fix them. There are also FOUR controls you need to worry about when using the sub. These are 1) the depth control lever, 2) the steering wheel, 3) the reverse switch, and 4) the speed lever. The steering wheel requires a key to unlock it, and the control lever needs repairs. With the submarine in tip-top shape, you need to find the dock whose location is randomized among a dozen possible options. However, the submarine will need to be at a specific distance, angle, and depth to dock.
There's so much about this sequence that drove me crazy. First, the game doesn't tell you what any of the switches do. Second, for the buttons that need to be fixed, it's not immediately clear what you need to use to improve them. Once all the controls are up and running, using them is incredibly exasperating. The issue is that you need to experiment to know what the different inputs do. For example, it took me a while to realize you need to alternate with the steering wheel to bring the sub closer to the screen instead of holding the wheel longer. Third, the switch that allows you to back the U-boat up is very picky, and knowing if your approach is close enough or too far away is impossible. I will say that this is something that after you solve it once, it gets easier, but for your first time doing it, the sub is slow, meandering, and unresponsive in the worst way possible. Oh, and I forgot to mention that because the placement of the airlock is randomized, some stations are far harder than others. The ones located at the center of the screen are especially onerous.
Act III
Opening The Door to The Outer Ring - 5/10 - Here's another puzzle in the dark. Like the previous puzzles lacking light, the screen becomes easier to see as you spend more time on the level. Finding the ladder to go up the platform is easy, but knowing where to put it takes trial and error. Finding the magical rod in the box is easier, but knowing that you need to use a bead on the rod is a bit of a stretch, especially considering that you have spots to place the rod, which seems more logical than using it to light up the room. Finally, knowing that you need to reverse the stones can be tricky as the hint in the book is vague enough to where you might not know what to do. For those that do not remember, this is the one time when you need to invert your regular stone positions by 180 degrees. I will say that once you know what you need to do, you'll never forget the solution.
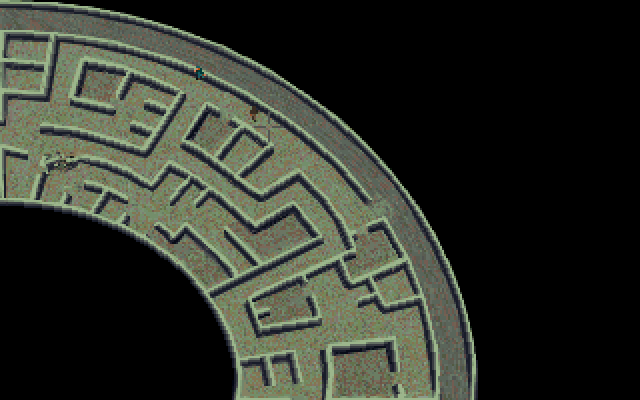
Item Collection in The Outer Ring & Using The Grates (Structure) - 8/10 - I'm sorry, but while I think the inner city of Atlantis is beautiful and the music is fantastic, the first part of the city of Atlantis sucks shit. Due to the randomized placement of the required items, checking every room in the Outer Ring is all but required. While some may counter that you do not need to explore all of the rooms, I would disagree. The maze-like structure is a pain to navigate, and locating the specific rooms with grates to story-required items is downright infuriating. Worse, the grates can be challenging to tell apart from the standard wall textures. The Nazi guards respawn, making this the hardest level in the game if you are not great at the combat engine. Also, the Outer Ring does a TERRIBLE JOB of cluing you into the necessary items you need for the later rings.
I have other issues with how the Outer Ring is designed. The game never communicates how many beads you will need in the Middle Ring. If you are playing this blind, it is frustrating when you realize you have run out and need to go back. The spoked wheel and bronze gear are both found in random rooms and are incredibly easy to miss, given they perfectly blend into the backgrounds they are located. Similarly, the robot part you need to pick up in the dungeon is tiny. Finally, navigating and returning to non-named rooms is awful, especially if you have missed a grate or item. The part that always gets me is remembering to pick up the spoked wheel in the Machine Room after you have finished making orichalcum. For whatever reason, Indy does not pick this part up automatically as he does with other story-required items.
The Machine Room - 6/10 - To use the bead-making machine, you need to collect a spoked wheel which is randomly placed in an unmarked room in the Outer Ring. This task is downright evil as the spoked wheel is in a pile of nondescript broken-down robot parts. Also, the spot where you need to place the wheel is not easy to find or locate, given how enormous and intricate the machine is, and other parts of the mechanism are equally difficult to identify. For example, it's a bit tough to find the funnel for the lava. Speaking of lava, the only part of this puzzle worth getting angry about is how annoying it is going back and forth between the lava and machine rooms to make enough beads for later parts of the game. If you are playing this game blind, the game does not signpost you enough that you should probably make more than one batch of beads. The walk of shame you may need to make if you waste your beads in the Middle Ring is a real bummer.
The Crab Room - 4/10 - Ah, yes, getting crabs! Everyone's favorite part of Fate of Atlantis! In the Outer Ring, there is a room that constantly spawns crabs. It is here you will need to catch a crab using a snare made from a skeleton for a future puzzle. First, you need to find a ribcage, and knowing that the outermost part of the environment has the subway is not clear. It also does not help that there is more than one possible location where the subway with the skeleton can be found. Getting rations from a Nazi will force some players to engage in combat, but luckily you can use any food-based item from your inventory if you still have them. Nonetheless, like the rest of the Outer Ring, there's a lot of backtracking, which is not a great time. That said, capturing a crab isn't all that demanding once you set up the trap.
The Lava Room - 5/10 - Similar to the Machine and Sentry Room, what makes this more complicated than the other rooms is an item you need to find in an unmarked room with a grate. As these rooms are randomized, this can either be a quick process or a long process. The one added annoyance is that the statue head and metal cup need to be placed in a specific order when you attempt to collect the lava. You need to place the cup down first and then put the statue head in the proper slot. Other than that, I am boosting this score because of the amount of backtracking required.
The Statue Room - 2/10 - This room is probably the easiest in the Outer Ring as all you need to do is cross a chasm and collect a cup. The statue on the other side is color-coordinated enough, so finding the cup is not impossible, and you only need to use one item, which you already have to cross the gap (i.e., the ladder). As a result, it's easy enough to figure out on your own.

The Sentry Room - 7/10 - Finding the eel figurine to make this room cooperate sucks. You first need to explore every room in the Outer Ring while fending off Nazi guards. As mentioned earlier, this structure is problematic because the rooms accessible using grates are easy to miss. For this puzzle, the eel statue itself is easy to locate once you find the correct room as it is colored in a blue texture that is easy to tell apart from the background. However, knowing how to use the eel figurine or even which room it connects to is a leap of logic. In this case, before you can open a door, you need to remove a pond in front of it. The game needs you to combine a bead with the eel statue, which will cause the water to evaporate. However, the game does not tell you this is the logical pathway for the figurine. Also, if you do what most do when you encounter the wall, which is to use a bead on the fish head, you will waste your resources, which will cause you to need to go back and make more beads. So, overall, it is a problematic item combination puzzle with poor signposting and even trickier item collection and verb usage.
The Dungeon - YOUR MILEAGE MAY VARY/10 - The fight with Fritz is among the most brutal combat sequences in the game, and at the very least, I want to praise the game for providing a puzzle alternative. If you defeat Fritz without using the statue, you are a better person than me. Given that the puzzle is a bone the game is throwing you, I can't get that angry that the statue does not immediately leap out as something you can use. Nonetheless, knowing that there is a puzzle solution to fighting Fritz is pretty hard to figure out on your own, even if you accept that using beads on everything is what this part of Atlantis usually entails.
Using the Crab Ship & Opening The Gates In The Canal - 4/10 - The crab flotilla is when the Atlantis sequence starts to lose me for a bit. You'll need to feed a sea monster using the crab you picked up earlier. Next, Indy hops on a crab-shaped float, powers it using an orichalcum bead (I HOPE YOU HAVE PLENTY OF THOSE), and pilots it through a canal. Nevertheless, Indy will bump up against a gate whenever he reaches the end of a screen. To open these gates, you will need to use the Sunstone, Moonstone, and Worldstone. However, you will not need to slide the stones around to match symbols this time around. Instead, you need to check the correct stone with the matching-sized circle at the top of the gate. For example, the large plaque you first encounter requires the Sunstone, and the smaller one furthest away from the entrance uses the Worldstone.
Did you know that you can leave the stones in the airlock and get to this part of Atlantis and need to drag Indy's ass all the way back to the entrance? I KNOW THIS SITUATION FROM PERSONAL EXPERIENCE! In my defense, this is the ONE LEVEL where Indy does not pick up the stones automatically. Luckily, telling apart which spindles coincide with which stones you have isn't too demanding as the gates are placed in a pattern of big-medium-small and vice versa. As you travel down the canal, the crescent-shaped gear can be easy to miss, and the cupboard, which the game designs as a hint, needs to be closed before it shows you a pattern used to solve the next puzzle.
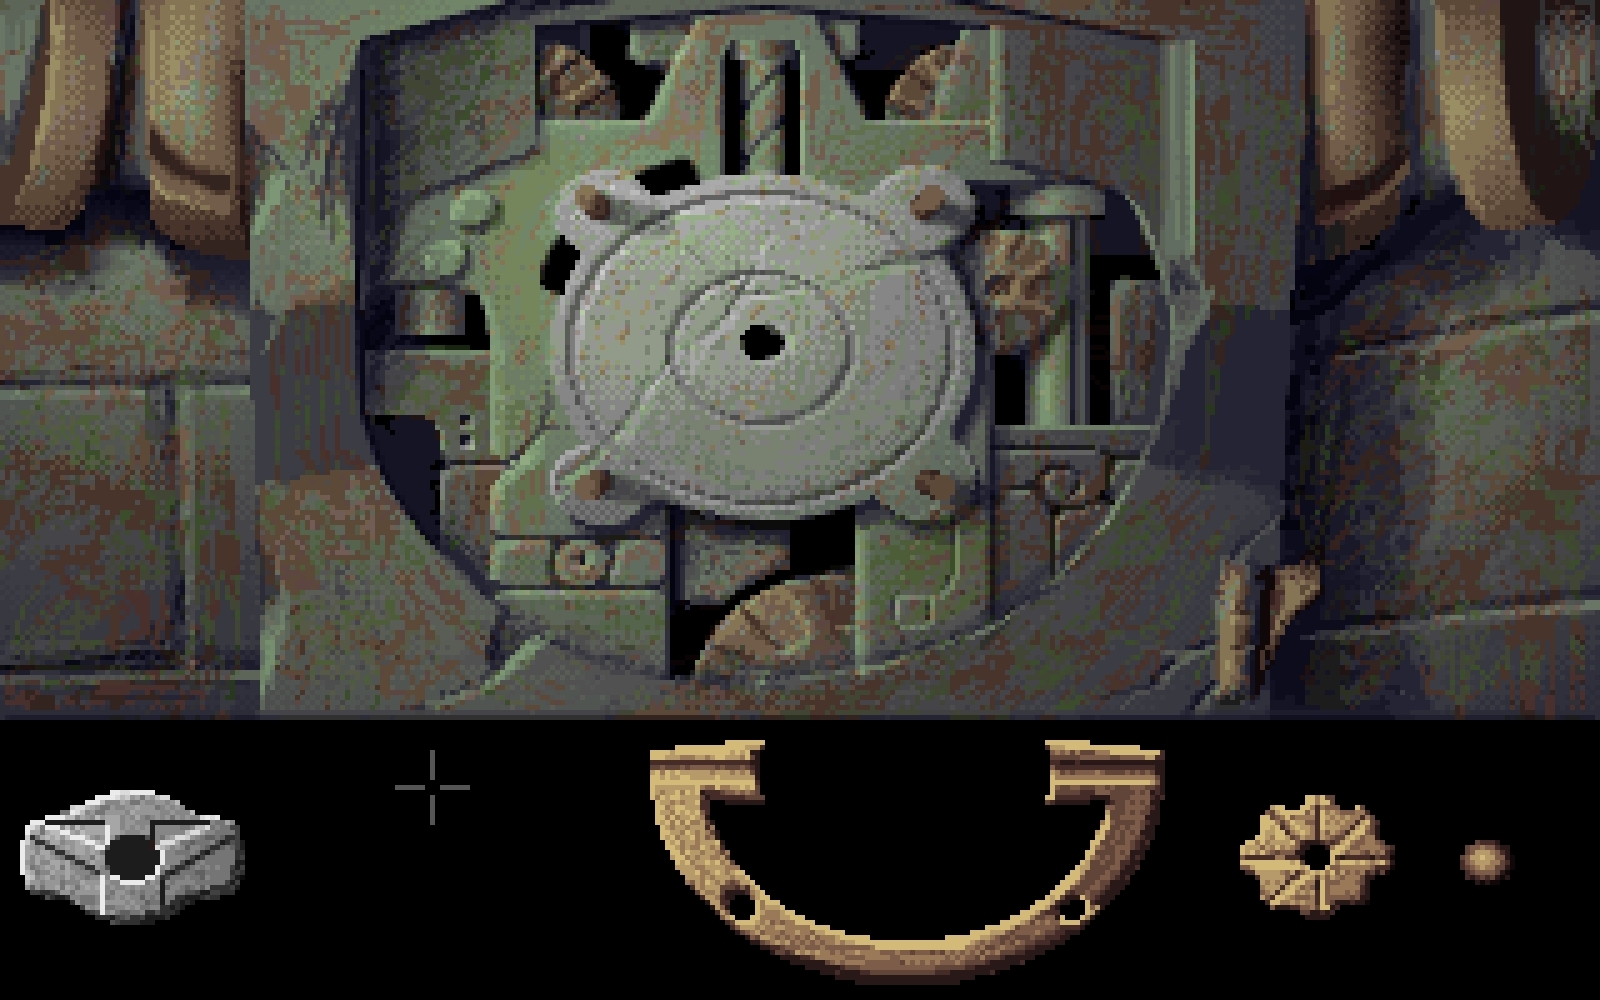
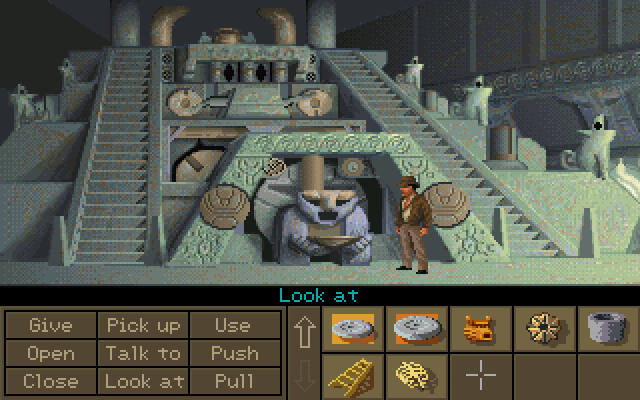
The Statue, Gears, And Chain Puzzle - 9/10 - This puzzle is where many players end up having to drag their asses back to the first level of Atlantis to make a new batch of orichalcum. It is worth mentioning that the game provides one clue on how to solve the statue mechanism puzzle. As Indy pilots the crab boat, he will see a staircase to a largely empty room. It is there he will pick up a crescent-shaped gear but will also observe a schematic of an Atlantean device. Eventually, Indy will make his way to the end of a hallway where he finds a broken-down robot, and it matches the schematic from earlier. The key here is to play around with the crescent gear inside the guts of the statue to make its arms move, so it tears down a stone wall. This task involves removing the gears already in the robot, placing the crescent-shaped gear on the rightmost two pegs inside it, returning the previous gears to their prior locations, and using an orichalcum bead to turn on the statue. You will end up wasting several beads if you are off by even a centimeter with any of these parts. Furthermore, you have to attach the statue's arms to chains so the mechanism can tear down the wall. If this explanation sounds longwinded and involved, that is because this puzzle is very much that.
When I did this the first time, I completely forgot to attach the chains to the arms of the statue and ended up wasting a bunch of my beads as a result. Because you can use your beads like crazy if you do not know what you are doing, this specific puzzle can fuck you over, as the machine room is pretty far away if you want to use it. Once you attach the chains, putting the gears in the correct order is a tall task because the "hint" from the previous cupboard doesn't exactly do the best job of telling which part goes where or the correct order of the gears. Likewise, needing to trigger the statue twice, one for each arm, was an annoying and unnecessary step. Overall it's a complex series of steps with an end goal that doesn't seem that clear to the player. Oh, AND I HOPE YOU REMEMBER TO PICK UP THE LADDER FROM THE AIRLOCK!
Getting Sophia - 3/10 - While not too troublesome, backtracking to get Sophia is not a fun escapade. From where you are at, going back to the dungeon is a royal pain in the ass, and with the Nazi guards still roaming about, it also takes up a non-insignificant amount of time, even if you are sucker punching. The worst part is how you need to remember to pick up the metal bar from the robot as it is a critical story item for a later puzzle, and if you forget to pick it up after saving Sophia, that's a real shame. Again, the actual puzzle is fine, but its structure is what kills it for me.
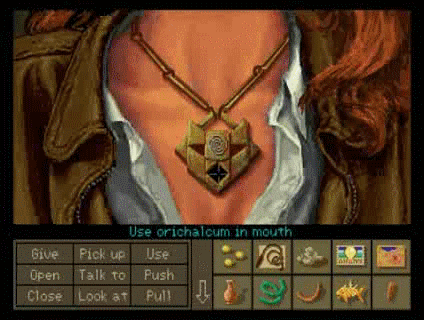
Getting Rid Of Nur-Ab-Sal - 3/10 - When you enter the first part of the Middle Ring, Sophia becomes fully possessed by an evil devil spirit. As a result, it is time to perform an exorcism. To accomplish this feat, you need to approach Sophia, ask to examine her necklace, and use an orichalcum bead on it until it makes a horrible face. This turn of events causes Sophia to scream in pain, and it is during this brief window, that Indy will need to use the gold box on the necklace. Doing so traps Nur-Ab-Sal, but you will need to destroy the box before continuing. So, Indy tosses it into a pit of lava and ends our sub-plot involving Nur-Ab-Sal.
The only step here that could get players is if they have run out of beads, and as I said before, that's a bummer. You have the option to leave Sophia behind, but as this leads to the "bad" ending, it is only something done by speedrunners. Otherwise, you need to observe Sophia, which is a bit odd considering that it seems like you should use an item on her. Likewise, using a bead on the mouth of the necklace is a bit finicky, and the timing to use the golden box can be harsh. Otherwise, it is a simple sequence and one I strongly recommend people do, given its story significance.
Piloting The Digging Vehicle - 5/10 - After dealing with Nur-Ab-Sal, Indy and Sophia explore the rest of the hall in the Middle Ring. Eventually, they find a large vehicle and can turn it on using a bead. When the machine powers up, Indy will need to manipulate three slots to get it to turn into a wall to reach the Inner Ring. To accomplish this task, you will need to use a stick from Nur-Ab-Sal's tomb and a pin from the robot. Using these items, you need to set each slot to the appropriate level for the vehicle to crash and dig through the wall.
Again, if you don't have a bead, it sure sucks going back to the start of the level to make another set. Driving the machine is a total pain in the ass, but at least it is not a timed puzzle. HOWEVER, if you forgot the pin in the dungeon after picking up Sophia, you dun fucked up. The scepter in the throne room is also easy to miss, as the bones in the foreground and background make it hard to locate. You can observe parts on the wall when directing the machine to know when to set the slots to the appropriate levels. However, it is pretty easy to start the vehicle and not know what the Hell you need to do to get it to stop spinning around in circles. Luckily, putting the levers in the correct slots and having them at the right positions can be brute-forced.
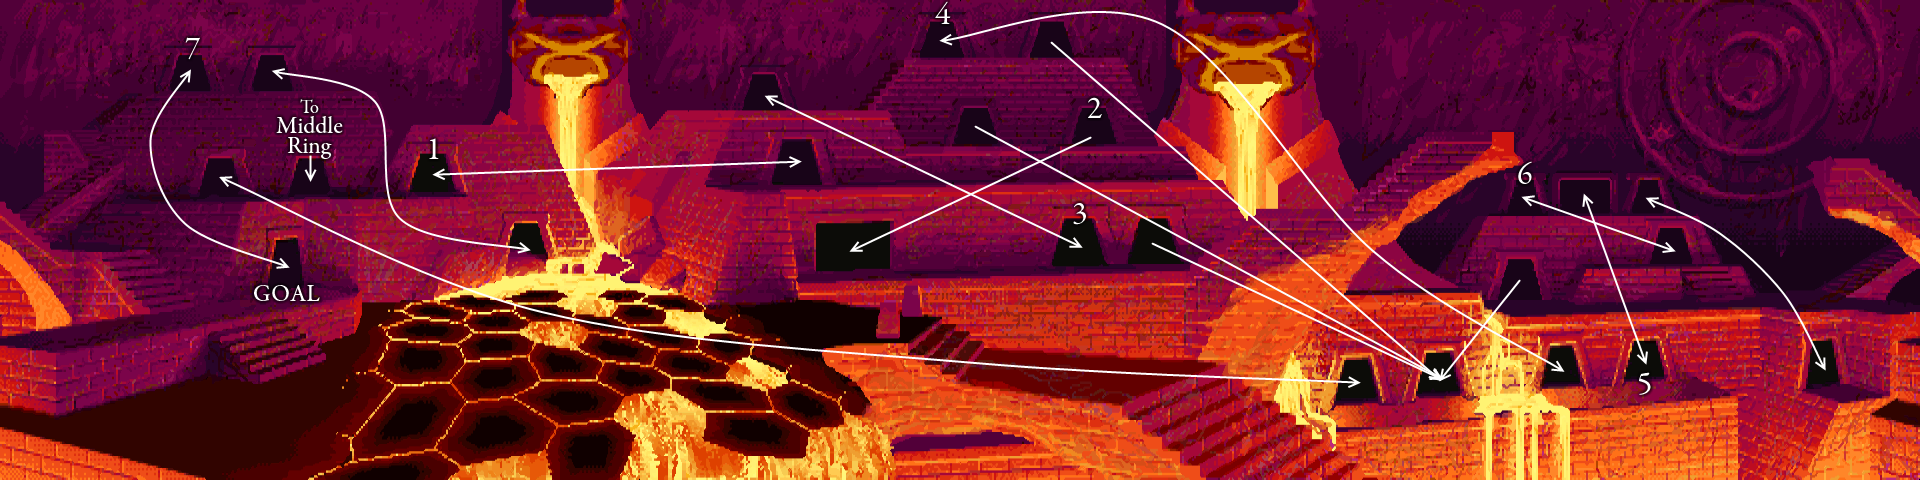
The Inner Ring Door Maze - 9/10 - I don't know what it was with LucasArts and door-based mazes, but tons of their games from this era have at least one. Fate of Atlantis is not immune and features one of the worst examples I have ever seen. As is always the case with these puzzles, you need to pick the correct series of doors to continue the game. In this case, it is a seven-step process with plenty of traps that can set up back a step or two. By the way, the level loops, making it way harder than it needs to be. Worse, a handful of doors lead to dead-ends making it tough to get your bearings straight. Finally, it is a seven-door sequence, and the doors do not have numbers or markers. Thus, you cannot even track your progress easily. To add insult to injury, the final exit isn't visible, so you don't know where the game wants you to go in the first place.
Lava Crossing - 6/10 - Hey, it's time for a game of "THE FLOOR IS LAVA!" The gimmick here is that there is exactly one solution to each possible attempt to cross the lava. The one dick move is that you will die if you stay too long on any tile. Every time you cross the lava, there is a different winning combo. Unlike the previous maze puzzle, at least the end is right there in front of you. However, luck makes it almost as unfun. Additionally, this puzzle resets, and you cannot simply use memory to get through it.

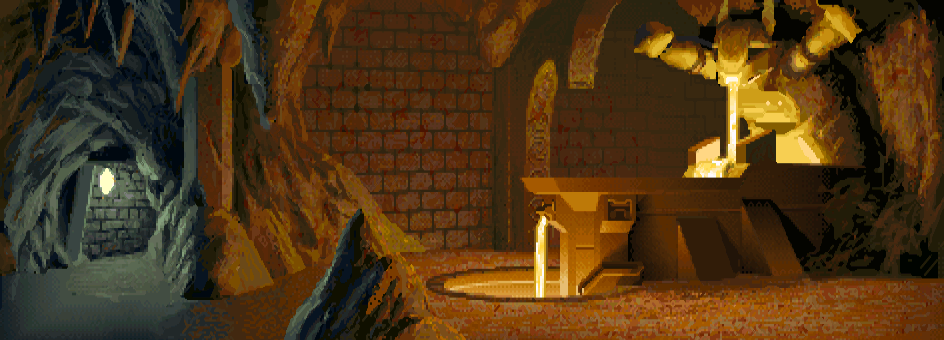
Turning On The Colossus Using The Stones - 10/10 - With the end in sight, Indy and Sophia enter the final chamber of Atlantis. If you were wondering, this puzzle is your last chance to get Sophia before the game commits you to the bad ending where she dies. Regardless, at the center of the final room is a spindle where Indy can place the Sunstone, Moonstone, and Worldstone. However, none of the previous combinations work. Instead, the game needs you to scan a mural three screens ago, and it is only there where you will observe an alignment of patterns unique to this central spindle. To which I say, "fuck that shit!" If this final puzzle had been on a "special" page of "The Lost Dialogue," that would have been one thing. Instead, you backtrack to a mural even before the door maze! Needing to do the lava puzzle and even remembering the correct door exits is a terrible experience! Furthermore, how the fuck were you supposed to know where to find the mural? I had to look it up, but nothing in the notes or even the environment pointed me to the location of this mural.
The Final Dialogue Sequence With Kerner - 6/10 - It's time to trick the evil Nazis using your intuition! First, you will need to screw over Kerner by convincing Ubermann to use one orichalcum bead instead of ten. This mistake will turn Kerner into a goblin, and then your attention can focus on Ubermann. As much as I like using dialogue prompts to beat enemies, the nuance of what the game wants you to pick is opaque and confusing. You need to point out Plato's error and turn Kerner into a mutant for the first choice. For the last dialogue section, you need to delay Ubermann rather than give him an amount or encourage him to use the machine, which is the opposite of what you did for the first sequence. Again, the scenario is not impossible but still tricky. Also, one incorrect choice immediately ending your game is a bit harsh.
Should You Play Indiana Jones and the Fate of Atlantis? (Verdict: Yes, 100%)
It's weird to look at this retrospective and notice how one might think I dislike Indiana Jones and the Fate of Atlantis. However, despite some niggling problems with how the game pushes the boundaries of the SCUMM engine and other questionable design decisions, there's no denying its place as a gold standard for the genre. Even if the Indiana Jones name holds no cache with you, this game is still worth experiencing. For something designed in the early 1990s, its production values and epic storytelling are astounding. Its riveting sense of adventure still holds up remarkably well and features a perfect blend of comedic and serious dialogue. I would even say that the version of Indiana Jones you get in the game is a more fully-fleshed "character" than some of the mainline movies bearing his namesake.
Nonetheless, there is bullshit to stomach with any playthrough, regardless of your route. The vehicle-based sequences are clunky and time-consuming, and there are multiple leaps of logic when performing more complex tasks. I laud Fate of Atlantis for having all of the ambition a game of its type could have at the time, but it also stretches its format and formula to the breaking point. If ever there is a game that pleads the case for LucasArts to begin exploring other gameplay systems beyond the SCUMM engine, this is it. Other companies and titles within LucasArts' wheelhouse (i.e., Loom) were already deconstructing the genre's conventions, and I cannot help but think Fate of Atlantis would have benefited from more experimentation rather than heel digging.
Nonetheless, I can only lament the game not being something it was never going to be for so long. It is a work of art and an indisputable high-water mark for an entire company and genre. If you have yet to play Fate of Atlantis, I cannot recommend it enough. You owe it to yourself to play the game to understand better why people across age groups and national borders hold this era of LucasArts and adventure games in such high esteem. The obvious next question is which of the three routes you should attempt first if you have yet to play the game. While my heart tells me to recommend the Wits Path as it is more my preference, there's no denying that the Team Path is the more accessible and conventional LucasArts experience. If you come to old-school adventure games seeking playful dialogue and punctuated humor, Team Path is the obvious choice. Likewise, while Wits Path is the more cerebral route for those who enjoy puzzles, Team's up-tempo pacing is bound to be more approachable to those who are less accustomed to adventure games from this era.