Grief Encounter: The Importance of Encounter Design
By Mento 1 Comments
A cornerstone of any good RPG, oriental or occidental, is a strong sense of encounter design. Sometimes an RPG will relegate its clever encounters to boss fights, and leave you to cleave through mobs to get there. Others will take the time to carefully consider every combat scenario in the game, ensuring that there's always some new wrinkle or enemy type you've yet to meet before, or at least a new combination of the familiar. And, of course, an "encounter" isn't necessarily limited to combat: it might include tense situations which you can defuse without bloodshed, or might not involve conflict at all.
I was thinking about this as I was playing Avadon 2: The Corrupted, the middle chapter of Spiderweb Software's axonometric turn-based Avadon RPG series: while a lot of the game's encounters are with crowds of common foes - undead, brigands, spiders, wolves, etc. - there's enough times where the player is forced to think on their feet due to some unforeseen snag, or one or more special conditions to the fight that changes your usual strategies. It's a game that is somewhat minimalist with its approach - there's not enough time for a small studio to test every combination of character and ability to ensure the balance is correct, and Avadon 2's heavy emphasis on turrets and tinkermages (a new class capable of building turrets on the fly) suggests that a lot of what they tested when adjusting the class ended up in the game. However, there are certainly some big ideas in what is otherwise a very conventional tactical RPG.
I spoke about a few of my favorite battles in Divinity: Original Sin 2, and I want to do so again here. I don't intend to get into quite as much detail - no play-by-play commentary this time - but I wanted to highlight a few times when the game surprised and delighted me; the game's designers managing to finagle the RPG engine's limited features to create some imaginative battles. I'll be providing some amount of context and follow-up too, so consider these rundowns spoiler-heavy. (It's a seven year old game at this point, but I still don't want to deprive old-school RPG fans of the same fun I had discovering these fights.)
(Oh, and you'll probably want to check out the Indie Game of the Week review and a plot synopsis for the backstory. Gonna be throwing a lot of proper nouns out there.)
Fightin' Words
The Lord of Wind
The Context: Avadon 2 sorta has three concurrent plots, based on the three biggest threats to the peace of The Pact (a name for the five-nation alliance that is the player's home) - The Tawon Empire, a lapsed sovereignty who is looking to gear up and retake their old territory; The Wyldrylm Rebels, a group of Lynyrd Skynyrd-loving freedom fighters operating against The Pact; and The Corruption, an unpredictably dangerous and barren region given over to chaotic magic and demonic invaders. It's on a mission to the Corruption that you meet Krymhylas, The Lord of Wind, who has taken up residence in one of the old Monitor Bases (observation posts in the Corruption that are regularly absorbed by it). He's been in talks with Miranda, a former "Heart" of Avadon (basically, one of the higher-ups), who is looking for some magical means of destroying The Pact and Avadon in the Corruption.
The Fight: Krymhylas doesn't attack you directly, but instead decides to test you by having you and Miranda fight it out for his favor. He's depicted as something of a blowhard, fittingly enough, but his powers over wind are legit: the battle starts by huffing you, your two companions, Miranda, and a few of his minions into a random room and closing the doors behind you.
However, it doesn't stop there. Every couple of rounds you get whisked off into another room connected to the previous in a circuit: what this does is shuffle where everyone is standing and toss in some new enemies, such as demons and hostile turrets. Miranda is there too and is almost impossible to defeat, but the constant motion will often stun her for a round making her less of a problem than the new wave of foes.
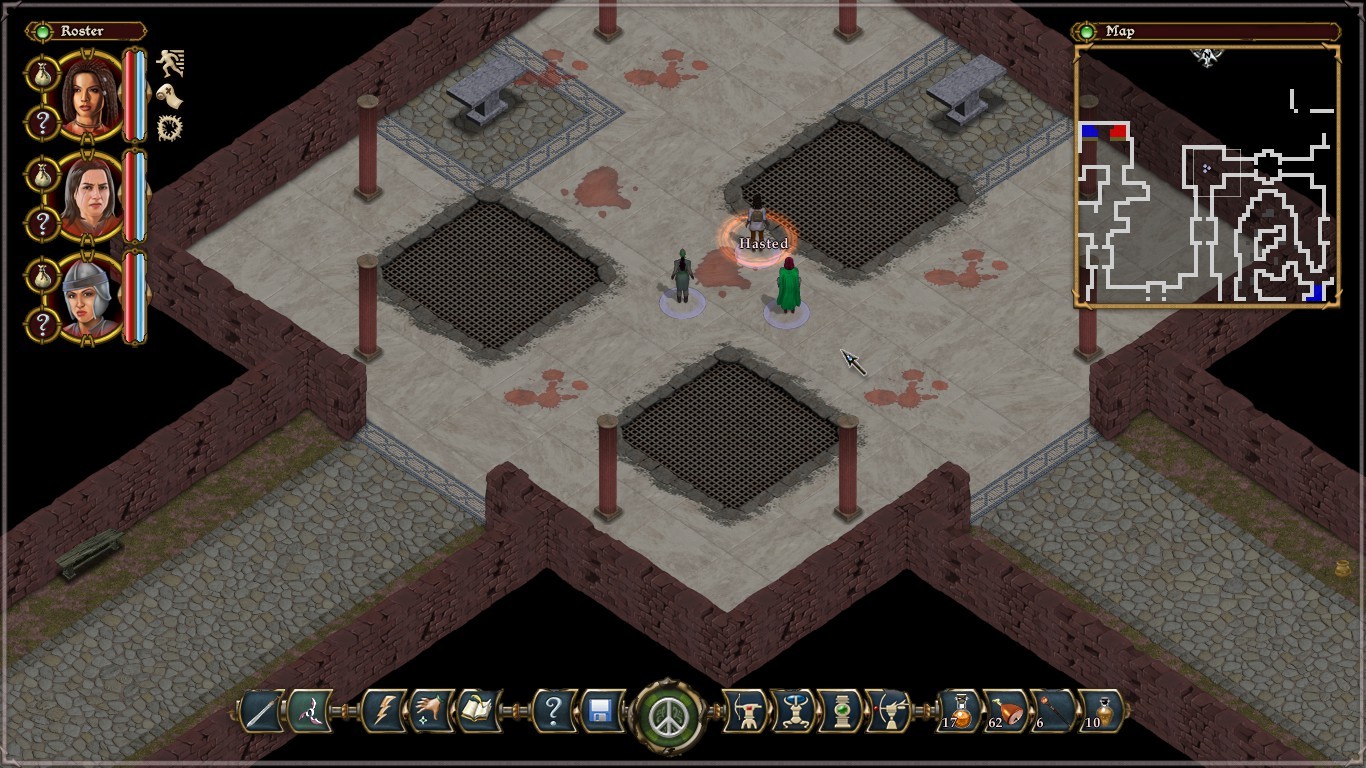
What I love about this fight is the unpredictability: it is what the Corruption chapters of the game are best at, as the capricious whims of the apparently sapient region will often put you in unforeseeable situations. The goal here is more to survive than to defeat everyone, as you'll inevitably run out of chambers to fight in and Miranda will be separated from you (she's a recurring villain, so she'll be back). Having a tinkermage or a shaman - the two units capable of making NPC allies appear - can help mitigate the crowd control, though you're always in close-quarters for the most part as the rooms aren't terribly huge.
The Aftermath: Simply surviving is enough to succeed this mission, though you do have to sheepishly report the loss of the base (since Krymhylas ain't budgin') and Miranda (who vanishes after you get separated) alike. Both Miranda and Krymhylas can be fought again towards the end of the game, though the latter is optional. His second boss fight plays similarly to the first, except now he is fighting you directly and the regular gusts push you to a different corner of the same larger room. For some reason, this also generates new minions every time. He's considered one of the game's four superbosses, another of which we'll talk about a little further below.
The Three Statues
The Context: A recurring side-quest - which is to say, it opens up in stages as you get further through the game - involves investigating an abandoned tinkermage workshop just outside the allied town of Troezen. It's only when you get to the center that things really start to pop off with the site's automatic defenses...
The Fight: The fight is against, essentially, three tinkermages and a whole lot of hostile security magic. The three tinkermages are actually statues: they operate independently and are normally immune to attacks, and each is capable of producing two turrets each. There's also a central ring that creates a new inert construct every two rounds: once it produces four, the next thing it does is activate them all, and they will quickly demolish the party once "alive". The one weakness with the tinkermage statues is a wisp that hops between them: whichever statue has the wisp can be damaged, but the statues don't all share a health bar.
This is naturally a very challenging battle and a slow one of attrition, as you whittle down each statue's health while stemming the flow of inert constructs in the center of the room. The turrets the statues create are random: some, like the crossbow turrets, aren't really strong enough to worry about but there are those like the flamethrower/icethrower turrets which hit hard enough to be an issue. Worse are the buff and debuff turrets: the former can increase the speed of every enemy unit within range, while the latter can cause your team to miss turns. Worst of all are the healing turrets: these are capable of repairing the damage you've done to any tinkermage statues as well as healing themselves, the other turrets, and the central constructs. It's a lot to keep track of, but it's largely a case of situational awareness and prioritization: identify the biggest threats and remove them quickly. If there's nothing that demands your immediate attention in any given round of combat, it's ideal to chip away at the currently-active tinkermage statue (if you can remember which one it is: the only clue is a slight visual effect that lasts a few seconds after the wisp moves).
For as much difficulty as I had with this one, it's a really intriuging fight that had me draw from all the resources at my command. AoE attacks are essential, as are summoned units/turrets, as they can busy themselves with the small fry while identifying the correct statue target. I built a few AoE turrets in the middle of the room to help me keep track of the true target while splitting my team between doing damage to it and keeping the central construct numbers down. It's definitely the kind of puzzle fight a smartypants mage would set up.
The Aftermath: The completion of the side-quest, which didn't reward much but gave my protagonist (a tinkermage) a decent piece of class-based equipment and a trophy/achievement for my troubles. Fortunately, the owners of the workshop didn't come looking for me afterwards.
Kitchen Nightmares
The Context: The Corruption plays a little trick on the party by creating a perfect facsimile of a farmhouse in the middle of the dry wastes. The party investigates despite the risks.
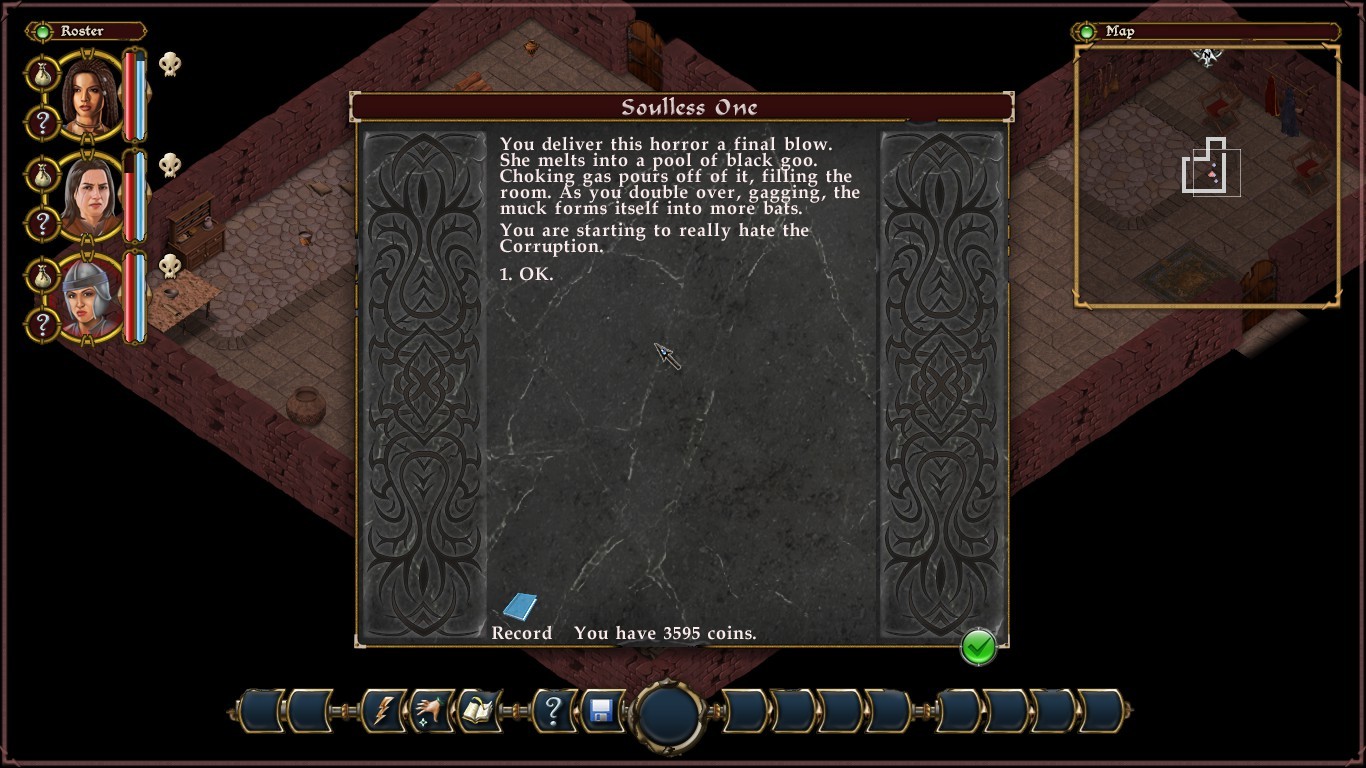
The Fight: You can tell the developers had a lot of fun writing encounters for the Corruption, which as stated above has a sort of godlike being with a malevolent sense of humor controlling it. The farmhouse is empty but for a single woman cooking something on the stove; the woman has no eyes, only black voids, and screams bats at you when you interrupt her cooking a stew (which has a human skull bobbing around in it). When I say "screams bats," I mean in the same way as that hypothetical guard dog in The Simpsons that shoots bees at you when it barks: the fight is against whatever creature this woman actually is and the small army of bats she brings to her side.
It's not much of a fight to be honest. I do appreciate that killing the woman-shaped horror causes her to melt into a puddle which summons more bats. Can't have too many bats.
The Aftermath: None, it's just a fun little side-encounter as you trek across the least hospitable region known to mankind.
The Wrath of Vardegras
The Context: After Krymhylas, the next Corruption resident that Miranda tries to negotiate with is an ornery old dragon named Vardegras. The dragon's also skeptical about whether Miranda's leader, the shadowy Tawon underworld figure Dheless who is busy mounting a continent-wide invasion, is capable of defeating Avadon and is vacillating on lending any support despite his evident dislike of the current status quo. When the player gets there, they're forced to leave their companions behind and negotiate with the dragon on behalf of Avadon alone. This leads to the player being put in a cell while Vardegras and Miranda hash out an opening bid for his vassalage, and you don't care to hang around long enough to hear what they decide.
The Fight: This is one of those times where fighting is not recommended. Vardegras is an incredibly powerful opponent (as dragons regularly are) and the player is by themselves for this chapter. Instead, what the player does is quietly move around the lair of Vardegras to find an escape route. As soon as Vardegras finds out you've left the cell and started poking around his territory and killing his "pets" (mostly spiders, some skeletons and demons), he's determined to end you. However, there's only so many places in his lair a big dragon like him can squeeze into.
In a sense, this is like the game's little homage to The Hobbit. By keeping to the passageways and rooms the dragon can't enter, you're safe from his wrath. However, these rooms and passageways regularly cross through the larger cave network that he can move around in, and he can detect you from a mile away. You can just about handle the pets at least, though this area does give you a few challenging optional fights if you're that confident as a solo warrior.
The Aftermath: You eventually escape the lair and send Miranda packing again, and the dragon wisely decides to let bygones and bygones and go back to pretending to be on Avadon's side. He's another of the game's superbosses: you can come back later with a full party and kick his ass if desired, but it's not an easy fight. In addition to a lot of strong breath attacks, Vardegras can summon golems that, whether they're destroyed or allowed to come close to the dragon, will power up his next move. He'll eventually allow the Corruption to take hold of him when desperate enough, which leads to more summoned horrors and additional powers to deal with. Best bet is to end the fight quickly by focusing on him and surrounding him so his breath attacks can't hit multiple members at once.
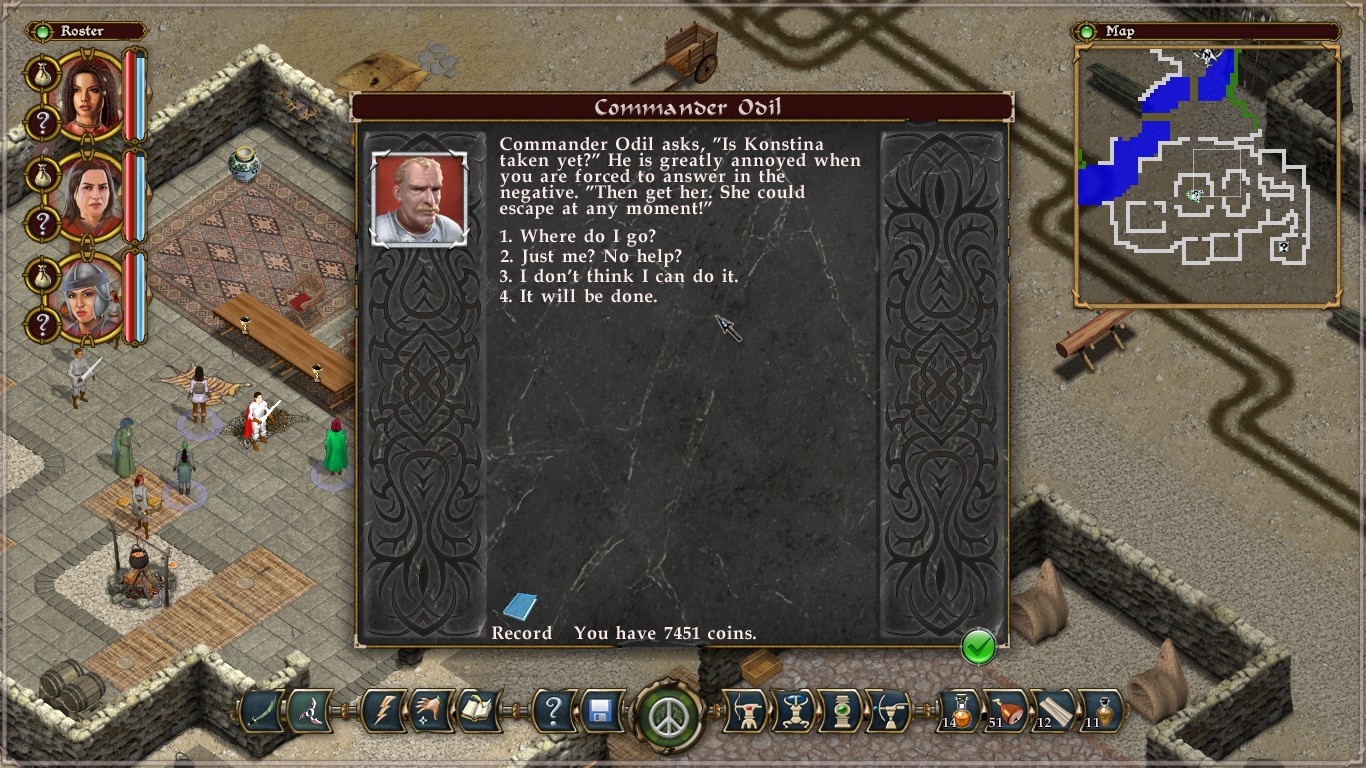
Siege of the Raider Stronghold
The Context: The first of the game's three game-wide arcs involves the Wyldrylm rebels, who you eventually corner with the help of the nearby Rockridge Fort and their spies. The player can decide to ally with the rebels or stick with the fort soldiers, but either way a massive fight breaks out at the rebel headquarters.
The Fight: My favorite part of any strategy CRPG is when the screen is filled with NPCs, both allied and hostile, and you get to watch them all duke it out while helping out whenever your turn eventually comes along. It's a fairly passive experience all-told, but you get attached to watching certain NPCs try to survive the fracas even if they're nameless fodder like "Fort Soldier" or "Rebel Archer". Avadon 2 doesn't have too many of these fights unfortunately, but the massive battle royale at the rebel HQ is a lot of fun. Reminds me of Mount & Blade, or those sieges in Skyrim, only way less hectic because of the turn-based format. Makes me wonder if I shouldn't get into more Total War games (or a turn-based equivalent).
The game does a smart thing by having the first stage of the rebel assault be against a group of titan enemies waiting just in front of the rebel base. Titans are blue giants that live in the Farlands - the external regions hostile to The Pact - and are presented early on as some of the most dangerous creatures in the game. The small troop of them here are absolutely no joke: if you were by yourself (and I'm talking about the usual three-person party set-up) they'd annihilate you quickly. The reason they're here is to stop you running too far ahead of your allied NPCs, who are needed to soak up the damage/attention long enough to defeat them all. After that, you can approach the fort as a massive raiding party and let loose.
The Aftermath: The rebels are destroyed by the Rockridge Fort soldiers (or the inverse if you decide to join them) but not without a whole lot of extra fighting underneath the HQ, after you break off from your NPC friends. It also concludes this particular thread of the game's story.
Anyway, these are just five of the most memorable battles from Avadon 2: The Corruption, an otherwise modest throwback RPG that generally doesn't go out of its way with regards to fancy battle-specific features or showiness. It's just packed with good writing and engaging encounter design, and I'm always happy to highlight both whenever I see them.