Something went wrong. Try again later

Choi

I edited my first ever video. A tutorial for my ARMA 3 clan. http://t.co/oOzg0Uvhaw

706 1 65 51
Forum Posts Wiki Points Following Followers

Choi's Maya Adventure- Texturing

Hi everyone from a land of pens, parachutes and light bulbs
  
Before I dwell on the texturing of  our little sacboy model, which we all know and love, I'll first need to learn all the basics.  
Which I have  =)  
And if you don't mind, I'm going to tell you all about it now. 
 
Here's the first thing I've done: 
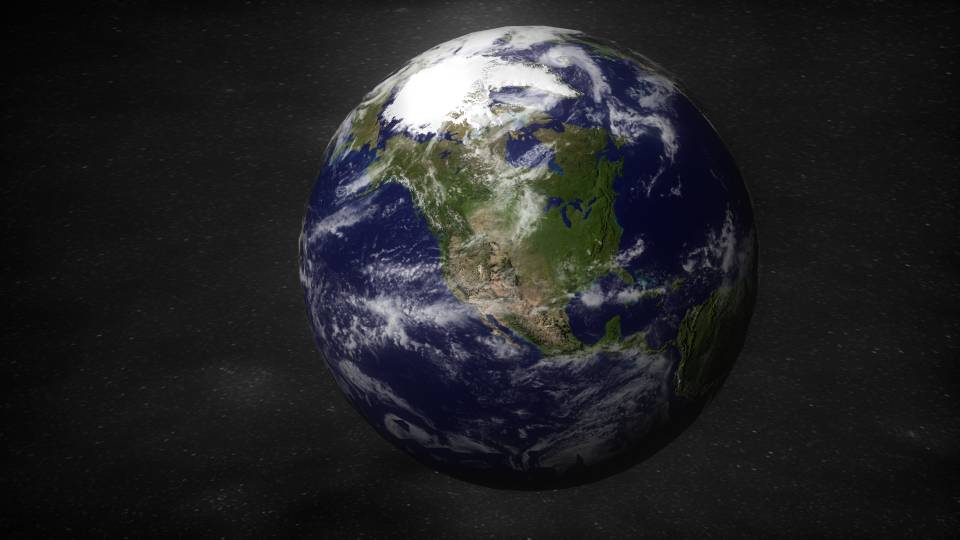
 2 minuts of rendering; my computer SUCKS!
 2 minuts of rendering; my computer SUCKS!
Original picture and size here!
Pretty cool result, keeping in mind that there are only 3 spheres of geometry here! One is the ground, the other is the cloud layer and the third large one  representing space. 
  
While googling for Earth textures, I came across this great site that already has them all. 
  

Bump Map

 
With this easy example, I'm going to show you how you can tell Maya what values you want on your geometry by turning images into valuable information. 
 Keep in mind that most attributes you assign to shaders (which are later assigned  to geometry) are just numerical values (transparency, reflection, bump etc.) , if you don't count attributes that can be colored (colors are 3 channels; red, green, blue). 
 
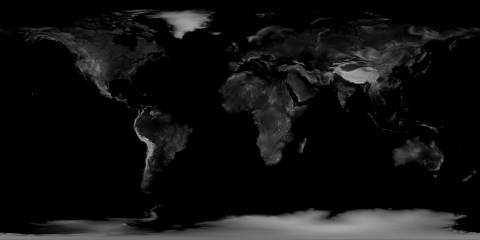
So if you load an image like this one into a bump map channel:  
No Caption Provided


You'll tell Maya that the part that is white is higher (1) then the black part (0) and the grey is everything in between (0-1).  
Easy as pie! When you wrap your mind around it and realize you can manipulate pretty much any attribute this way, it becomes a very powerful tool. 
 
Hope you liked this little sneak peak, stay tuned for more texturing goodness!  
   
Comments, suggestions and critique always welcome! 
 
Thanks for reading!     
28 Comments

28 Comments

Avatar image for choi
Choi

706

Forum Posts

1

Wiki Points

0

Followers

Reviews: 0

User Lists: 2

Edited By Choi

Hi everyone from a land of pens, parachutes and light bulbs
  
Before I dwell on the texturing of  our little sacboy model, which we all know and love, I'll first need to learn all the basics.  
Which I have  =)  
And if you don't mind, I'm going to tell you all about it now. 
 
Here's the first thing I've done: 

 2 minuts of rendering; my computer SUCKS!
 2 minuts of rendering; my computer SUCKS!
Original picture and size here!
Pretty cool result, keeping in mind that there are only 3 spheres of geometry here! One is the ground, the other is the cloud layer and the third large one  representing space. 
  
While googling for Earth textures, I came across this great site that already has them all. 
  

Bump Map

 
With this easy example, I'm going to show you how you can tell Maya what values you want on your geometry by turning images into valuable information. 
 Keep in mind that most attributes you assign to shaders (which are later assigned  to geometry) are just numerical values (transparency, reflection, bump etc.) , if you don't count attributes that can be colored (colors are 3 channels; red, green, blue). 
 
So if you load an image like this one into a bump map channel:  
No Caption Provided


You'll tell Maya that the part that is white is higher (1) then the black part (0) and the grey is everything in between (0-1).  
Easy as pie! When you wrap your mind around it and realize you can manipulate pretty much any attribute this way, it becomes a very powerful tool. 
 
Hope you liked this little sneak peak, stay tuned for more texturing goodness!  
   
Comments, suggestions and critique always welcome! 
 
Thanks for reading!     
Avatar image for sweep
sweep

10887

Forum Posts

3660

Wiki Points

0

Followers

Reviews: 4

User Lists: 14

Edited By sweep  Moderator

That's a nice little site, good find. You could key the clouds layer to slowly rotate around the earth, that would look pretty cool. Although, if it's taking you 2 minutes to render a single frame then maybe animation isn't such a good idea. 24 frames per second could really fuck you up ;)

Avatar image for jeust
Jeust

11739

Forum Posts

15085

Wiki Points

0

Followers

Reviews: 8

User Lists: 15

Edited By Jeust

Cool! I liked what you did with the Earth on space. Pretty nifty! ^^

Avatar image for choi
Choi

706

Forum Posts

1

Wiki Points

0

Followers

Reviews: 0

User Lists: 2

Edited By Choi
@Sweep: Yup, no animations for me, at least not of that quality. 
But I'll probably try and make a better water texture so you can see the waves and details and maybe do a "at night" shot with the lights from the dark side =)
Avatar image for choi
Choi

706

Forum Posts

1

Wiki Points

0

Followers

Reviews: 0

User Lists: 2

Edited By Choi
@Jeust said:
" Cool! I liked what you did with the Earth on space. Pretty nifty! ^^ "
What do you mean? Earth on space?
Avatar image for jeust
Jeust

11739

Forum Posts

15085

Wiki Points

0

Followers

Reviews: 8

User Lists: 15

Edited By Jeust
@Choi said:

" @Jeust said:

" Cool! I liked what you did with the Earth on space. Pretty nifty! ^^ "
What do you mean? Earth on space? "
Didn't you model that image of Earth seen from space? 
 
That is awesome!
Avatar image for choi
Choi

706

Forum Posts

1

Wiki Points

0

Followers

Reviews: 0

User Lists: 2

Edited By Choi
@Jeust: Ah, that! Yes I did. 
But it's not "modeling" per se. There are only 3 simple, plain spheres of geometry here. Everything else is done with textures, maps and rendering. But yes- I did it and it is 3D.
Avatar image for jeust
Jeust

11739

Forum Posts

15085

Wiki Points

0

Followers

Reviews: 8

User Lists: 15

Edited By Jeust
@Choi said:
" @Jeust: Ah, that! Yes I did. But it's not "modeling" per se. There are only 3 simple, plain spheres of geometry here. Everything else is done with textures, maps and rendering. But yes- I did it and it is 3D. "
Yeah, I know. I think it looks great. You are really getting the hang of things. ^^ 
Avatar image for choi
Choi

706

Forum Posts

1

Wiki Points

0

Followers

Reviews: 0

User Lists: 2

Edited By Choi
@Jeust: Thank you duder.
Avatar image for jeust
Jeust

11739

Forum Posts

15085

Wiki Points

0

Followers

Reviews: 8

User Lists: 15

Edited By Jeust
@Choi said:
" @Jeust: Thank you duder. "
Just keep working it! ^^  
Avatar image for jambones
Jambones

1726

Forum Posts

10015

Wiki Points

0

Followers

Reviews: 2

User Lists: 2

Edited By Jambones

It'd take much longer on my computer. :-| I think that, combined with the fact that UV unwrapping busted my ass, is the reason I stopped modelling. Though your blog is making me want to try again. 

Avatar image for choi
Choi

706

Forum Posts

1

Wiki Points

0

Followers

Reviews: 0

User Lists: 2

Edited By Choi
@Jambones: Don't give up man. Just use IPR rendering and render a small frame of an image while you tweak what you need to see the effects.  
 I didn't get to the UV unwrapping yet, so I don't know what awaits. 
Post some of your work, I would love to see some! 
If you're also new and/or learning by yourself, we could have small project standoffs! 
Avatar image for kimbokasteniv
kimbokasteniv

120

Forum Posts

0

Wiki Points

0

Followers

Reviews: 0

User Lists: 3

Edited By kimbokasteniv

Pretty cool, makes me want to get back into 3D modelling. Is there a particular reason you chose Maya over 3dsmax? What I would really like to see you do with this model, is add a specular map so the water reflects more than the land, and make the clouds cast a shadow on the Earth. 

Avatar image for choi
Choi

706

Forum Posts

1

Wiki Points

0

Followers

Reviews: 0

User Lists: 2

Edited By Choi
@kimbokasteniv: Hey, you should definitely pick it back up! 
I never tried 3dsmax- I grabbed Maya one day without knowing jack abo ut it and immediately fell in love with its user friendliness. 
Have you used both? What do you think? What are the differences?  
OO, and post some of your work, too!
Avatar image for kjellm87
Kjellm87

1735

Forum Posts

2788

Wiki Points

0

Followers

Reviews: 0

User Lists: 1

Edited By Kjellm87

I'm pretty sure that like in 3dmax Maya has a place to set a bitmap as background when rendering and not have to use a extra sphere, the space looks a little stretched.
Good job though, and have you placed any light since it tok 2 min to render some spheres?

Avatar image for choi
Choi

706

Forum Posts

1

Wiki Points

0

Followers

Reviews: 0

User Lists: 2

Edited By Choi
@Kjellm87: It does probably.  I didn't add any lights, some attribute generated one- blinns specular probably. It's default lighting, pretty big texture files and my REALLY old rig (5-6 years old, Sepron 3000+ and a gig of RAM).  
I know the background's stretched, it's the first thing I'll change and improve. Thanks for the feedback.
Avatar image for zimbodk
ZimboDK

863

Forum Posts

20

Wiki Points

0

Followers

Reviews: 1

User Lists: 2

Edited By ZimboDK

I've started modelling stuff again too. I pretty much forgot everything I learned in 3ds max, so I'm starting over again with various tutorials. Also, the program has changed quite a bit since I last used it 5 years ago, so getting back into a steady rhythm again is quite difficult.
 
The only stuff I have left from my earlier days of 3d are these two:
 

 An old school project that turned out alright.
 An old school project that turned out alright.
 Yeah, It's a cane. I dunno why I made it.
 Yeah, It's a cane. I dunno why I made it.


Avatar image for crusader8463
crusader8463

14850

Forum Posts

4290

Wiki Points

0

Followers

Reviews: 7

User Lists: 5

Edited By crusader8463

Ahhh the planet model. The 3D equivalent to the programmers Hello World. I remember how proud I was the first time I modeled planets. Whenever I got let down after putting hours, upon hours, upon days of work into a model only to have it turn out like crap in the end I would always take a few minutes and make a cool looking space scene to boost my ego because they were so easy to make look awesome!
 
Good place to start learning the basics of applying textures and how to map them onto the model correctly. Keep up the work.
 
EDIT: Also, fuck you! Making me want to find a copy of 3DS max and to try doing 3D again! I always get half a body modeled and get frustrated when I mirror it and one little vertex is off center and it fucks up the whole model and I need to start again. I was free of the nightmare of 3D! STOP TRYING TO PULL ME BACK IN!

Avatar image for choi
Choi

706

Forum Posts

1

Wiki Points

0

Followers

Reviews: 0

User Lists: 2

Edited By Choi
@ZimboDK: Hey, thanks for sharing those with us, their great! I really dig the foliage in the first one- KUDOS. Whats with the reflection on the left wall with the cane? 
What school did you go to if that was a school project? In Croatia, we don't have schools for that kind of work- only courses. 
Avatar image for zimbodk
ZimboDK

863

Forum Posts

20

Wiki Points

0

Followers

Reviews: 1

User Lists: 2

Edited By ZimboDK
@Choi: Well, it was a technical college in Denmark. I went on the creative line, so everyone has to go through several months of basic education where you try a bit of everything (3d modeling and texturing, 2d design, basic web programming and stuff like that), and then you choose what you want to specialize in. I chose programming and web design.
 
Oh, and the wall is supposed to be a mirror, hence the reflection.
Avatar image for choi
Choi

706

Forum Posts

1

Wiki Points

0

Followers

Reviews: 0

User Lists: 2

Edited By Choi
@crusader8463: You know that you can snap to the grid and keep all those vertices in check right? You'll have to find a better cop-out reason than that. (also check out my other blogs for modeling, I did a sackboy model you know? =) )  
Pick that MAX back up and share some of your stuff with us. 
 
@ZimboDK:
I know it's suppose to be a mirror, it's just that something is wrong with it. It's too bright. 
 
Wow, there really are a lot of people who do Maya and/or 3DSMAX here.... 
Maybe I'll assemble a small community with all the good stuff after I gain more followers and this thing here starts to spread around the site. 
Avatar image for zimbodk
ZimboDK

863

Forum Posts

20

Wiki Points

0

Followers

Reviews: 1

User Lists: 2

Edited By ZimboDK
@Choi: Oh yeah, it is a bit too bright. I think I placed a light directly over the mirror, and I hadn't set up Vray correctly so it caused the reflection to go a bit crazy.
Avatar image for cjmabry
cjmabry

514

Forum Posts

35

Wiki Points

0

Followers

Reviews: 0

User Lists: 5

Edited By cjmabry

This makes me want to start re-learning Blender. I remember doing this kind of stuff with a randomly generated black and white cloud image in the GIMP, then making some random terrain with it. I learnt for about a week then stopped ha. 
 
 Oh and ya, I'm an open source guy :D 
 
EDIT: Good work btw.

Avatar image for kimbokasteniv
kimbokasteniv

120

Forum Posts

0

Wiki Points

0

Followers

Reviews: 0

User Lists: 3

Edited By kimbokasteniv
@Choi: I really never got too good. I was looking at your sac-boy model, and I never made anything out a of a mesh like that. The only thing I ever felt I got good results with was extruding and lathing splines. I am curious as to how you manipulated the sacboy model. Did you just pull on a few vertexes at a time? What shape did you start with? Or did you start with several shapes and connect them together? Otherwise here are two things I made 4 years ago:            
No Caption Provided
No Caption Provided
   
I have made other things, but a lot of it is just weird unfinished stuff.  I realized that I would have to invest a lot of time if I ever wanted to model humans or animals, so I decided to stick with programming instead. Otherwise, I did the same thing as you, picked up 3dsmax one day, and never thought twice about it. But now that I see this stuff, I'll probably pick up Maya, and give this stuff another shot.      
Avatar image for choi
Choi

706

Forum Posts

1

Wiki Points

0

Followers

Reviews: 0

User Lists: 2

Edited By Choi
@cjmabry:  
Well, I'm glad if you find this an inspiration to do your own thing like so many others. And you should- too much young talent going to waste. ; ) 
 
@kimbokasteniv: Everything is pretty much explained in that blog and the blogs before. I made a base (head and body) with Z spheres in Zbrush. For basic geometrical foundations I just switch between Z brushes Z spheres and Maya to clean the topology- hope that helps. 
Thanks for sharing your work- Really like the Hitman logo, and nice render on the chess table.  
 
EDIT: 
@kimbokasteniv:
 And you should take another shot! We can all practice together!
Avatar image for akrid
Akrid

1397

Forum Posts

0

Wiki Points

0

Followers

Reviews: 0

User Lists: 2

Edited By Akrid

Looks great!
 
If you want to try something a bit more technical with texturing, you can try making an atmosphere effect on a 3rd sphere, with ramp shaders on the transparency and diffuse color parameters:

No Caption Provided
 
It'd probably be easier to make this effect in photoshop, but it's still a cool trick.
 
Actually, just noticed I built this wrong. Since the ramp shader has parameters for transparency built in, there's no need to feed it into another shader. Maya is so confusing, I hate working in it.
Avatar image for zimbodk
ZimboDK

863

Forum Posts

20

Wiki Points

0

Followers

Reviews: 1

User Lists: 2

Edited By ZimboDK

Alright, I finally took a break from gaming and started a 3D project. I plan to build a domed mega city with a surrounding wasteland. I built the basic structure of the city today, though it still lacks a lot of detail. And textures. And lights.
 

No Caption Provided

Doing stuff like this isn't really recommended with only 2GB of RAM. Total render time so far: 3 minutes. It cripples my PC during rendering, to the point where I can just wait for it to finish. This thing will be a beast when I've added lights and extra models.
Avatar image for choi
Choi

706

Forum Posts

1

Wiki Points

0

Followers

Reviews: 0

User Lists: 2

Edited By Choi
@ZimboDK: Hell yeah man!  Glad you decided to pick it back up. I know it's super early, but why are those streets so wide? 
Yeah, the pc almost locks up while rendering, you can just wait it out. Looks great duder! Keep it up.