Overview
Released on December 31, 1998, roughly a year after Uprising: Join or Die, Uprising 2: Lead and Destroy is a PC first-person real-time strategy game developed by Cyclone Studios and published by the 3DO Company. Much like the original game and Activision's subsequent title, Battlezone, Uprising 2 employs many of the gameplay tropes commonly associated with traditional real-time strategy games of its era, such as resource gathering, base building, and unit production, while allowing the player to interact with this game world from either a first-person or third-person perspective rather than the more typical isometric viewpoint used by most RTS games. Facilitated by this change in perspective, Uprising 2 places a significant emphasis on fast-paced action, with the player being required in most situations to personally lead the assault on their enemies at the helm of a powerful Wraith tank, which they pilot at all times. Success in most missions requires the player be able to successfully balance the demands of their bases while also participating in combat.
Uprising 2 contains two single-player modes: a story-driven campaign mode and a scenario mode where individual missions can be played with adjustable variables. The story mode of Uprising 2 is more linear than that of the first game, with only the occasional option to choose between different missions, however its three campaigns can be played in any order. In addition, Uprising 2 supports multiplayer between up to eight players.
Plot
The campaign mode of Uprising 2 takes place roughly one hundred years after the events of the previous game, which, it is revealed, resulted in the dissolution of if the Imperium at the hands of dissident rebels. In the interim period, a new government is established, calling itself the New Alliance, however its formation is preceded by years of intense backlash against the vestiges of the fallen Empire. Buildings and artifacts associated with the old Imperium are razed or destroyed during this time, and several members of the Imperium are publicly executed. The scientific, historical, and cultural losses exacted by this mob chaos are incalculable, and it is not until the New Alliance is established that order is fully restored and the process of rebuilding is able to begin in earnest. For a time the government's efforts are quite successful, and the oppression and anarchy of the past years are soon forgotten as mankind begins to coalesce around its new leaders.
As the New Alliance reaches it centennial, however, it faces its first major crisis. Rumors begin to arise from the border regions that the Kri'iSara, also known as the Trich or the Swarm, they whose emergence first necessitated the creation of what would become the Imperium, are once again active within human space. Even more frightening, reports indicate that they are equipped with more advanced technology than they had during the First Trich War, and are using this tech to wage attacks on fringe worlds and isolated outposts. Fearing that they will not last more than a decade if the Trich are allowed to advance unchecked, the New Alliance commissions the Wraith Corps, composed of second-generation Wraith pilots, as a spearhead against the Trich. As one of their number, the player character is tasked with leading the fight against the Trich not only within human space, but also the border regions, and, ultimately, within hostile Trich space.
Gameplay
Controls
Uprising 2 is primarily controlled by way of a traditional WASD setup in which the player moves and strafes their vehicle with the W, A, S, and D keys while adjusting their orientation and firing weapons with the mouse. Building, repairing, and selling base structures is done primarily through the Satellite Overview, accessed with the R key by default, though there are exceptions, notably Citadels and Turrets, that can be placed from the first-person view. Units can be summoned to battle through use of the function keys or by holding the Shift key, which activates a mouse cursor that can be used to easily activate units by left-clicking their icon in the game's HUD. Switching secondary weapons can similarly be done by holding the Shift key and selecting the desired weapon from the HUD. The Tab key acts as a viewpoint toggle, switching between first-person and third-person viewing modes. Uprising 2 also introduces a context-sensitive "Auto Suggestion" feature, which will recommend actions based on where the player is looking or where they reside that can be performed simply by pressing the F key. When situated on an unclaimed command bunker, for instance, pressing F will call in a Citadel, whereas pressing it while looking at an enemy building might call in an Infantry platoon.
Gameplay
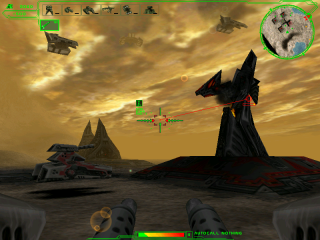 A Light Tank attacks a Trich Citadel as allied Bombers fly overhead.
Being a real-time strategy game at heart, Uprising 2 revolves mostly around building and maintaining military bases for the purpose of attacking and overtaking the bases of opposing players. One way in which the Uprising series distinguishes itself from other RTS titles is that base structures must always be built upon predetermined command bunkers, thus limiting the player somewhat in how they can expand their holdings. Each command bunker has a single claim square, and, provided the bunker is not already claimed, the player can position their Wraith within it to call in a Citadel, allowing other structures to be built there. Command bunkers are also tied to the game's primary resource, energy, and once a base has been established the player can call one or more Power Buildings in order to extract energy from around the command bunker in question. Missions often require the player to confront enemy forces in order to expand by claiming new bunkers, and while there is some variance in mission objectives, in most cases claiming all bunkers within a given map will end the scenario. During the game's single-player campaigns, players are rewarded with currency for completing primary and secondary objectives that can be used between missions in order to upgrade units and buildings.
Much like other RTS titles, deploying units in Uprising 2 requires the player to first construct a unit-producing building associated with the specific unit they wish to deploy. Doing so will enable a meter within the player's HUD that gradually charges itself, allowing the player to call in that unit once it has reached full charge. After a unit is called in, the meter depletes, and must be recharged before another unit of the same type can be teleported to the battlefield. Building multiple unit-producing structures of the same type allows for multiple charges to be stored; a player with two Barracks, for instance, can call in two Infantry squads in quick succession, but must wait for a short period before doing so again. Unit deployment is further restricted by command points, which represent the total number of units the player can command at a single time. All units have a set command point cost when deployed, and if a commander does not have sufficient points to call in new units, existing ones must either be dismissed or killed before they can be brought in. Once in the field, allied units can be commanded directly by selecting them and using the Auto Suggestion feature. In most cases, though, units will automatically perform whatever action is most appropriate to the situation currently at hand.
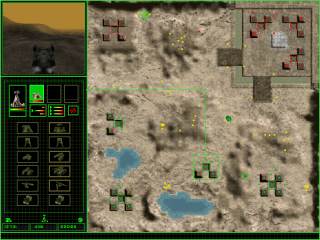 The Satellite Overview serves several purposes.
Apart from building bases, defending them, and commanding units, players are also put in command of a Wraith tank, which acts as the player's mobile command center and the window through which they view the game world. The Wraith is far and away the most deadly unit in the game, with extremely high maneuverability and the option to be outfitted with a vast array of potent weaponry. The durability of the Wraith as well as the number and potency of its weapons can also be augmented between missions using funds awarded to the player upon finishing scenarios. Any damage sustained by the player during a mission can be restored, for a price, by visiting an allied claim square, and secondary weapons that have been depleted of their ammunition can be replenished in the same fashion. The player also starts each scenario with a certain number of lives, allowing one to respawn when killed at a nearby allied claim square. Additional lives can also be purchased between missions. Since Wraiths are more dangerous than other unit types, it is usually in the player's best interest to assist their own units in battle. In situations where the Wraith is too far from an allied base to be able to effectively contribute to its defense, it is also possible to remotely control Citadel Turrets.
Wraith Weapons and Upgrades
As in Uprising, the player is able to acquire various enhancements for their Wraith over the course of the game's single-player campaigns. The Laser Cannon, which has unlimited ammunition, is considered the Wraith's primary weapon, and is bound to the left mouse button by default, while all other weapons are considered secondary. Secondary weapons are bound to the right mouse button initially, and while in missions the player is free to switch to any secondary weapon they possess using the Shift interface. Unlike the first game, Uprising 2 has no weapon triangle, so it is not possible in-mission to increase or decrease a weapon's power output.
 Wraith Chassis Wraith Chassis | Wraith Chassis- Tech Level 1: Flexon Composite - 35 mil Ferrolar plate
- Tech Level 2: Ferrolar Reinforcement - 45 mil Ferrolar plate
- Tech Level 3: Ferrolar Supports - 60 mil Ferrolar plate
- Tech Level 4: Full Ferrolar - 75 mil Ferrolar plate
Upgrades to the Wraith's chassis are fairly straightforward, adding extra survivability for the tank with each new level. Players have the first tech level of Wraith Chassis by default, which consists entirely of Flexon Composite. Each upgrade replaces part of the chassis with Ferrolar, with Level 4 consisting entirely of this substance. |
| Laser Cannon | Laser Cannon- Tech Level 1: 100 Kilocycle - .20 second cycle time
- Tech Level 2: 100 Kilocycle - .10 second cycle time
- Tech Level 3: 120 Kilocycle - .10 second cycle time
Considered the Wraith tank's primary armament, the Laser Cannon fires a steady stream of laser bolts at its target. It does not require finite ammunition, and thus does not deplete like other weapons. The first upgrade doubles the weapon's rate of fire, while the second maintains this rate of fire while also boosting damage. |
| Jaeger Missile | Jaeger Missile- Tech Level 1: 1 Missile - .20 second cycle time, 150 missiles (75 discharges)
- Tech Level 2: 2 Missiles - .20 second cycle time, 180 missiles (45 discharges)
- Tech Level 3: 3 Missiles - .20 second cycle time, 210 missiles (35 discharges)
Another staple weapon of the Wraith tank, Jaeger Missiles have limited heat-seeking capabilities, and are able to damage both structures and units. Upgrades do not increase the damage done by these missiles, but rather the number of missiles fired with each volley. As a side effect, higher tech levels allow fewer volleys. |
| Remote Health | Remote Health- Tech Level 1: Basic Level - 1 module
- Tech Level 2: Reduced Mass - 2 modules
- Tech Level 3: Further Mass Reduction - 3 modules
The Remote Health secondary is not a weapon at all, but rather a means of Wraith repair without returning to a base. Activating it drops a power-up at the specified location that restores the player's tank to full integrity when touched. Additional tech levels for Remote Health simply increase the total number of uses allowed. |
| Recon Probe | Recon Probe- Tech Level 1: SecureTech Model XLRP-1.0 - 2 kg fuel, 100 kph velocity, .75 kilometer range
- Tech Level 2: SecureTech Model XLRP-1.1 - 3 kg fuel, 125 kph velocity, 1.50 kilometer range
- Tech Level 3: SecureTech Model XLRP-1.1 - 5 kg fuel, 150 kph velocity, 2.25 kilometer range
The Recon Probe affords Wraith commanders the opportunity to scout areas without establishing a physical presence there. When launched, a Probe will travel in a set direction, revealing any undiscovered areas it passes. All tech levels of the Recon Probe allow five uses, though higher levels increase speed, sensor range, and travel distance. |
| Shrike Missile | Shrike Missile- Tech Level 1: 4.4 Kg HEAP Charge - .40 second cycle rate, 660 kph velocity
- Tech Level 2: 6.1 Kg HEAP Charge - .30 second cycle rate, 680 kph velocity
- Tech Level 3: 8.3 Kg HEAP Charge - .20 second cycle rate, 700 kph velocity
The successor to the Helix Missile System, the Shrike Missile offers greater tracking capability than the Jaeger Missile, making it a good choice against aerial targets. The Wraith can hold two hundred Shrike Missiles regardless of tech level, while upgrades allow for larger payloads, faster missiles, and better firing rates. |
| Tactical Nuke | Tactical Nuke- Tech Level 1: 0.50 GigaTon Warhead - 6 Nukes
- Tech Level 2: 0.75 GigaTon Warhead - 8 Nukes
- Tech Level 3: 1.00 Gigaton Warhead - 10 Nukes
The Tactical Nuke, as one might expect, unleashes a massive explosion centered on a specified target, causing tremendous damage to all units and structures caught within its blast radius. Upgrading the Nuke not only allows the Wraith to carry additional Nukes, but also increases their overall destructive force considerably. |
| Marauder | Marauder- Tech Level 1: Basic Projectile - 1 secondary projectile
- Tech Level 2: Advanced Tracking - 2 secondary projectiles
- Tech Level 3: A.I. System - 3 secondary projectiles
The Marauder is a highly damaging missile launcher that fires a single warhead with each volley capable of tracking almost any target. Though the basic level is capable of targeting only one foe, upgrades allow it to break apart into multiple projectiles mid-flight, with each one being able to track targets independently. |
| Death Shroud | Death Shroud- Tech Level 1: 2:1 Conversion Factor - 150 GHz conversion rate, 75 GHz generation rate
- Tech Level 2: 5:4 Conversion Factor - 125 GHz conversion rate, 100 GHz generation rate
- Tech Level 3: 4:5 Conversion Factor - 100 GHz conversion rate, 125 GHz generation rate
The Death Shoud is a defensive weapon that allows Wraith pilots to temporarily drain shield strength in order to generate a dense cloud of particles around the Wraith that damages nearby units and structures. The strength of the cloud is based on charge time, and with higher levels the Death Shroud can be charged for longer periods. |
| Gopher Torpedo | Gopher Torpedo- Tech Level 1: 5 Kilo HE Charge - 1 torpedo per volley, 50 m/sec velocity
- Tech Level 2: 8 Kilo HE Charge - 1 torpedo per volley, 100 m/sec velocity
- Tech Level 3: 10 Kilo HE Charge - 3 torpedoes per volley, 100 m/sec velocity
The direct descendant of Uprising's Mole Torpedo, the Gopher is a sub-surface missile that performs particularly well against stationary or slow-moving targets. Upgrades improve its capabilities in several areas, including the payload of its warheads, the number of torpedoes fired per volley, and their maximum velocity. |
| Charged Particle Disruptor | Charged Particle Disruptor- Tech Level 1: 200 Ka/m2 - 100 cells, 5 second charge time
- Tech Level 2: 500 Ka/m2 - 150 cells, 10 second charge time
- Tech Level 3: 1000 Ka/m2 - 200 cells, 15 second charge time
The Charged Particle Disruptor, or Disruptor, for short, is a charge-fire weapon that grows in strength the longer the trigger is held. The basic level cannot be charged for very long before it must be discharged, however higher levels can be charged for a considerable duration and come with a larger power cell capacity. |
| Mine Layer | Mine Layer- Tech Level 1: 10 Mines Per Layer - 10 Mine Layers
- Tech Level 2: 15 Mines Per Layer - 10 Mine Layers
- Tech Level 3: 20 Mines Per Layer - 10 Mine Layers
The Mine Layer, though its name would indicate otherwise, is in reality an improved version of the weapon used in the previous game. Rather than simply laying a single mine per use, it deploys a large number of mines with each deployment. Higher tech levels of the Mine Layer increase the total number of mines per Layer. |
Structures
For the most part, structures in Uprising 2 must be placed upon preset squares found within command bunkers, and even then only after a Citadel has been built in order to claim the bunker. The exception to this rule is Turrets, which may be placed anywhere around the claimed command bunker that the player so desires. Apart from Booster Facilities, which are themselves a manner of upgrade, all base structures can be upgraded in order to improve their performance in some way or that of the unit they produce. Buildings that are no longer needed can be sold through the Satellite Overview in order to recover some of their build cost.
| Gatling Turret | Gatling Turret- Tech Level 1: Archer Class - 60 Kc energy output, 4 bps rate of fire, 40 mil Kevlon plate
- Tech Level 2: Crossbow Class - 60 Kc energy outbut, 6 bps rate of fire, 60 mil Kevlon plate
- Tech Level 3: Javelin Class - 90 Kc energy output, 6 bps rate of fire, 30 mil Ferrolar plate
- Tech Level 4: Longbow Class - 100 Kc energy output, 6 bps rate of fire, 40 mil Ferrolar plate
Uprising 2's basic defensive structure, the Gatling Turret is primarily intended for defense against ground targets, though it will fire against airborne foes. With research into Gatling Turret upgrades, the emplacement gains faster rate of fire and additional firepower, which is augmented by more and, eventually, better armor. |
| Patriot Site | Patriot Site- Tech Level 1: Fortifier Class - 2-projectile targeting capacity
- Tech Level 2: Champion Class - 3-projectile targeting capacity
- Tech Level 3: Guardian Class - 4-projectile targeting capacity
- Tech Level 4: Defender Class - 6-projectile targeting capacity
The Patriot Site is a defensive emplacement specifically designed to counter the ordinance delivered by Ballistic Missile Systems. Tech levels above and beyond the first allow it to track additional BMS missiles, and at its highest level a single Patriot Site can neutralize fifty percent of an incoming strike. |
| SAM Site | SAM Site- Tech Level 1: Catapult Class - 1.8 kg HE payload, 3 missiles per volley
- Tech Level 2: Trebuchet Class - 2.4 kg HE payload, 4 missiles per volley
- Tech Level 3: Ballista Class - 2.4 kg HE payload, 5 missiles per volley
- Tech Level 4: Bombard Class - 3.0 kg HE payload, 6 missiles per volley
The counterpart to the terrestrially-focused Gatling Turret, the SAM Site offers defense against attacks from the sky. Investment in upgrades allows for greater potency per warhead in addition to more missiles with each firing. The ultimate tech level also upgrades its tracking system for even greater accuracy. |
| Citadel | Citadel- Tech Level 1: Watchdog Class - 160 Kc energy output, .33 second rate of fire
- Tech Level 2: Sentry Class - 200 Kc energy output, .33 second rate of fire
- Tech Level 3: Peace Keeper Class - 240 Kc energy output, .25 second rate of fire
- Tech Level 4: War Lord Class - 260 Kc energy output, .25 second rate of fire
Construction of a Citadel enables the deployment of other base structures and also provides a baseline of defense. They are linked to turrets placed nearby through their A.I., causing defensive structures to self-destruct if their Citadel is lost. Higher tech levels increase the power and rate of fire of its main gun. |
| Power Building | Power Building- Tech Level 1: Miner Class - 210 tHz extraction rate
- Tech Level 2: Dredger Class - 270 tHx extraction rate
- Tech Level 3: Driller Class - 330 tHz extraction rate
- Tech Level 4: Extractor Class - 390 tHz extraction rate
Power Buildings are the means through which the player harvests energy from the area surrounding their command bunkers. Each location can provide only a certain amount of power, so Power Buildings can often be sold later on in a scenario. By researching higher tech levels, their rate of extraction can be increased. |
| Barracks | Barracks- Tech Level 1: Conscripts - Mk. I Laser Rifle, 2 mil Ferrolar plate
- Tech Level 2: Light Infantry - Mk. II Laser Rifle, 3 mil Ferrolar plate
- Tech Level 3: Medium Infantry - Mk. III Laser Rifle, 4 mil Ferrolar plate
- Tech Level 4: Heavy Infantry - Mk. IV Laser Rifle, 4 mil Ferrolar plate
The Barracks produces Infantry, the weakest offensive unit in Uprising 2. While they fare poorly against other units, they are equipped with satchel charges which make them useful in demolishing enemy buildings. Upgrading Infantry units improves their survivability somewhat and gives them better weaponry as well. |
| Tank Factory | Tank Factory- Tech Level 1: Stinger Class - 80 Kc Laser Cannon, 60 kph velocity, 10 mil Ferrolar plate
- Tech Level 2: Rattler Class - 90 Kc Laser Cannon, 75 kph velocity, 15 mil Ferrolar plate
- Tech Level 3: Cobra Class - 100 Kc Laser Cannon, 90 kph velocity, 20 mil Ferrolar plate
- Tech Level 4: Asp Class - 110 Kc Laser Cannon, 110 kph velocity, 25 mil Ferrolar plate
The Tank Factory produces Light Tanks, which are capable of mopping up enemy Infantry and going toe-to-toe with other light vehicles. They are more maneuverable, though also more fragile than their heavier brethren. Upgrades to the Light Tank improve its firepower, overall speed, and the thickness of its armor. |
| Heavy Tank Factory | Heavy Tank Factory- Tech Level 1: Goliath Class - 110 Kc Laser Cannon, 20 kph velocity, 25 mil Ferrolar plate
- Tech Level 2: Juggernaught Class - 120 Kc Laser Cannon, 25 kph velocity, 30 mil Ferrolar plate
- Tech Level 3: Dreadnought Class - 120 Kc Laser Cannon, 27 kph velocity, 35 mil Ferrolar plate
- Tech Level 4: Behemoth Class - 120 Kc Laser Cannon, 30 kph velocity, 40 mil Ferrolar plate
The Heavy Tank Factory, naturally, produces Heavy Tanks, the most powerful non-Wraith ground units in Uprising 2. At its most basic level, a Heavy Tank has as much armor and firepower as a fully upgraded Light Tank, albeit with far less speed. Later tech levels improve firepower as well as speed and armor rating. |
| AAV Facility | AAV Facility- Tech Level 1: Dart Class - 150 kph velocity, 10 mil Ferrolar plate
- Tech Level 2: Javelin Class - 175 kph velocity, 15 mil Ferrolar plate
- Tech Level 3: Lance Class - 50 Kc Laser Cannon, 175 kph velocity, 18 mil Ferrolar plate
- Tech Level 4: Trident Class - 75 Kc Laser Cannon, 200 kph velocity, 20 mil Ferrolar plate
The AAV Facility is responsible for the construction of Aerial Assault Vehicles, which can attack both airborne and grounded targets with its Jaeger Missiles. More advanced AAVs have better armor and faster speed, and, starting at Tech Level 3, they can also be equipped with a secondary Laser Cannon for extra punch. |
| Bomber Facility | Bomber Facility- Tech Level 1: Smasher Class - 2-ton HE bomb, 1 Chaff Caster, 100 kph velocity, 15 mil Ferrolar plate
- Tech Level 2: Destructor Class - 3-ton HE bomb, 2 Chaff Casters, 125 kph velocity, 18 mil Ferrolar plate
- Tech Level 3: Eclipse Class - 3.5-ton HE bomb, 3 Chaff Casters, 133 kph velocity, 20 mil Ferrolar plate
- Tech Level 4: Hell Raiser Class - 4-ton HE bomb, 4 Chaff Casters, 140 kph velocity, 23 mil Ferrolar plate
The Bomber Facility churns out Bombers for the war effort, being primarily useful in softening up enemy structures. They are vulnerable against incoming fire, especially from AAVs, and are equipped with Chaff Casters for this reason. Later versions of the Bomber have more destructive bombs, more Chaff Casters, better speed, and heavier armor. |
| Ballistic Missile Site | Ballistic Missile Site- Tech Level 1: Sky Hammer Class - 0.1 GigaTon payload
- Tech Level 2: Thunderbolt Class - 0.2 GigaTon payload
- Tech Level 3: Deliverer Class - 0.3 GigaTon payload
- Tech Level 4: Jupiter Class - 0.5 GigaTon payload
Taking the place of Uprising's KSAT Building, the Ballistic Missile Site allows Wraith Commanders to call down an aerial strike at a specified point on the map. Because of their immense energy requirements, 1,000 units per strike, BMSs require that the player have at least two Power Buildings. Upgrades improve their destructive potential. |
| Booster Facility | Booster Facility- Infantry Booster - gains a single-use Tomahawk Missile
- Light Tank Booster - gains a single-use Tomahawk Missile
- Heavy Tank Booster - gains a single-use Level 2 Marauder
- AAV Booster - gains a single-use Gopher Torpedo
- Bomber Booster - gains an anti-air Laser System
Booster Facilities do not produce anything in and of themselves, instead offering concrete benefits to unit types that are already available. In order for a Booster Facility to be built for a particular unit, the player must first have two production facilities of that type. Once a Booster Facility is built, new units will receive its benefits automatically. |
Reception
Uprising 2 was greeted positively overall by the gaming media, though most reviewers took issue with certain aspects of the game. Gamespot rated it at 7.7, higher than the original game, reacting positively to the game's presentation and interface tweaks. At the same time, reviewer Michael E. Ryan criticized it for being too easy, too repetitive, and too predictable in its mission design. PC Gamer gave it a significantly lower rating than the first game at 79%, citing intense micro-management and lackluster unit A.I. as two of the game's biggest problems. Like Ryan, PC Gamer's reviewer, Joel Durham Jr., was quite appreciative of the game's presentation and streamlined interface, however both seemed to agree that the sequel did little in the way of breaking new ground, and both lamented that, while good, Uprising 2 might have been much better.
Log in to comment