Breaking Brad: Doom II: Levels 15-16: Statistics
By bhurnie 1 Comments
A recent tweet about Drew's performance in his Metal Gear playthrough reminded me of a project I started long ago, then semi-abandoned, then forgot about.
Someone did some AWESOME number-crunching for @drewscanlon's deaths during Metal Gear Scanlon: http://t.co/uL0XMe2BmV pic.twitter.com/afAQuvntrK
— GB Duders Feed (@GBDudersFeed) September 19, 2014
A while back, as a way to improve my programming skills, I made some statistics and graphs and charts about Brad's performance in the Xbox 360 version of Doom II. Unfortunately it was a lot harder than I thought - or at least a lot longer - so I never got very far, and then I lost a huge amount of progress due to a poorly-maintained backup system and just sulked about it forever.
But I still have the information for the first two levels, and one day I'll get around to fixing the bugs and finishing it. (I also have his performance from the original Quick Look, but frankly not much happens.)
Oh, by the way. I have no idea how well this will look for colourblind people but the Excel default colours must surely have been tested. No guarantees about other charts though.
Level 15
Brad played through the first fourteen levels, and most of 15, before starting the video series. Much of this level involves Brad reacquainting himself with the controls and trying to figure out how to cross a lava-filled chasm and complete the level.

I can't upload it directly, so here is a graph of Brad's performance through (the recorded section of) Level 15. The resolution is fairly large due to the detail - I converted it from a SVG without too much thought about settings. There's no legend, so here's an explanation for what's shown:
- The horizontal dimension is time, as indicated by a timeline at the top of the image.
- The vertical dimension represents lives; each time Brad loads, a new line further down is created from the save point he loaded at.
- Save points are green circles with a white outline; loads are green circles linked by lines to the save points. Deaths are indicated by a thick, black, full-height vertical line.
- Times when Brad (or the game) paused are indicated by angled grey stripes. Times when Brad is viewing the map are indicated by whiter sections on the graphs.
- Each individual lifespan displays specific information:
- Health and armor are shown above the centerline, with armor above health. (Note that for most of these two levels, Brad has little if any armor.)
- Ammunition levels are shown below the centerline, as a percentage of the maximum capacity (for instance 100 shells and 600 cells would be the same size). From the centerline downwards: Bullets/Grey, Shells/Green, Rockets/Brown, Cells/Blue.
- Monster kills are shown as vertical lines symmetric about the centerline, with size proportional to monster health (e.g. zombiemen are short, Hell Knights are taller). On occasions where Brad killed more than one monster simultaneously the number is shown as dots above the line. The exception is for BFG 'explosions', which are indicated with a thick red full-height line regardless of monsters killed.
- Pickups are shown above the centerline, with instant or permanent ones indicated with a thick vertical line and limited pickups shown with their duration. I'm not certain, but I think:
- Berserk: vertical red
- Automap: vertical green
- Radsuit: horizontal green
- Invisibility: horizontal grey
- Invulnerability: horizontal gold
- Keys are shown with the appropriate image when picked up.
You can see that Brad initially has problems dealing with a 'BFG trap', then spends most of his third-through-fifth lives trying to cross a lava chasm, ends up nearly dead while mopping up the last enemies, then finally finds the last key and escapes.
Level 16
Despite having controls and movement in hand, Brad struggles with the wide-open areas and vast number of teleported-in enemies, as well as several more difficult monsters such as Arch-Viles. This would be difficult enough on ultraviolence, but Brad (accidentally) makes it even harder by entering the map with no armor and never discovering any.
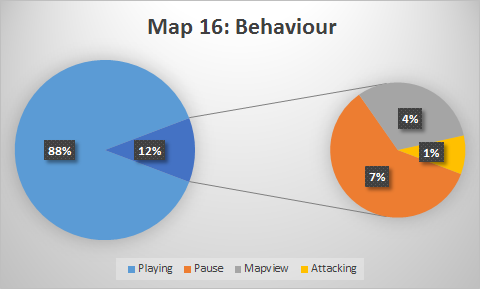
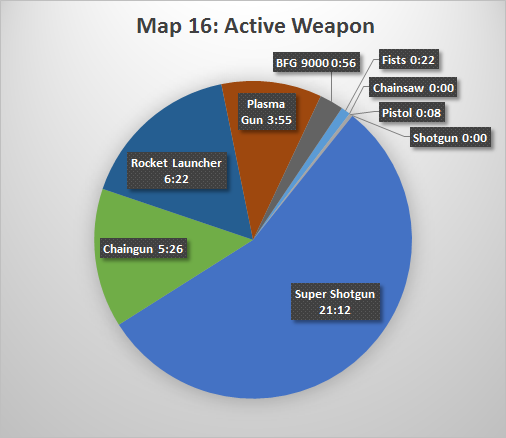
Here is the graph of Brad's performance in Level 16 - see the 'legend' explanation above for what it all means.
Brad has trouble at the start of the level with an Arch-Vile and enclosed space, with the exception of his second life (where he escapes and goes on an incredible if lucky rampage, but forgets to save). After several attempts he escapes through sheer skill, with the level proceeding normally until Brad triggers more enemies to enter the map. He spends a number of lives trying to dispatch them quickly with the BFG 9000, then resorts to slower methods. Eventually the enemies are thinned out and Brad's main problem becomes finding the exit. Brad also has his most powerful combination of pickups twice in this level: partial invisibility, invulnerability and (admittedly redundant) radiation suit.
Overall Statistics
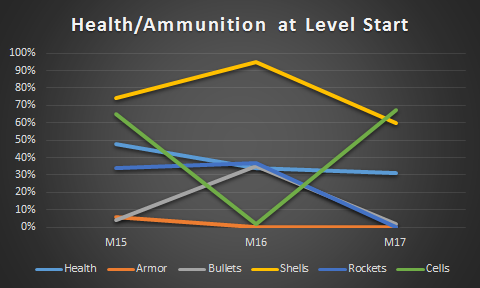

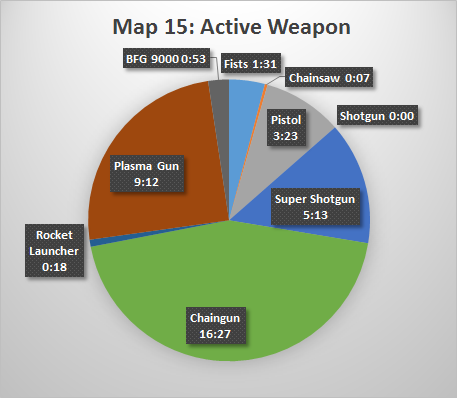
I want to add to this graph that the levels are to 100% and not really equal; Brad attacks more in level 16. The BFG 9000 uses 30 cells per shot, the Super Shotgun uses 2 shells, and fists don't use ammo in the game.
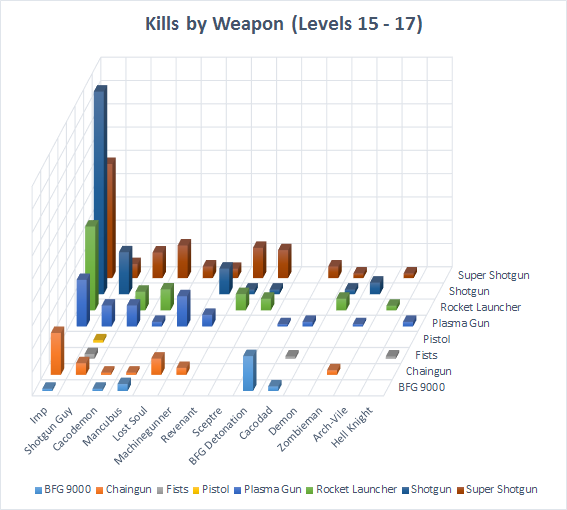
You can spot a few trends in the above graph, even from just two-and-a-bit levels. Imps are the most common enemy by far (largely due to Brad dying in an Imp-heavy section repeatedly on L16). Brad prefers to kill Lost Souls with the plasma gun, Machinegunners with the shotgun, but most other enemies with the Super Shotgun. Brad somehow scores a BFG kill with the Plasma Gun - I don't think it's an error, but low ammunition causing a weapon switch between the BFG being fired and the energy ball hitting a surface. (Other BFG kills are from the energy ball hitting a monster before exploding.) The pistol is generally ignored, with only one kill; on the other hand, with the help of a Berserk pickup he kills a Hell Knight with his fists.
