Overview
Upward is a single-stage
payload map. There is a single bomb-carrying cart on a track which runs from one end of the map to the other. The goal for the BLU team is to get the cart to the other end of the track. The goal for the RED team is to prevent them from doing that. There are four points in this map for the BLU team to capture, and each time they capture a point they receive additional time.
If the RED team can prevent the BLU team from pushing the cart for 30 seconds, it will slowly go in reverse until the BLU team starts pushing it again. The cart will also stop going in reverse if it reaches an incline or a point that the BLU team has captured.
Gameplay
 Spawn to point A
 The path to the first capture point is pretty simple. It's not too far, and it's all flat ground. The challenge comes from it being surrounded by a hill and two buildings. The RED team will use these to build sentries and give them the height advantage in battle. Both of the buildings have two floors, and this is where the RED engineers will build their gadgets. The BLU team will have the advantage of a nearby spawn room, so it won't be too hard for them to take control of this area.
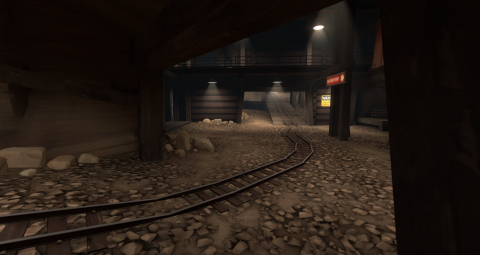 Point A to B, underground
 The BLU team will need to push the cart through an underground tunnel to get to the next capture point. The RED team has an exit from their spawn room that connects to the middle of the underground tunnel, plus they can come from either side of the tunnel. There is also a ledge in the tunnel that overlooks the track, which the RED team can use for a height advantage or build sentries. Point B is right on the other side of the tunnel, back above ground.
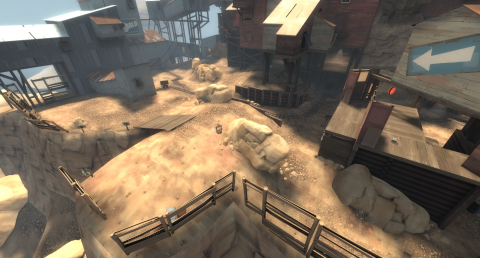
 Point B to C
 The path from B to C is out in the open, so there's not much room for either team to hide or take shelter. It'll be an all out fight for control of the next point. There is a ledge overlooking the second half of the path, where the red team will build their sentry guns. After that there is a small upward spiral in the track, leading to the point. In this spiral there are three small sections where the track goes uphill. If the BLU team stops pushing the cart before it reaches the top of one of these sections, it'll fall back to the bottom of that section. Point C is right at the top of the third section.
Point C to D The first part of the path from C to D remains out in the open, however it is now right outside of the RED team's spawn room. As with the previous point, this part will mostly be an all out fight, with little place to take shelter or build sentries, although it'll be a bit more challenging for the BLU team as they pass one of the RED team's spawn exits. The final point is inside of the RED team's base building. The RED team has multiple spawn exits in this building, and have access to the second floor, where they will build their sentries. The RED team also has a lot of shelter from the second floor, along with the height advantage, so soldiers and demomen will sometimes fire down on the BLU team from up there. The BLU team should also be cautious of RED players coming from the spawn exit they just passed, to attack from behind.
Log in to comment