Overview
 Laughing Octopus in the Middle East
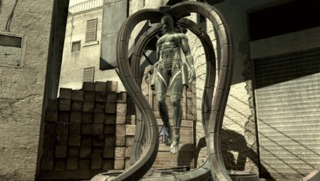
Laughing Octopus was born in a small village which customarily ate the creature she shares her name with. A local cult despised the eating of octopus, and after amassing a large store of weapons, attacked the village. In order to survive, Laughing Octopus was forced to kill her loved ones, all while laughing. The emotionally scarring event led to her joining the Beauty and the Beast Unit, where she officially became known as Laughing Octopus.
In MGS4, she is introduced in the Middle East while attacking the locals. Her suit, like the rest of BnB, was very advanced. Like Snake, she wore OctoCamo to hide herself. But she had something Snake didn't have at the time, FaceCamo. Snake soon spots Laughing Octopus once again, this time stationed in the camp where Naomi Hunter is being held. Eventually the two meet in battle, and Laughing Octopus uses all her camouflaging tricks until he is finally defeated. She falls out of her suit, with only minutes left to survive, and attacks Snake on last time.
Like the other BnB battles, the player had the option of killing her using lethal force, or ending the fight using only non-lethal force. Depending on which method is chosen, one of two endings will occur. Ultimately, the era of Laughing Octopus is put to an end, and Drebin reveals her past to Snake.
Laugh with me!
-Laughing Octopus, Metal Gear Solid 4
Fight Strategy
Extreme
Laughing Octopus is a pushover even on Extreme. The only difference here is that she deals and takes more damage, but you won’t be getting hit by anything except her P90, which is still easily avoided. This guide assumes you already have knowledge of this fight and are attempting the Big Boss Emblem, thus will not cover Health recovering items or lethal means.
What you will need:
- Two high powered weapons of choice (Anti-Material Rifle, Rail Gun and Shotguns are excellent choices)
- Solid Eye
Phase 1You can’t get the first hit on her, so don’t try. Run out of the room through the door facing your back. She won’t go into hiding until after you attack her, so keep away from any windows she might come through and land a few shots with your weapon of choice (It’s not recommended you use any sort of explosives if you’re attempting a Big Boss Emblem because you might hit one of the unconscious Frogs). Don’t ever get within melee range of and always stay close to a doorway to avoid possible attacks. Keep in mind if you’re using the Anti-Material Rifle she cannot block the shots even when attempting to deflect with her tentacles, so take advantage of this. When she falls over you’ll be in Phase 2.
Phase 2Here Octopus will go into hiding. If you’ve done this fight even once it’s not hard to locate her. Equip your Solid Eye and switch to Thermal Night-Vision. If and when she inevitably yells it will show up on your radar giving you a better idea of where to look. Her first hiding spot is always against one of the outer walls, when you find her there pull out your strongest weapon (Rail Gun, if you have it) and shoot her in the head (Again if using the Rail Gun, fully charge it before firing). She will fall to the ground emitting black smoke that obscures your vision. Quickly run away from the explosives she leaves behind. Don’t worry they are extremely easy to destroy/evade; there is no reason why you should be having troubles with them. Continue to locate her with the Solid Eye/Radar and follow the same steps. Beware of when she hides on the ceiling however as she does attack you if you are directly beneath her. So keep your distance in that situation. After you have taken away most of her health she will no longer hide.
Phase 3This phase is tougher than the first 2, but still not hard. It’s the same as Phase 1 with a few changes. After falling to the ground she will no longer hide, instead emitting the same black smoke without the explosives and perform 1 of 2 actions:
- She will simply disappear and break through a window ready to perform her standard attacks again.
- She will roll up into a ball and try to flatten you.
You should have no problem with the first, but the second is going to spell instant doom if you mess up. Fortunately there is an easy way to prepare for this. Every time she falls flat on her ass run to a nearby crate or bed or anything off the floor. Sometimes she will roll towards you, but with no avail. When that happens you’ve got a free shot, so take it when she ‘unravels’ and run to the next room. From here on out it’s the same. Keep up the room shuffling and eventually she’ll be out of the picture.
For a funny and useful moment during Phase 2, when Octopus turns into the Mk.II, rather than following, head around the opposite side to trick her into falling for her own trap. The damage isn’t significant, but it’s amusing to watch.
Log in to comment