Overview
The Scout is the fastest character class in Team Fortress. He has three weapons - a shotgun, a pistol and a baseball bat. He can also perform a second jump in the air that gives him both extra height and the ability to change direction midflight. The Scout drastically accelerates the capture speed of points and the movement speed of payload carts, making him a staple on maps with these elements. His speed also makes him an obvious pick for runner on capture the flag maps so long as the enemy has not set up sentries which, contrary to every video released involving such a scenario, the Scout cannot run past without suffering massive injury or death. Assuming he hasn't had some 'bonk' energy drink before hand. Using the Scout as a direct combatant can be a worthwhile endeavor--a combination of projectile-dodging speed and a powerful point blank weapon make him very deadly--but this requires quite a bit of practice before it becomes a reasonable application of the class.
- Health: 125
- Speed: 133%
- Role: Offensive
Backstory
The youngest of eight boys from the south side of Boston, the Scout learned early how to problem solve with his fists. With seven older brothers on his side, fights tended to end before the runt of the litter could maneuver into punching distance, so the Scout trained himself to run. He ran everywhere, all the time, until he could beat his pack of mad dog siblings to the fray.
As seen in the video "Meet the Spy" His mother was or still is intimately involved with the enemy spy.
- Voice actor: Nathan Vetterlein
- Country of origin: Boston, Massachusetts, USA
- Job: Rapid Recovery
- Motto: "Too. Much. Caffeine."
- Emblem: Talaria
Default Weapons
Bat (melee)
Unlockable Weapons
Primary
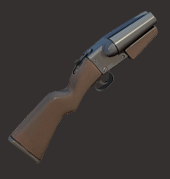 The Force-A-Nature
The scattergun replacement is a very powerful double-barrel shotgun which has powerful recoil. The recoil can blast enemies away and can be used as a pseudo-jump, akin to a rocket or stickybomb jump. This allows the scout to get even higher with his new "triple" jump. Obviously it only holds 2 shells at a time, with 32 in reserve. It's rate of fire is faster than the Scattergun, and each shot spits out more pellets than normal, but at a reduced damage per pellet, the intended effect is reduced efficiency at range.
- Even if you only shoot once the reload will remove 2 shells from your supply.
- The recoil on you only works when you are airborne, and only works once until you hit the ground. It will push you in the opposite direction you shoot, usually canceling your momentum.
- Knocking someone into the air with one shot can often make them an easy target for the second.
Number of Achievements Required: 10
 The Shortstop
Primary weapon with a 25% faster fire rate than the scattergun. When hit the movement speed of the enemy will by reduced by 40% for 0.5 seconds. Magazine size of 4, 33% smaller than the Scattergun's.
 The Soda Popper
A double barreled shotgun that is combined with the Atomic Bonk. it builds a hype meter as you run. when it is activated, it grants critical hits for all of the scout's weapons for a short time.
Baby Face's BlasterThis weapon was unveiled in the Pyromania Event on Day 2 alongside the Pretty Boy's Pocket Pistol.
- +40 percent accuracy
- on hit: builds boost, for a maximum boost of double speed
- 30 percent damage reduction
- 35 percent less movement speed
- jumping resets boost.
Secondary
The 'Bonk' Energy DrinkThis bonkalicious can of radioactive material gives the Scout the energy to dodge all forms of attack for a short period of time, it is ideal for running past sentries or away when low on health. The Scout freezes for a second to take the drink and then is given back movement with even more speed and a blur to accentuate it, the player views the Scout in third person whilst immune and cannot attack.
Number of Achievements Required: 22
- Even though you're supposed to be dodging, you can avoid explosions and fire, but will still take the knockback of sentries.
- The Scout has an unlimited supply of the drink, he only needs to wait for the cooldown to drink again.
The Crit-A-ColaDrinking this new Bonk! flavor imbues the drinker with Mini Crits, dealing AND taking 35% more damage, for 6 seconds. It then takes 24 seconds after the affects have warn off to cooldown.
Can be crafted with a combination of a can of classic Bonk! and a Kritzkreig.
The Mad MilkSecondary weapon. Thrown like Jarate. Coats target in milk for 8 seconds. 75% of all damage dealt to targets coated in milk is returned as health to damage-dealer. You can see cloaked spies covered in milk.
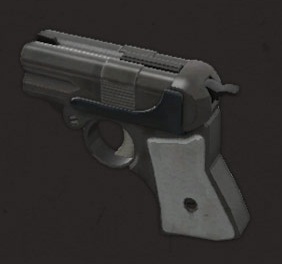
The LugermorphOne can assume the Scout and Max would get along as both could be described as "hyperkinetic", so it only makes sense that they have the same taste in firearms.
The WingerIt is a pistol with an inset radioactivity symbol on its grip and a small pair of stylized yellow wings emblazoned on the slide over the magazine. It does 15% more damage, but only loads 5 rounds at a time. Scout jumps %25 higher when holding the Winger.
Pretty Boy's Pocket PistolThis weapon was unveiled in the Pyromania Event on Day 2 alongside the Baby Face's Blaster.
- +15 percent max health on wearer
- wearer does not take falling damage.
- 25 percent slower firing speed
- 50 percent more fire vulnerability on player.
Melee
The SandmanThe Sandman is a wooden bat, which comes with a baseball. The Scout can use the bat to whack the ball at enemy players, and if it hits them, it will daze them for a few seconds, keeping them from attacking. The longer the ball travels, the longer the enemy will be out, if it hits him at an extreme distance he will be unable to move as well. Targets dazed by the ball will move slightly slower but will only take 75% of incoming damage.
- -15 HP penalty
- The Sandman's taunt is one of the many taunts that can potentially kill, but it is much slower than other taunts.
- The ball's stun has a minimum range, so you cannot ding people in close quarters.
- Stun does not work on ubercharged enemies.
- The Sandman works exactly the same as the aluminum bat as a melee weapon.
- Hitting a deployed heavy will keep him from attacking but his gun can still be spinning, he will be able to fire as soon as the effect wears off.
Number of Achievements Required: 16
The Holy MackerelMelee weapon with the same stats as the normal baseball bat. Corner kill display is replaced with the number of hits with the fish on a particular player. When that player is killed, it lists the kill icon and says "FISH KILL" next to the player's name, as a kind of Humiliation killing.
The Candy CaneA melee weapon with the same stats as the normal baseball bat. Killing an enemy with the Cane will cause a small health pack to drop. The player takes an addition 25% explosive damage.
The Boston BasherA Melee Weapon with the same stats as the normal baseball bat. Hitting an enemy with the bat will cause them to Bleed for 5 seconds. If you miss, you instead deal damage and the Bleed effect to yourself.
The Sun-on-a-StickThe Sun-on-a-Stick is a promotional melee weapon for the Scout. It looks like an ornate jet-black mace with orange veins, topped with a fiery orb and black spikes. It delivers 25% less damage than the bat, but it guarantees a crit whenever a player stikes a burning enemy with it.
The AtomizerIt's a new aluminium bat for the Scout, with the Bonk! logo emblazoned on it with team-colored stripes. It does give the ability to do triple jump, at a cost of 10 health per jump. It does 20% less damage on enemies (normal damage for buildings), and the attack speed is 30% slower. It's possible to use the Home Run taunt kill with this weapon.
The Three-Rune BladeThis weapon is an ornate silver sword with a curved cross guard, a worn brown hilt and a pommel in the shape of a wolf's head. It was given to players who pre-ordered The Witcher 2 on Steam. It's basically a re-skin for the Boston Basher.
The Unarmed CombatThis weapon is a re-skin of the Holy Mackerel, with the same stats, however it will display the phrase "ARM-KILL" instead of "FISH-KILL". It's a Spy's right arm with a ripped glove and a protruding bone that serves as a handler.
The Fan O'WarThis weapon is a large metal gunbai war fan. It does 90% less damage, but marks the enemy for 15 seconds, making all damage he receives be Mini-Crits. Only one enemy can be marked at a time.
Special abilities
Double Jump
As a Scout, the player can do a double-jump. As the name implies, the Scout can jump once, then jump again while in the air confusing his enemies and dodging their projectiles.
Further Information/Uses:
- Can be used to stop from taking damage when dropping from high places (jump right before you hit the ground).
- Opens up many new areas for a scout to get to fast and efficiently.
- Useful for dodging.
- Can also be used to change direction in mid air.
- Triple jump can be achieved with the either Force-A-Nature or Atomizer.
- Quadruple jump can be achieved with both Force-A-Nature and Atomizer.
Capture Prowess
Along with being the fastest class in the game, the Scout counts as two people on a control point or push cart (up to a maximum of 4 with teammates), making him a highly valuable class when it comes to capture point maps such as Granary or Badlands.
Tactics/Tips
Scouts usually have trouble killing heavies - but with some tactics you can take them down.- Keep moving. This is essential for the Scout, as he has very low health, and a Heavy catching you off guard (especially with Natascha equipped) could easily spell death.
- Utilize your double jump ability to hide away in places other enemies can't reach well while you're being chased. Not only will it save you from death, it's possible you might be able to sneak away quickly afterwards and score a quick kill on them. It can also be used to reach higher ground that other classes cannot immediately get to, and it allows the scout to jump over enemies heads and highly damaging rockets.
- Heavies are a formidable foe - but they are slow, and up close you'll be able to kill them without them even seeing you. Although, if they are being healed, either take out the medic (if you have the opportunity - don't just try to run past the heavy) or just leave it to teammates with more firepower to take him down for you. It is a good idea to simply avoid a heavy when he is spinning his gun - you can hear the whine of the gun spinning from miles away. Use hit-and-run attacks to chip away his health when he is not revving up Sasha (or Natascha), and if there's no chance of escape, and you are forced to fight, try jumping over his head to disorientate him, while circle strafing around him.
- Don't be afraid to take the intelligence. Don't be afraid to start capturing a capture point. That's basically the point of this class. You're not going to survive long anyway, and if you're on the front lines, you're most likely doing it wrong. Be prepared to sneak behind enemy lines and capture the point/intelligence when they're not looking (on capture point maps, known as a backcap).
- Once you learn how to aim, you can easily hit-and-run enemy medics. Two shots is all it should take, and you should be out of there before the enemy forces even realize it - killing enemy medics means there will be no ubercharges coming your way - which can help win you the game. Just avoid chasing straight at him when he has his needler, it can drop you very quickly and potentially heal him.
- LISTEN for sentry guns. It can save your life - running into a sentry gun, even level one, will send you crying for medic, or to an early grave. Once you hear them, try to remember popular sentry gun spots for the map you are on - and using your ears, you can tell where the gun is. You can even tell what level the sentry is without seeing it, one beep means a level one, two beeps mean a level two, and three beeps mean a level three. Take another route, Bonk past it, or least warn your teammates so that they can effectively deal with it.
- Note any med pack locations you come across. If a scout takes damage, being the fastest class, it is usually easier to just double back a little and top yourself off. This is also very helpful if a pyro manages to get within range and ignites the scout. Luring a pursuing enemy to a med pack spawn can give the scout a huge advantage by effectively increasing his total health over the course of the fight.
- A scout using the 'Bonk' Energy Drink can act as a make shift uber when working in concert with a soldier or demoman. The scout only has to drink his 'Bonk' Energy Drink before running as close to the offending sentry as possible, while the demoman or soldier takes out the turret from a distance as it is distracted by the immune scout. The scout can also use the 'Bonk' Energy Drink to trick a demoman into detonating his carpet of sticky grenades prior to your team arriving on the scene. These two tactics can make the scout an extremely affective support class when he is not flanking the enemy.
- When dealing with soldiers try to focus on dodging his rockets 'till he runs empty on you. Make sudden changes in movement, run erratically and when double jumping try to jump in opposing directions. You can certainly shoot while doing this, but make certain your shotgun is loaded for when you move in. Just watch for his shotgun when he runs out of rockets.
- Although sentries are usually your biggest problem, engineers themselves are not. Taking them out before they build anything is preferable, even when setting one up the gun will be weak and the engineer focused on it and not you. If you know the sentry is up be patient, you can often be the most well suited to ambushing the engy as they leave the room for more metal or other reasons. If you do manage to take out the sentry gun's owner it is possible to carefully creep up to a corner and hit it without it able to fire back, although if your attacked while doing this you'll be in a bad way.
Quotes
Quotes used by the Scout to taunt enemies and contact teammates.
- "Bonk!"
- "Hey, knucklehead, I'm talking ta you! Bonk!"
- "I'm runnin' circles around ya!"
- "Hey, is someone keeping track of my heads batted in? Boink!"
- "Grass grows, birds fly, sun shines, and brother - I hurt people!"
- "Need a dispenser here!"
- "Who's the tough guy now? Huh, tough guy?"
- "How's that feel, wimp?"
- "Ya got anything smart ta say now?"
- "Ooooh yeah, you're real scary!"
- "Lotta' good that gun didya!"
- "Oh hey, you suck!"
- "You wimps suck!"
- "Haha! You got owned!"
- "Way to go, pally!"
- "We got 'em, we got 'em!"
- "That's what I'm talking about!"
- "Wassamatter, y'freakin' stupid?"
- "You knuckleheads ain't even worth the effort!"
- "Capture the freakin' point guys!"
Meet the Scout
Meet the Scout was released on April 22nd 2008 and demonstrates the Scout's speed as well as showing him bullying the Heavy and stealing his sandwich.
Scout Update
The Scout update was the fourth class to undergo a major update, you can view the update here.
Trivia
- Scout seems to have an ability to break the fourth wall, and he does this quite a bit. He tells dominated players to "ragequit", despite the game being set in 1968, before video games were invented, he pokes the camera lens in "Meet The Scout" and the smudgy fingerprint stays there until the end of the video, and he slams into the screen in "Meet The Medic".
- As of the end of "Meet The Medic", the RED Scout appears to have had Medic's pet dove Archimedes accidentally sealed inside his chest.
- His resemblance to Vince Offer of Sham-Wow! and Slap-Chop fame caused a couple of related quotes ("If ya order now, I'll throw in a second beatin', absolutely free!") to be added into the game, along with several fanmade videos making comparisons and jokes about both of them.
- One of Nathan Vetterlein's rejected ad-libs from "Meet The Sandvich" ("He-he's like a big shaved bear that hates people!") inspired a community-created item for Heavy that are essentially bear claws wrapped around Heavy's hands.
- His "Bonk Boy" mask is a possible reference to The Flash, a DC Comics hero whose superpower is speed.
- Scout seems to consider himself a ladies' man, hitting on Jessica in the non-canon "Mac Update" comic, and Miss Pauling in the "Meet The Director" comic. Both attempts were seemingly unsuccessful, though.
- Scout kept The Director for five hours after running out of film for "Meet The Scout", insisting the team looks up to him and that he's "a father to his men".
- Scout seems to be associated with a rabbit, according to Spy and Engineer's domination quotes for him. Spy: "You were quick as a little bunny, weren't you?" Engineer: "Just a dead little jackrabbit..."
Hats
Below is a list of every hat specific to the Scout. Hats that any class can equip are listed on the main Team Fortress 2 page.
Miscellaneous items
Below is a list of every non-hat specific to the Scout. Miscs any class can equip are listed on the main Team Fortress 2 page.
Log in to comment