The Quest For The Worst Adventure Game Puzzles - The Legend of Kyrandia - Book Three: Malcolm's Revenge [Part 1]
By ZombiePie 7 Comments
If you enjoy this blog and would like to read my other adventure game retrospectives, here's a list of my previous episodes of this series:
- Episode 1: The Dig
- Episode 2: Atlantis: The Lost Tales
- Episode 3: Loom
- Episode 4: Drowned God
- Episode 5a: Indiana Jones and the Fate of Atlantis Part 1 & Episode 5b: Indiana Jones and the Fate of Atlantis - Part 2
- Episode 6: The Journeyman Project: Pegasus Prime
- Episode 7a: The Journeyman Project 2: Buried in Time (Part 1) & Episode 7b: The Journeyman Project 2: Buried in Time (Part 2)
- Episode 8a: The Journeyman Project 3: Legacy of Time (Part 1) & Episode 8B: The Journeyman Project 3: Legacy of Time (Part 2)
- Episode 9a: The Legend of Kyrandia: Book One [Part 1] & Episode 9b: The Legend of Kyrandia: Book One [Part 2]
- Episode 10: D (The Game)
- Episode 11a: The Legend of Kyrandia: Hand of Fate [Part 1] & Episode 11b: The Legend of Kyrandia: Hand of Fate [Part 2]
Preamble (i.e., How To Kill A Franchise)
Last year I belted out retrospectives for the first two games of The Kyrandia Series at a relatively brisk pace. Then, with the end of the year looming, I desperately needed to get the first part of my Lightning Returns retrospective out, so I put the third game on hiatus. I had almost zero enthusiasm for covering this game, partly because it is not just disappointing but a sad end note to a franchise I think could have been something. As I repeatedly stated in the previous two write-ups, by the time you get to the second game, the adventure game division of Westwood Studios finally found its stride. The complexity of the puzzles could have been more manageable at times, but the game's tone, graphical style, and characterization were all top-notch. Then, Command & Conquer happened. While The Legend of Kyrandia: Malcolm's Revenge ended up being the best-selling game in the series, according to lead designer Rick Gush "the brass at Westwood did not care about anything else" by this point, "except Command & Conquer." So, the series ended with its third title, although plenty of unresolved plot threads could have been expanded upon further.
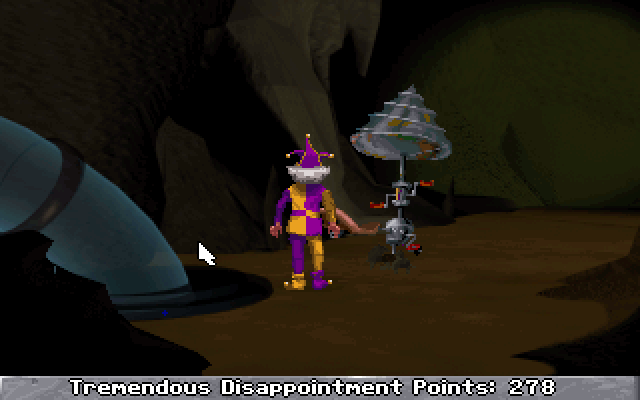
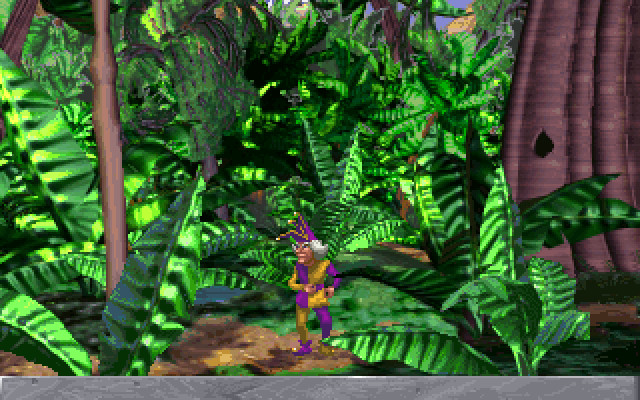
Command & Conquer also had other undeniable impacts on the way Malcolm's Revenge's production progressed. The first two games were pixel-based and more akin to the works of LucasArts. However, with Malcolm's Revenge, the Fables & Fiends team was forced to use the digitized rendering engine from Command & Conquer. The game encodes all of its background visuals into the VQA (Vector Quantized Animation) file format and is one of the few in video game history to do that. The result is that Malcolm's Revenge looks like crap, and you can tell the game's traditionally trained pixel artists were uncomfortable using their new rendering tools. The other consequence is that it's challenging to tell where new paths or exits exist when navigating Malcolm from one location to the next. To underscore this problem, look at the image above one more time. Now, see if you can find the FIVE critical paths leading to new locations or screens.
If there is one positive aspect of the game I have to concede, it has to be its myriad of optional routes and directions. Unlike the first two games, there are upwards of six possible ways to move from one set piece to the next. Malcolm has an assortment of puzzles and character interactions he can make and discover depending on how you decide to play the game. Similar to Indiana Jones and the Fate of Atlantis, at least in spirit, you can opt into a more puzzle-oriented playthrough or a more cinematic playthrough. It's an impressive accomplishment but it does not change my underlying disappointment with the overall product. For this blog, I went with a neutral route and interacted with as many of the game's puzzles as possible. However, unlike with my Fate of Atlantis playthrough, I'm not going back to prior scenes or locations to detail sequences I missed. I played this game and saw the credits roll, so, in my mind, I did my time.
However, the bigger problem with Malcolm's Revenge isn't how it looks. The game is simply not a fun experience. For reasons I cannot understand, it reverts to the first game's penchant for murdering you. There are a TON of anti-player sequences that seek joy in offing Malcolm when you least expect it. Whether it's snakes hiding in bushes, trigger-happy pirates, or fleas on a tropical island, this game kills you in the most frustrating and annoying ways possible. That dovetails into the game's overall puzzle design being far more annoying and time-consuming than anything you experienced in the previous games. That's primarily thanks to the game resorting to RNG-based sequences and brute force more than the past two games combined. Additionally, there's a morality system in Malcolm's Revenge, and you will often need to toggle between having Malcolm speak to NPCs truthfully or facetiously to get past roadblocks. Unfortunately, the game provides no clear indications of when you need to interact with this system besides the one time it introduces it to the player. Be warned; you will repeatedly hear me call parts of this game "too long" or "annoying" in this blog! And with that in mind, let's review some puzzles!
Kyrandia
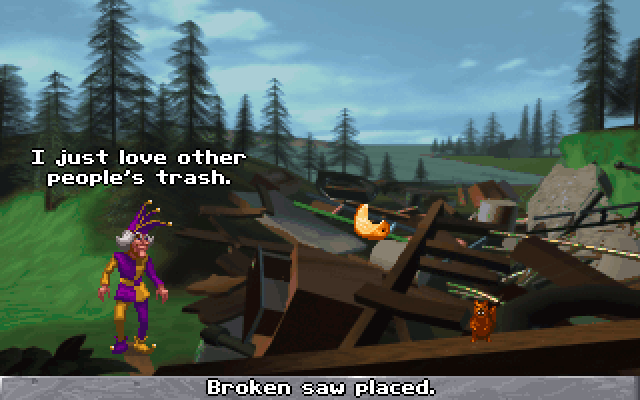
Pulling Up A Bunch Of Random Shit In A Trash Pile - [Rating: 4/10] - Well, isn't this game off to a rip-roaring and exciting start! After Malcolm breaks free from his petrified state, he finds the castle of Kyrandia locked up and in disarray. Before exploring the world, one must do what one always does in the Kyrandia games: collecting random shit! Near the castle is a pile of refuse to the right, and from it, Malcolm will need a broken flask, an empty flask, two nails, and Brandon's shoe. Any other objects from the pile are unnecessary, and this game wraps back to the first Kyrandia game by limiting your inventory slots to just ten. I can't get too angry at this specific "puzzle," considering the first two games would always prompt the player to explore random screens of new environments by forcing them to pick up crap for future puzzles. The complication is that the items you pull from the trash pile are random, and there's a hard cap on how many objects you can remove in a single attempt. Therefore, you are required to move Malcolm back and forth until you nab the needed things. It's not "difficult," but much like the rest of the game, it's an annoying waste of time.
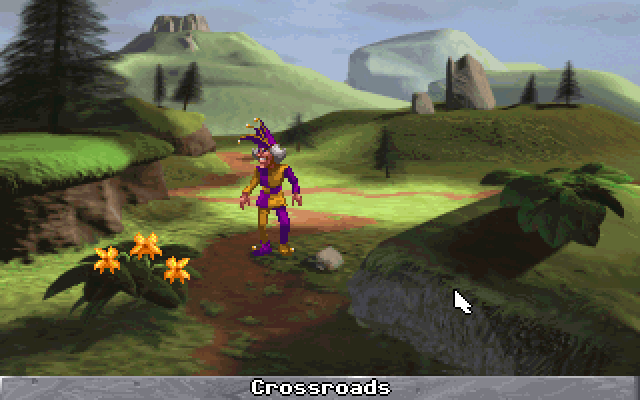
Summoning The Ghost Of Brandon's Mother - [Rating: 5/10] - After rummaging through trash, it's time for Malcolm to get a brief rundown on his mission and how the world of Kyrandia has been doing since we last saw him. You can initiate a fun scene involving Zanthia by checking out a landing pad, but the center of our attention now is the grave of Brandon's mother. To summon her spirit, move left from the junk heap, down, and then left. You'll notice some flowers at a crossroads, but if Malcolm attempts to pick them by hand, they run away and make monkey sounds. To take them, use the broken flask and cut two flowers from the plants. Then, return to the graveyard and place both flowers on the correct tomb to summon Brandon's mother. Also, you need to talk to her with Malcolm's mood set to "Nice"; otherwise, you will have to repeat the previous steps! The task here is simple, and this is a clever callback to the first game, but knowing what to do in the first place is a bit of a tough cookie. Nothing in the game prompts you to know the tombstone is the key and that you need the broken flask to cut the flowers. This entire game has a HUGE problem with signposting and piggybacking, and this is the first indication of it.
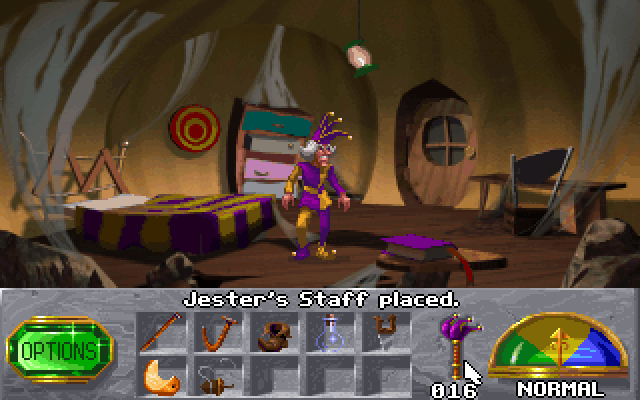
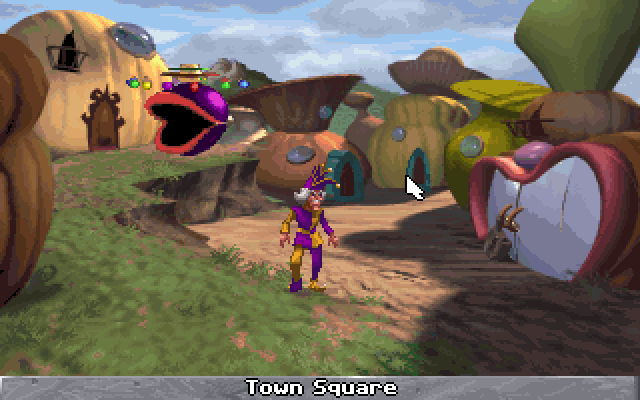
Picking Up Malcolm's Belongings In His Apartment - [Rating: 2/10] - It's time for EVEN MORE item collecting! To get to Malcolm's apartment, return to the bluff by the castle and hop into a purple transporter. This device will send Malcolm to a town square where he can enter a toy factory after using one of the nails to pick the padlock blocking Malcolm's way. The nail becomes bent but should return to an inventory slot rather than be thrown away. Once in the toy factory, find a door in the back and locate a chest in Malcolm's bedroom. You'll find a "Nut-On-A-String" toy and can use the bent nail to make a "Bent-Nail-On-A-String." You can also acquire Malcolm's Jester's Staff after clicking on the bed and a photo album. Return to the town square, and feel free to have an optional scene with the "Voice Of Reason" statue in the town hall. There's not much to say here other than to highlight the importance of not throwing away the nail when it gets bent and remembering to use it on the toy as soon as possible. However, this is still one of the easier collection missions in the first half of the game, thanks to the town only having a few items for you to pick up and a limited number of explorable locations.

Getting The Leather Vest From The Public Baths - [Rating 3/10] - It's time to put Malcolm's mood mechanic to good use! First, pick up two firewood logs at the city limits when exiting the town square. I must emphasize how the game only giving you ten inventory slots leads to so much fiddly inventory management from beginning to end. No matter, walk down and then left to find the entrance to a public bath near a mime. Don't mess with the mime too much, and to break into the bathhouse, you'll need to switch Malcolm's mood to "Lying" and then use the toy with the nail on a payment box to break the lock. When you enter the bathhouse, the manager will recognize Malcolm and kick him out if he is not programmed to tell a fib. While at the bath complex, adjust a temperature gauge to the highest setting to cause everyone to yelp out in pain, which provides a short window for Malcolm to steal a leather vest.
Overall, I'm not a fan of the mood mechanic for reasons I have already listed. However, the game provides a tutorial here on how to use it and how it can allow Malcolm to get past checkpoints or roadblocks. There's nothing particularly wrong with this specific puzzle, and unlike later parts of the game, you switch Malcolm to his "Lying" mood and stay there for the entire bathhouse puzzle. I appreciate the added amounts of dialogue this mechanic must have presented for the writing team for Malcolm's Revenge, but that doesn't save it from being a bitter disappointment compared to the alchemy system in the second game. Also, the mime being a red herring is a fun but unexpected complication that might set you back if you are not careful.
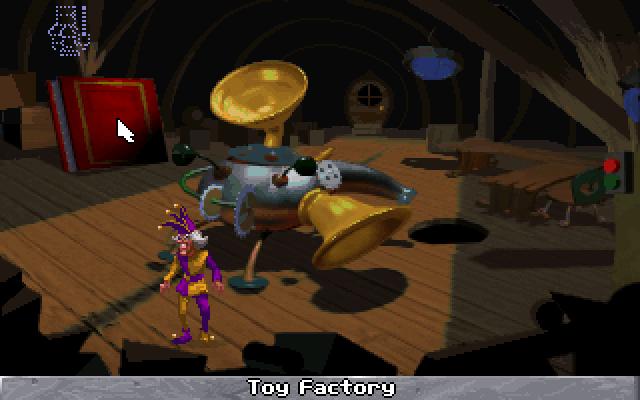
Making Toys At The Factory - [Rating: 7/10] - With the "Leather Jerkin" in Malcolm's possession, it's time for him to return to the toy factory in the town. While in the main toy room, notice a large machine and a red book. When you click on the device and then the book, the outline of a toy soldier should appear in the air. Before you ask, the game does not signpost that this is how you find the toy recipes. Use one firewood log to get the machine running, then press a green button. A toy soldier should come out of one end of the machine, but there are more toys for Malcolm to make before he calls it a day. Take note of two levers on the toy-making device and set the left lever up and the right one down. A toy horse should appear when you toss the other log into the machine and press the green button again. Finally, reverse the levers with the right one up and the left one down, toss in Brandon's Shoe or the Leather Jerkin and then press the green button to make a leather ball.
There's a lot wrong with this puzzle, and it's hard to point to one reason. First, Brandon's shoe ties back to the shitty trash heap from the start of the game, and it's not like the Leather Jerkin is any better. Second, the game does nothing to communicate how you interact with the toy machine or even how to make the recipes appear. Clicking on two random environmental objects to make magical figures appear is decidedly not in the spirit of the previous Kyrandia games, as they emphasize using items on environmental objects. Finally, that part with the levers requires brute force. Nothing in the book or environment hints at which lever needs to be up or down to make the toys you need, so if you play the game without a guide, you are at the mercy of luck. Also, because the game only spawns a certain number of firewood logs at a time, you'll likely need to go back and forth to where they appear. It's not an impossible task, but it takes far longer than it should and is incredibly fiddly and annoying.
Getting A Fish Cream Sandwich - [Rating: 3/10] - You might be asking why Malcolm needs to take time out of his busy schedule to make children's toys. The reason is that he needs to pick up a fish cream sandwich from a kid that speaks an alien language. Trust me; it makes sense in context. Return Malcolm to the crossroads and exit and enter until the child in question spawns, which is determined by a random dice roll. To get the kid to surrender the sandwich, you need to present them with one of the toys, but the toy they want is randomized with every playthrough. When you place the correct toy on the ground, he takes it and hands Malcolm the disgusting hoagie. This puzzle is a gear check puzzle, with Malcolm moments away from the game's second act. If you took the time to make all three of the toys, you should be fine, but if you skipped a step, you might need to return to the factory and toil away until you make the object the kid wants. Likewise, having the kid's spawn rate be randomized is a terrible design choice.
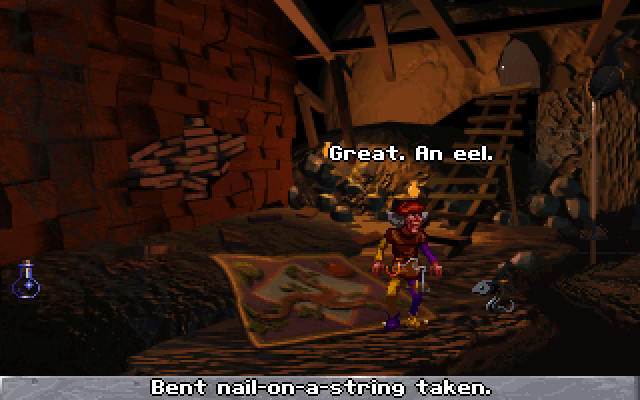
Stealing The Mime's Outfit - [Rating: 8/10] - If you take the time to explore the remaining locations on the starting hub world, you'll eventually run into a ship captain that also happens to be a dog. When you ask to board their ship, they refuse unless you are a member of a circus troupe. With that hint, it's time to return to the toy factory. This time, jump into a pit on the floor to enter the factory cellar. Use the Bent-Nail-On-A-String on a small pool of water to fish out an eel. Return to the bathhouse's entrance and find the mime. Instead of talking to the mime, place the eel in their hat and wait for them to notice a fishy smell coming from them and watch them dart to the bathhouse. Now, it's time for you to do the same fucking steps you did to get the leather vest a second goddamn time. I'm not joking; you even need to use the bent nail contraption to fuck up the payment box to get inside the complex. They recycled the same fucking puzzle! After you adjust the water temperature to distract the manager, you can take the mime outfit. With it, you can convince the captain you are a circus member, but now they complain about being hungry. Hand them the sandwich, and you'll finally be sent away to the Isle of Cats!
You might be asking why I bumped up the rating between the first time you went to the bathhouse and this time. It all comes down to you needing to learn how to get the mime into the bathhouse. You can get eels from the ocean next to the captain or the pool at the cellar, but there's nothing in the game to logically clue you into knowing you need to catch eels in the first place. Furthermore, if you talk to the mime one too many times, he murders Malcolm and forces you to reload to an earlier save. As a result, the game presents this roadblock and provides zero scaffolding for getting past it. I know the first two games have some significant issues with red herrings and weird dead-ends, but this alone at least matches the second game not telling you how to make the indigo potion at the rainbow machine, AND WE AREN'T EVEN AT THE HALFWAY POINT OF THE GAME!
The Isle Of Cats

Collecting Bones In The Jungle - [Rating: 9/10] - This sequence is dogshit, and I'm not even making a funny joke about this tropical island being populated by anthropomorphic dogs! When you first land on the Isle of Cats, you'll notice cats are subservient to dogs. However, when you interact with a cat pulling a cart, you'll get wind of a possible rebellion brewing. Nonetheless, click on the dog driving the cart, and they will take you to a fort where you can find the island's canine leaders. Around this point, you'll notice Malcolm scratching his skin, which is your clue to either jump into pools of water or click on him to remove fleas. While at the fort, find the leader, Duke, pick up some sesame seeds from a pile, and find and collect a machete. What ensues next is one of the DIRT SHIT WORST PARTS OF THE GAME! You must explore the jungle labyrinth, cut down foliage, and hope a bone will spawn after removing the plant life. To complete the puzzle after this sequence, you will need at least six bones, but with the items already in your inventory, you'll likely not have enough space to collect the minimum amount of bones in one go. Also, it would help to find Fluffy, the cat leading the rebellion against the dogs, and have Malcolm lie that you are willing to help his revolution.
This sequence is when it hit me this game would not live up to the high bar the second game set for the series. Fuck, I think the cave sequence in the first game with the fire berries is better than navigating the jungle in this game. To give you a sense of how shitty this feels, let me share the most optimal way to play this puzzle I found on a random guide. First, enter the jungle maze, and hack the bushes on the first screen. The first screen can spawn as many as two bones, but after you reach a certain threshold, the bones will stop generating entirely. Move left, hack the bushes and check for bones and kill snakes. We will talk about the snakes shortly because they are such complete bullshit! Walk left and repeat the previous steps before moving up one screen. Set Malcolm to lie when talking to Fluffy and pick up the leather mouse he hands you. Depending on your luck, you might need to drop a unit of bones to make room for the mouse. Walk left, up, and up to return to the fort.
The spawn rate and location of the bones suck incredible amounts of shit. It's utterly anti-player game design and seems antithetical to the franchise's breezy sensibilities. Additionally, while navigating the jungle, some cuttable foliage will spawn snakes. If you click any part of the screen that is not the snake pile, even if you attempt to move Malcolm away from them, he dies. He will also die if you take too long to use the machete on the snakes. But that's not the only source of a "Game Over" you must worry about on the island. Because dogs and cats populate the island, there's a massive flea infestation, and if you fail to click on Malcolm from time to time to remove fleas, he will get eaten alive by the bugs. There is no more frustrating feeling than being halfway through a puzzle or sequence on the island and needing to stop everything you are doing to pick off fleas. It's like the designers took the concept of the gem spawning in the first game and thought, "What if we made that harder with a bunch of instant death-causing bullshit?" It sucks.
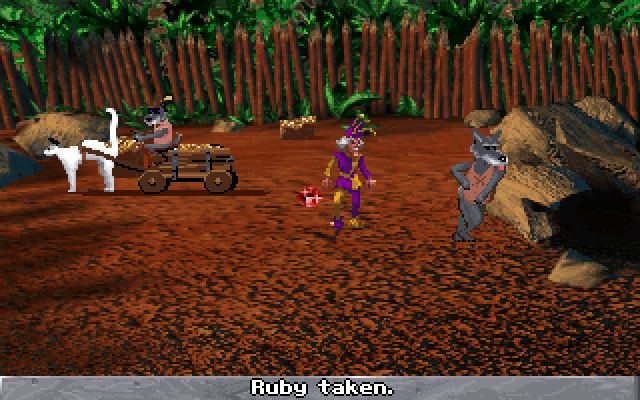
Getting Gems Using The Bones - [Rating: 8/10] - Now it is time to put those bones to some use! Not "good" use, mind you, but just "some use." When you return to the fort, you have two options for using them. You can directly click the bones on Duke and cause him to bury them at random locations, or you can manually apply them to the empty plot of land below him. Either way, Duke burying the bones may dig up a gem, and Malcolm will need six of these before moving on to the next puzzle. As you might expect, the location of these gems is randomized between playthroughs, and no matter your approach to using the bones, you are at the whims of Lady Luck. This design choice inevitably means you are bound to return to the jungle in pursuit of a new set of bones with the same death-causing bullshit gracing your adventure once again.
I mentioned earlier that you'll need more than the minimum of bones, which stems from this puzzle's "randomness." The sizes or ranges of each plot are not at all clear to the player, and there were times when I wasted a bone by clicking on what I thought would be a new digging spot, only to watch Duke dig in a location I had already twice checked. Trusting Duke is no better, as he has the habit of recycling previous dig sites more often than he should. There's no logic to apply here; it's pure trial and error, with the game's cruel design laughing at your face when you fail. The moment of dread I got when I realized I was out of bones and would either need to save scum or return to the jungle cannot be described in words. It's a shitty feeling and an even shittier puzzle.
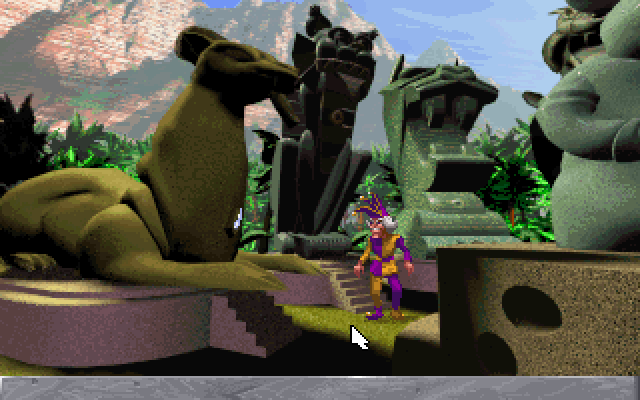
Using The Gems On The Cat Altar - [Rating: 6/10] - Things only marginally improve when you move to use the six gems at an acropolis filled with statues. But before you do that, set Malcolm to his "Nice" mood, hitch a ride on the cart and find a nearby beach where pirates have taken residence. The captain agrees to transport Malcolm if he can perform a magic trick. With that in mind, click on the cart and return to the screen from when Malcolm first landed on the island. You'll find an altar to the left of the island's entrance, and you can use this to determine the elemental affinities for each gem. For example, the ruby represents fire, the emerald is wind, the diamond is the moon, and the list goes on. To the left of this altar is a complex with ball-shaped statues. When you use the toy mouse Malcolm got from Fluffy on one of these statues, the entire complex transforms, and the sculptures take the shape of cats. The gems need to be affixed to the correct statues, and then they will provide a crystal mouse that allows Malcolm to perform a magic trick.
As long-winded as this sequence might sound, it is far from the worst thing in the game or even on the island. When you get the gems, as long as you remember a quip about the ruins that Fluffy makes from a while back, you should know where to use them. Also, the game provides an altar that allows you to determine their affinities which is an appreciated mulligan compared to how the rest of the game functions. Unfortunately, that quality-of-life addition is all for naught because the game does NOTHING to help the player figure out where to place the gems. I have heard mixed reports if the game defaults to trial and error or if there is a tell to the symbols or designs on the statues. I tend to vote for the former, and even if the latter was true, the graphical fidelity of the background and foreground textures is so bad you can't see shit on the sculptures. Worse, when you place a gem in the correct spot, the game does not provide a helpful animation or clue that it's where it needs to be. The only time the game does anything to show you are doing things right is when you have fixed all of the gems in the right spot. Which, AGAIN, means there's a tireless amount of trial and error.
The Ends Of The Earth
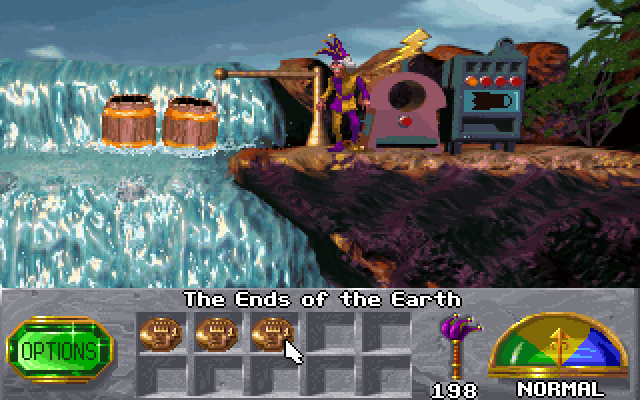
Using The Vending Machine At The Top Of The Waterfall - [Rating: 3/10] - After hitching a ride with the pirate captain, he drops you near a waterfall and tosses three gold coins Malcolm's way. At the top of the waterfall are two vending machines. When you use the one to the left, Malcolm will get an "Insurance Policy Scroll," which allows you to continue playing the game at least once after making a mistake. Weirdly, this and the cat statue puzzle have player-friendly mercies, whereas other FAR HARDER parts of the game do not. When you look at the machine to the right, there is an assortment of options, but to complete the waterfall puzzle, Malcolm will need to buy an umbrella and a pool ring float. I don't hate this puzzle as much as I should. The game presents the waterfall, and you must use logic when buying tools and devices accordingly. Also, when you make it to the lower levels of the waterfall, the game outright tells you the correct tool to use in the form of helpful signs. There's some trial and error, but it is not the end of the world.
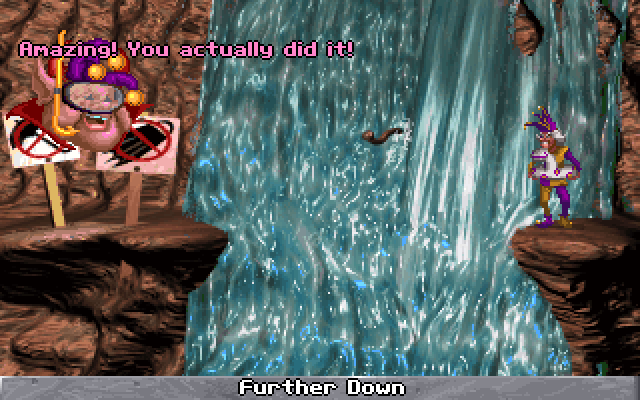
Reaching The Bottom Of The Waterfall - [Rating: 4/10] - With both of the required items in hand, it is time for Malcolm to hop into a barrel and go to a lower level of the waterfall. When you get down once, you'll notice a sign that says "No Pool Toys," which is your sign to use that item on Malcolm. Luckily for all involved, the toy has a pump to inflate and deflate it, and you'll want to use it on a nearby yellow flower to make it into a jump pad. Using the flower, you can enter a cave and watch a cutscene that I have never been super clear on if it is optional or required, but it's weird. Once that is done, you can go to the second level of the waterfall by jumping down. Use the pump to remove the pool toy from Malcolm and use the umbrella on a branch to get Malcolm near a jumping point. After using the umbrella on Malcolm, click on a rock to float to the third level of the waterfall. With the third level, enter a cave and jump into Limbo.
It's not perfect, but this waterfall sequence is the one time Malcolm's Revenge feels authentically like its predecessors. It requires you to use items on parts of the environment and prompts the player to pull context clues and hints from the foreground and background. It's fiddly, and if you enter one of the lower depths and realize you don't have the necessary item, you're fucked. However, the tone is solid, and the silliness of using a pool float to survive a waterfall is in the franchise's spirit. My only quibble stems from Malcolm's leaping points. You can have him jump down with the correct item in hand at any point on a given waterfall screen. Nonetheless, there's only ONE specific location where he can leap to a lower level without dying, and the granularity of where he needs to be is all over the place. With the first screen at the top, he can hop into the barrel as long as he is in the general area. With the third screen, where he needs to use the umbrella for the first time, he needs to be across from the rock at a very exact angle. It's still one of the better puzzles in the game, but that one part annoyed the Hell out of me.
Limbo
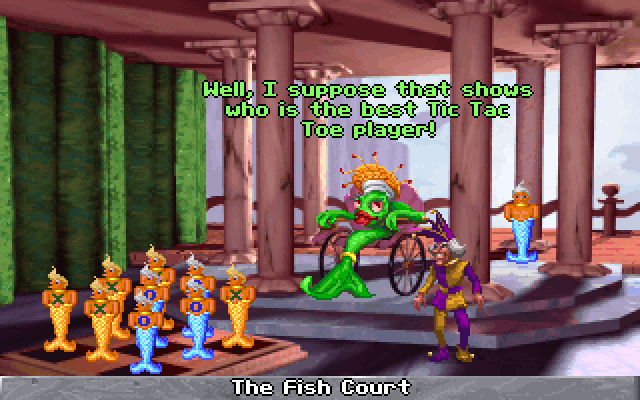
Playing Tic-Tac-Toe Against The Queen - [Rating: FUCK THIS GAME/10 (i.e., 8/10)] - Now it's time for THE OTHER WORST PART OF THE GAME! After reaching Limbo, Malcolm discovers a tyrannical fish queen is in charge, and they place a collar on his neck, which forces him to attend to her every whim. She asks that you leave her alone to get some shut-eye, which is enough time for Malcolm to move right and pick up a gold key from the ground. The queen then uses the shock collar to force Malcolm to return to her court, forcing him to play a game of tic-motherfucking-tac-toe. However, setting Malcolm to his "Lying" mood is essential. As you play the game, you need to purposely lose and tell the queen they are the best tic-tac-toe player in the world. Otherwise, she will force you to keep playing tic-tac-toe until the heat death of the universe. When you finally allow her to win and flatter her with compliments, the queen permits Malcolm to explore Limbo freely.
There's one problem. The fish queen is designed to play the worst possible move, which makes losing to her an especially tricky proposition. The only way you can have her win is if you can avoid making a winning move until she plays her last possible piece. Even if you set her up to win earlier by helping her to connect two similar colored pawns, she'll miss it and place her shit somewhere else. She can only win on her last possible move. That's how they designed this puzzle, and I hope you can sense the teeming anger emanating from the text I am writing. Also, LOOK AT THE ANGLE THEY MAKE YOU PLAY THIS GAME! THEY DON'T EVEN HAVE THE COMMON COURTESY OF LETTING YOU PLAY THE GAME FROM A TOP-DOWN PERSPECTIVE! I don't have enough fingers on my two hands to count the times I accidentally made the wrong move because I clicked on the wrong square, thanks to the shitty camera angle. And you have to play her at tic-tac-toe at least THREE TIMES! This shit is shit. This puzzle is well-regarded as the worst part of the game, and I full-heartedly agree with that consensus.
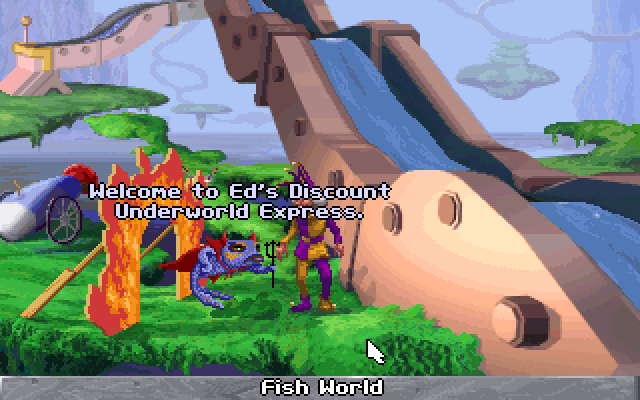
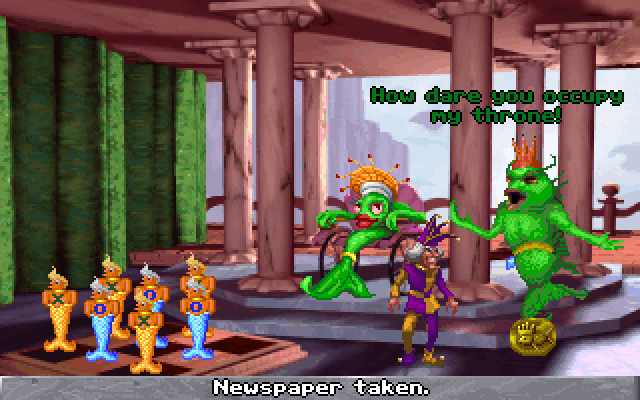
Malcolm's First Bout Of Freedom In The Fish World - [Rating: 8/10] - After exiting the fish court, move right once to enter a garbage dump. Pick up a sock on a fence and find a black flatfish named Benny. He buys junk, and you can pick up a gold coin when you talk to him a second time. Return to where you started and find the fish university on the upper left. Take note of the class in session, use the Jester's Staff on one of the students, and steal the apple on their desk while the teacher is not looking. From the classroom, move left, click on a portion of a water slide, and then a lever to quickly enter the garbage dump again. The goal is to pick up as much trash as possible and sell it to Benny until Malcolm has six gold coins. When you find a newspaper, keep it. When you have that amount, find a fish operating a circus cannon and offer him five coins to use it. The canon ends up sending Malcolm to the Underworld, and it is vital to have Malcolm set to "Nice"; otherwise, this will fucking take forever to complete. Talk to a man named Elvis and then interact with a woman behind a desk until she tells you how to perform a seance to summon the ghost of the fish king the queen murdered to become the leader of Limbo. Getting that tidbit will cause the fish queen to call Malcolm back to her court for ANOTHER game of tic-tac-toe.
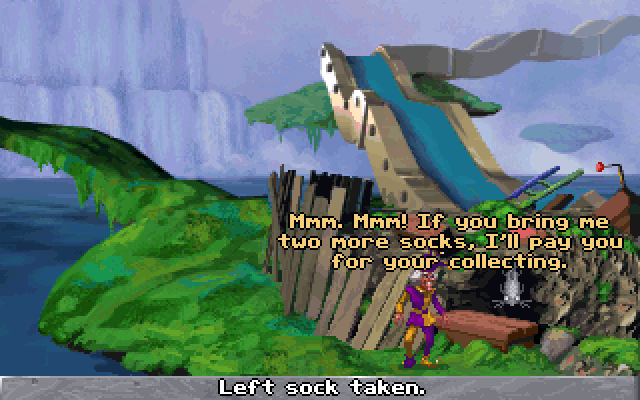
Fuck me. If you enjoyed pulling shit from a trash heap at the start of the game, you're in luck because the designers recycle that puzzle again! However, this time it's even more punishing because not all the trash you gather is of equal value to Benny. Sometimes the shit you pull will get a coin, and sometimes it nets you jack-shit. Once again, you are at the mercy of pure RNG, and it sucks complete and total shit. Also, getting the apple is CRITICAL, but it has been FOREVER since you last used the Jester's Staff for ANYTHING! The game remembers the staff exists in weird and random spurts, and it never feels like a natural solution when required. It's not like it is on par with Zanthia's cauldron from the last game. Likewise, the timing of when to steal the apple and the lack of a visual cue that it's a stealable object could be better. Finally, you can accidentally sell the newspaper and not realize you've fucked yourself over because its importance is not discussed until AFTER you enter the Underworld! You can still pull it from the trash heap, but it could take a while. Oh, and how could I forget about playing tic-tac-toe a second time?
Summoning The Fish King - [Rating: 6/10] - After the fish queen summons you, lose to her the same way you did the first time. However, remember to have Malcolm's mood set to "Lying," or she'll force you to play her game perpetually. After that first match, it's time to perform the "Royal Séance" you learned about from the Underworld. However, you'll need a newspaper and one gold coin to perform that incantation, and if you lack either, you need to return to the trash heap next to Benny and be at the whims of RNG. If you have both trinkets, you need to set Malcolm to "Nice" and then talk to the queen until she agrees to play a new tic-tac-toe game. However, as the lady in the Underworld explained, you need to stop playing when there are seven characters on the board. When you get to that point, place the newspaper on the floor and the gold coin on top. This act summons the fish king, who scares away the queen and allows Malcolm to explore Limbo without restrictions.
I can't get too angry at this puzzle because the game outright tells you everything you need to do to chase away the queen. You know the number of people that need to be present in the room and which items you need to use. To a certain degree, it's another example of the game using an adventure game, "gear check," before it transitions you to a different chapter. Where I get a bit negative is the puzzle's structure and lack of gameplay piggybacking. When I first played this game, I needed to be reminded that the tic-tac-toe pieces counted towards the warm body requirement to start the ritual to summon the king. You also may need to backtrack to solve this puzzle. That sucks because getting trash from the heap isn't fun and restarting a tic-tac-toe game with the queen necessitates a different process or set of steps. Overall, it's one of the better puzzles in Limbo because it has some signposting, but it's far from flawless.
Returning to Kyrandia - [Rating: 2/10] - With the board game-obsessed queen out of the picture, pick up the gold coin and newspaper from the floor. Retrace your way back to the fish that operates the circus canon to initiate a sequence where Malcolm demands a refund. When the scene ends, set Malcolm's mood to "Nice" and click on the fish again. Instead of a full refund, the canon operator offers a one-time discount for a second ride for the price of one gold coin. Agree, and end up back at the entrance of the Underworld and ensure Malcolm is still set to his friendly mood setting. Get in line to enter the afterlife, but talk to the man in front of Malcolm, and eventually, he will let him go ahead. When you speak to the lady behind the desk a second time, she lets you move forward, and you are treated to a fun in-game cutscene where the residents of Hell happily greet Malcolm as one of their own. This is one of the few times I think the writing and humor of the game really "clicked" for me, and I was relieved it was a fun cutscene that didn't have any puzzles. When the gatekeeper of Hell announces it is not yet Malcolm's time, they kick them out, and he finds himself next to a vehicle that can tunnel back to the planet's surface. You click on this vehicle once to return to a familiar crossroads.
If there is one part of the first half of Malcolm's Revenge I want to sing praises for, it is this part. Like the Waterfall Puzzle, the game finds a fun balance between talking to you and you needing to figure out how to interact with your surroundings. It's one of the few times you need to repeatedly interact with Malcolm's moods to get past multiple checkpoints, but it works, considering everyone you are interacting with feels like they need some brown-nosing to get them to do what you want. Finally, the scene at Hell is excellent. The classic writing and humor of the Kyrandia series shine through during this sequence. So, at least we end this first blog on a positive note!