Overview
 RE5 sees the return of legendary Ex-STARS member, Chris Redfield
Capcom announced Resident Evil 5 on July 20, 2005, released it on March 5, 2009 in Japan, and in North America and Europe on March 13, 2009. Developed by Capcom, Resident Evil 5 marks the franchise's first appearance on the PS3 and Xbox 360.
The game takes place in 2009, eleven years after the events of the original Resident Evil, and the game's plot explores the post-Resident Evil 3, post-Umbrella world. Chris Redfield, now a member of a group known as the Bio-Terrorism Security Assessment Alliance (BSAA), is deployed to investigate an incident in West Africa, which serves as the game's main setting. Chris is accompanied by Sheva Alomar, an agent of the West African branch of the BSAA.
Resident Evil 5 requires a 5GB installation on the PS3, and 6.8GB on 360.
Gameplay
Overview & Controls
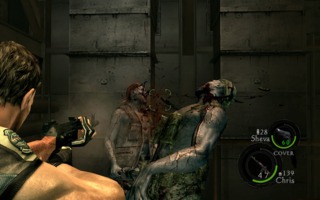 Chris combating Soldier Majini
Resident Evil 5 carries on much of the gameplay design and control scheme from Resident Evil 4 before it. It functions primarily as a third-person shooter with an over-the-shoulder perspective, only players cannot simultaneously move and shoot. This then gives the game a more methodical feel that prioritises accuracy and crowd management rather than commonly hunkering behind cover or running & gunning. Though while there is in fact a cover system, it is relatively rudimentary and is only accessible at specific segments -- most notably during when enemies that can shoot back such as Soldier Majini are introduced. When available, players can pop-out to fire, but cannot shimmy along nor dive between different pieces of cover.
For as much as RE5 resembles RE4, it still nonetheless carves out its own identity by way of its faster pace and more action-orientated focus. Puzzles have been near-completely removed, and RE5 has adopted a more modern shooter control scheme that by default has players aim with L1/LB and shoot with R1/RB. Characters can now slowly strafe left or right as well, though amongst the four variable control schemes exists the 'Classic' Type D, which has RE5 control much like RE4. However that also includes removing the player's ability to strafe. A basic map in the top right corner of the screen can be displayed by pressing R2/RT. It won't disclose the information of enemy locations, but will at least visualise the blueprint-like design of the area.
The story is now told almost-exclusively via in-game cutscenes this time around, though nearing the later segments there are still a number of Files (diaries, memos ect.) that shed light on the series' backstory and mythos.
The most notary change from RE4 is the addition of a secondary character that persists throughout the whole game, in both single-player and cooperative formats. (See further below for more details)
Inventory & Shop
 The in-game inventory display
Possibly the most notable overhaul is the inventory system. Long gone is the tetris-like inventory management of Resident Evil 4, and in its stead is a new format that is presented as a grid made up of nine squares -- each of which can hold any type of weapon or item. Players press triangle/Y to bring up their inventory, where they can then choose to move around their items into whichever square they desire. However inventory management is done in real time, and players cannot move whilst in their inventory leaving them potentially vulnerable to attack. To compensate, players can now once again reload their weapons via their inventory screen--by moving ammo towards the hypothetical weapon square--as opposed to only being able to do so manually like in RE4. Due to the animation-priority concerning certain actions, this allows players to reload their weapons or move items around while the character is climbing a ladder or opening a door for example. The speed with which the inventory menu can be opened & closed attributes to this factor also.
Another benefit is with the use of the d-pad players can select between whatever items they have in the top, left, right, and bottom squares. This thusly allows players to switch between their weapons in real time.
There is no longer a mysterious merchant by which players buy and upgrade their weapons. Instead there is a HUB that the player can use to store unwanted weaponry or ammunition and so forth, and can then use their accumulated gold from killing enemies to potentially buy new weapons or upgrade their current ones. Though not all weapons are available for purchase; some are unlocked as the story progresses, while others are made available once other certain weapons have been fully upgraded. Treasures can once again be collected through the game, be they hidden within the environment or dropped by a powerful enemy, which can be sold in the HUB for additional cash. Treasures cannot be combined like in RE4 for an increase in value, however.
The Inventory & Cooperative HUBPlayers are sent to the HUB whenever they re-enter the story should they have quitted earlier, in-between story chapters, and even when they die. Whatever treasures/weapons/ammunition the player may have collected (or used up, in the case of ammunition) before reaching a hard checkpoint will still persist in the player's inventory when they are sent back to the HUB. Players can also access it via the game's main menu as well.
Health & Healing Items
A character's health is now again represented as 3/4's of a circle; whence damaged, the health of the circle will deplete and change color the more health is lost. A character's extent of health is static and cannot be upgraded with yellow herbs anymore, though there are items that can be equipped to reduce damage.
While yellow herbs are no longer available, green and red still persist and can be combined to increase their effectiveness. A list of herbs and their effectiveness is as follows:
- Green Herb - On its own will heal roughly 25% of health.
- Green + Green Herb - Mixed will now health roughly 50% of health.
- Green + Red Herb - Mixed will heal the player character fully.
- Red Herb - On its own will do nothing.
Besides herbs, first aid sprays are available for use and like always will heal the character fully. Eggs can also be found throughout the game in three varieties:
- White - Roughly heals about 30% of health
- Brown - Roughly heals about 40% of health
- Gold - Heals a character fully.
While they're ordinarily found like any other item, the player will sometimes encounter chickens. If a player scares it enough, be it by aiming or shooting near one, there's a chance it'll lay an egg the player can collect. Snakes also exist within the world (and often like to hide within destructible crates/barrels) that have a chance of dropping an egg whence killed, too.
When healing with a herb mixture or first aid spray it's beneficial that the characters are close by as it will heal them both -- eggs, however, will not. Though they do at least have the advantage of being stackable, with up to five of a single variety being able to fit into a single inventory square.
Chris, shown to be in the 'Dying' state.When a character's health gets into the red the player will visually walk with their hand on their hip with a slight decrease in movement speed. Should a character lose all of their health, however, they will go into the Dying state -- represented by the fourth segment of the circle. When in the Dying state players can only slowly limp while what remains of their dying gauge begins to drop; the only way out of it is if the other character can either heal them with a herb/first aid spray, or will otherwise administer a shot of adrenaline to bring them out of it -- a prompt to do so for both actions will appear on the saviour character's screen. The shot will not heal any health, however, and any attack will throw the character back in the Dying state--if not kill them outright--which will continue to drop from whence it was left before the player was pulled out of it.
Cooperative Gameplay
In-line with the game's bigger emphasis on action, the whole of RE5's story can be played cooperatively for up to two-players. By default player 1 is always Chris Redfield while the second takes control of Sheva Alomar. Though upon completing the game the first player can then choose which character they want to play as. RE5 can be played cooperatively Online, though split-screen and even LAN are available methods also. However there is no drop-in drop-out functionality; whence a new player joins an online game, the game will take both players back to the HUB screen as mentioned before.
Playable story characters Sheva & ChrisBoth Chris & Sheva play almost the exact same as one another, and have the same capabilities and can use nearly all of the weapons available in the game, however they each have their own single, exclusive weapon that only they can use. The one major difference between how they each play is their perspective; Chris, like the playable characters of RE4 before him, aims over his right shoulder, whereas Sheva aims over her left. This was done to give the game a more pleasing visual aesthetic in split-screen mode.
There are a number of times throughout the game where the two characters are forced to split-up. This usually involves Sheva, with the help of Chris, leaping over a gap to reach another part of the environment to collect a key item -- while the other may likely be able to provide cover fire. However since the players are split up, they can no longer heal each other nor bring the other back out of the dying state. Though sequences where characters split-up are short-lived.
Players are able to trade supplies such as ammunition and healing items (thought not weapons) between each other both in-game and in the HUB. There is also a small series of in-game commands players can give each other. These are: Go, Wait, Come On, and Thanks. Go, Wait, and Thanks are triggered by holding (by default) the circle/B button down, and then choosing from the three commands with the d-pad; Come On is triggered by simply pressing the circle/B button. Though Thanks can also be triggered this way in response to assistance from the other character, such as after being gifted/traded an item or after being saved from an enemy grappling the player. Pressing circle/B when the player's partner scores a headshot or manages to successfully enact a follow-up melee attack will also have their character compliment their partner.
With the map up, both players will be shown. Though if one player gets out of range of the map, the other player can then hold down L2 directing the player's attention to the location of the other player.
Secondary Character AI
When playing in single-player the secondary character will still persist, but is now controlled by a friendly AI. However it is still just as vulnerable as the player and shares all of the same gameplay mechanics and trappings, including its own 9-square inventory grid. It will often act of its own accord and will fire at whatever enemy it encounters, regardless of how much ammunition it has. It will heal itself when damaged and usually knows which healing item is most suitable, though it will usually rush to the player first to make sure they both get healed -- regardless of whether the player actually requires healing or not. It will also collect supplies on its own, though will at least give some to the player should they feel the player is in need of them, or if it collected ammunition it can't use. Though this may not always be the case.
Fortunately it will gladly trade items with the player when requested and will even always thank the player for any assistance as well. However because it tends to go through ammo relatively quickly, it's advised that the human player equips themselves with different weapons to the AI. Such as for example sticking the AI with an SMG or Assault Rifle while the player uses a Handgun. As it's an AI, its accuracy is very high, thus it excels with Sniper Rifles in particular. While it will use whatever firearms it has at its disposal, it will not use any explosive weapons such as the RPG Launcher, Grenade Launcher, or even grenades.
When the player is forced to split-up with the AI it will follow a specific script, be it collecting the necessary key item or unlocking a door, and will then attempt to regroup with the player ASAP. It will at least attempt to defend itself when necessary, though it will not revert to its default patterns until it is reunited with the player.
Though while it is largely agreed upon by its community that Resident Evil 5 makes for a better experience when playing cooperatively, it's worth noting there is unique dialogue in the single-player version--dialogue that also differs dependant on whether the player is controlling Chris or Sheva--that isn't heard otherwise.
Chris, Sheva, and JoshOn two occasions the player(s) will be accompanied by BSAA Delta leader, Josh Stone. However he is not playable under any context within the main game and functions as a friendly AI compatriot. Though unlike Sheva, Josh Stone sticks to a script and isn't as dynamic as the player's partner AI. He is often shown trying to work a piece of machinery to help open the way. During the first scenario Josh will defend himself when necessary, equipped with an M9SF pistol, but can also die if he receives enough damage. Though for his second appearance he merely awaits for the players on a boat, and none of the enemies will pay him any heed.
Josh's melee attacks are a carbon copy of Chris', and it wasn't until the DLC story Desperate Escape that Josh was given his own set of unique attacks.
Quick Time Events
QTEs return and are again most commonly encountered should a player be grabbed by an enemy--which'll require the player to wiggle the right analogue--or in the case of bosses to sometimes avoid an attack entirely. They are also encountered during specific cutscenes, where the player must press the on-screen prompts as they appear otherwise they will die. Sometimes players may also have to rapidly tap a single button as well, usually as a means to further illustrate a scene depicting a struggle for example.
If playing cooperatively, cutscene QTEs are divided between players depending on which character is doing the action on-screen. Though there are still some that require both players to press the prompts simultaneously.
Melee Combat
Melee attacks return and have been further expanded upon. When fighting the variety of regular Majini enemies, shooting them in the head, leg, or shoulder will stun them for a couple of seconds, allowing players to then perform a powerful melee attack by way of a prompt next to the stunned enemy. Though depending on which part of the Majini is shot will prompt a different attack -- Chris & Sheva each have unique melee attacks as well. Characters are also invulnerable whilst performing a melee attack, making them suitable for both offence and defense.
Chris, managing to hit two Majini at once with a Right HookCertain melee attacks can be chained between characters, with for example Chris enacting one following by Sheva committing another, with Chris unleashing a final third. The third attack of the chain is extremely powerful and cannot be triggered any other way beyond being the final attack of a combo. They will most often be used against the larger enemies, as they tend to stagger rather than get knocked to the ground like common Majini enemies. When playing alone with the AI, it will attempt to chain melee attacks with the player when possible, though it will usually rely on firearms more so than melee attacks.
A list of Chris & Sheva's melee attacks are as follows:
Chris:
- Straight Punch - A straight lung, usually only striking a single enemy but may still knock the enemy far enough to topple over other enemies. Is often comically compared to Captain Falcon's Falcon Punch attack in Nintendo's Super Smash Brothers franchise. Within the context of a regular Majini enemy, it is actionable when it has been shot to the face and is forced to clasp its face.
- Right Hook - Chris' weakest attack, though it has a good chance of hitting multiple enemies and is useful for potentially starting a combo with Sheva. Within the context of a regular Majini enemy, this attack is actionable when it has been shot in the left or right shoulder.
- Kick - Another relatively weak attack, this too is primarily useful for leading into another attack by Sheva. Within the context of a regular Majini enemy, this attack is actionable from behind when it has been shot in the left or right shoulder.
- Uppercut - Roughly about the same power as the Straight Punch, the uppercut has a better chance of hitting multiple enemies. Within the context of a regular Majini enemy, this attack is actionable from the front when it has been shot at the knee and keels over in pain for a few seconds.
- Neck Snap - Chris' most powerful attack as it will kill a regular Majini instantly. Within the context of a regular Majini enemy, this attack is actionable from the back when it has been shot at the knee and keels over in pain for a few seconds.
- Stomp - A very powerful attack, and one that may often act as a finisher due to the damage an enemy may have already received to get knocked over. Within the context of a regular Majini enemy, this attack is actionable when it has been knocked to the ground.
- Haymaker - Besides the Neck Snap, this is easily Chris' most powerful attack. However it can only be performed as the third attack of a combo chain--beginning with Chris--and when directed at an enemy from the front.
- Backhand - Like the Haymaker, this too deals an equally incredible amount of damage. However it can only be performed as the third attack of a combo chain--beginning with Chris--and when directed at an enemy from the back.
- Top Down Punch - A relatively weak attack, this is the attack Chris uses against an enemy that is currently grappling the other character. It visually resembles Ryu's top down punch from the Street Fighter Alpha series.
Sheva:
- Roundhouse Kick - A reliable manoeuvre due to its high likelihood that it'll disperse a crowd, and can at least knock an enemy over. Within the context of a regular Majini enemy, it is actionable when it has been shot to the face and is forced to clasp its face.
- Twist Kick - Sheva's weakest attack, and is only primarily useful for potentially starting a combo chain with Chris. Within the context of a regular Majini enemy, this attack is actionable when it has been shot in the left or right shoulder.
- Knee - Another relatively weak attack, this too is primarily useful for leading into another attack by Chris. Within the context of a regular Majini enemy, this attack is actionable from behind when it has been shot in the left or right shoulder.
- Somersault - Somewhat reminiscent of Guile from Street Fighter's Flask Kick move, Sheva's somersault does a high amount of damage, but will often only manage to hit a single enemy. Within the context of a regular Majini enemy, this attack is actionable from the front when it has been shot at the knee and keels over in pain for a few seconds.
- Throat Slice - Sheva's most powerful attack, as like Chris' Neck Snap will kill a regular Majini instantly. However the animation is noticeably longer overall. Within the context of a regular Majini enemy, this attack is actionable from the back when it has been shot at the knee and keels over in pain for a few seconds.
- Impale - A very powerful attack, even more so than Chris' stomp, and one that may often act as a finisher due to the damage an enemy may have already received to get knocked over. Within the context of a regular Majini enemy, this attack is actionable when it has been knocked to the ground.
- Skull Crusher - Besides the Throat Slice, this is easily Sheva's most powerful attack. However it can only be performed as the third attack of a combo chain--beginning with Sheva--and when directed at an enemy from the front.
- Spinning Back Kick - Like the Skull Crusher, this too deals an equally incredible amount of damage. However it can only be performed as the third attack of a combo chain--beginning with Sheva--and when directed at an enemy from the back.
- Pivot Kick - A relatively weak attack, this is the attack Sheva uses against an enemy that is currently grappling the other character.
Story
Main Characters
The leading protagonist and returning hero from the original Resident Evil, Chris is now apart of the Bioterrorism Security Assessment Alliance (of which he is a founding member) heading into Africa to investigate a possible arms deal under way lead by Ricardo Irving.
Now aged at 35, Chris' overall motivations have slipped somewhat and he has begun to question if what he is doing is even making a difference to the world.
An all new character, Sheva is a native of West Africa, a part of the B.S.A.A. branch stationed there. Because of the tragedy that befallen Jill Valentine 3 years ago, Chris has often purposely chosen to work alone. Even still, it was recommended that Sheva join up as a guide.
Confident, intelligent and highly skilled with both firearms and melee combat, Sheva has a surprising degree of experience with B.O.W. threats despite her relatively young age of 23--coincidentally the same age as Jill Valentine during the Mansion Incident in the original Resident Evil.
- Voiced and mo-capped by Karen Dyer.
- Appearance based on Michelle Van Der Water.
Another West-African native, Josh is the captain of the stationed B.S.A.A.'s Delta squad. A long time friend and mentor to Sheva Alomar, Josh is an equally capable operative who commands respect from his squadron.
Survivor of the Mansion Incident, one of the people involved in finally taking down Umbrella, one of eleven people involved in founding the BSAA, and Chris Redfield's best friend. Jill Valentine, like her cohort Chris, is a renowned operative for her wealth of experience fighting against B.O.W. creatures. Unfortunately, 3 years earlier to Resident Evil 5, she was attacked and presumably killed by series antagonist Albert Wesker.
While on the surface Ricardo is an overseer of an oil refinery owned by Tricell, he is also a suspected arms dealer the B.S.A.A. have been keeping a track on for a while now. Once their sources hear about a potential B.O.W. deal lead by Ricardo Irving may be under way, the B.S.A.A. then send multiple teams in to apprehend him - instigating the events of Resident Evil 5.
Regardless of his suspected trade, Ricardo is a highly arrogant and sleazy individual who is willing to stoop to any level to help benefit his own personal wealth.
The beautiful and seductive Excella is the head of Tricell's pharmaceutical division and the granddaughter of the founding members of Tricell.
Born and bred as an aristocrat in Europe due to her family's lineage, Excella is often used to getting what she wants, and makes ample use of her natural beauty to her advantage.
A recurring side-villain, Wesker has always been there behind the scenes, scheming and stepping in only in small doses to claim what he is after. Come Resident Evil 5, Wesker is finally given center stage as the main antagonist. Because of the virus he was injected with before the events of the very first Resident Evil (and his 'death' which put it in effect), Wesker largely retains his human appearance yet his skills in hand-to-hand combat and overall agility easily reaches super-human qualities.
A complete megalomaniac, Wesker is narcissistic enough to consider himself a God, and far above most of the heroes and even other villains of the series.
One of the founding members of the Umbrella Corporation, Spencer makes his debut physical appearance during a flashback as he explains the truth behind Albert Wesker's entire existence.
Insidious and conniving, Spencer has often always been behind the scenes of the series. However by this point in his life his health has rapidly begun to fail him.
Plot
New character Sheva AlomarSet 5 years after Resident Evil 4, the series returns to the original leading hero Chris Redfield. Now apart of the B.S.A.A., a non-profit military organisation that exists to combat Bio-Organic threats, Redfield's latest mission takes him to West Africa.
While he would ordinarily be partnered with long-time friend Jill Valentine, 3 years earlier she was attacked and presumably killed by Albert Wesker. As such, Chris chose to travel to Africa alone. Though when arriving, he is quickly partnered up with Sheva Alomar, a West African native and fellow B.S.A.A. agent.
The two are to investigate the fishing town of Kijuju, as there is purported to be a B.O.W. arms deal planning to be put underway, lead by Oil businessman Ricardo Irving. It isn't long before the locals are quickly revealed to all have been infected with the Las Plagas -- a parasite first encountered by Leon S. Kennedy in Spain. Upon being forced to fight their way through hordes of infected civilians, the two are able to locate Alpha team of the BSAA, who were planning to apprehend and question Irving. However they are heard in combat via radio and communication is cut off. Chris and Sheva are soon able to locate Alpha team, however it was too late; all of them were killed, with team captain DeChant as the only survivor. He claims they were set-up, but before he can divulge anymore information dies due to his injuries.
It isn't long before two then encounter what killed Alpha team -- Uroborus, a new type of B.O.W. even Chris hasn't encountered before. Utilising the nearby furnace, they discover it is weak to fire and use it to kill the monster.
From there they meet up with Josh Stone, captain of the West African branch's Delta team. He provides them with information regarding Irving's whereabouts before going off for backup. Chris & Sheva keep on the tail and are able to corner Irving. However he is rescued by a woman concealed by a bird mask and cloak. The duo are thusly forced to continue the chase.
Upon meeting up with B.S.A.A. member Dave Johnson, they hitch a ride on his humvee. Though upon their arrival at the next checkpoint, they are ambushed by a massive creature called N'desu. It kills Dave, but is then taken down thanks to the weaponry located on the humvee by Chris and Sheva. After travelling through a Tribal Village that has also been infected with the Las Plagas, with the return of Josh they are then able to finally reach Irving once more on his yacht.
However, Irving injects himself with a Master Plagas sample, rapidly transforming himself into a humongous, amphibious monster. With the use of the gatling and rocket turrets on his boat, the two are able to kill it. Barely hanging on to life, what remains of Irving--who was functioning as the uvula of the creature--upon realising the male agent that killed was Chris Redfield, states the two should head to the nearby cave and look for an ''Excella''.
Excella GionneTaking his advice, Josh ferries them to the cave, but then departs once again to try and locate help. Chris & Sheva fight their way through the cave, which is infested with more Las Plagas-infected tribesman. They eventually are introduced to Excella, the CEO of Tricell who are in fact a B.S.A.A. benefactor. Like Irving she continually gives them the slip. Upon their chase, Chris discovers that Jill Valentine may actually be alive; footage of her in a test beacon is found on an Umbrella computer. Chris demands answers from Excella, but she instead unleashes a huge crab-like B.O.W. Though this too is bested by the combined skill of Chris and Sheva.
Upon reaching Excella within an underground temple, Chris' arch-nemesis Albert Wesker reveals himself, alongside the woman wearing the bird mask. The woman is also then revealed to be Jill Valentine, however she is shown to be a puppet of Wesker and follows his command.
While Excella leaves the scene, Wesker opts to engage in a two-vs-two fight; Chris & Sheva vs Wesker & Jill. Wesker, however, still retains all of his super-human agility and strength, and cannot be fought by normal means. As such, Sheva attempts to keep Jill occupied--whom while is incredibly aggressive is still only human--while Chris lures Wesker into the side corridors of the temple. From there he uses stealth to catch Wesker off guard, doing whatever damage he can. Eventually, Wesker is forced to draw the fight to a premature close due to other business, but leaves Jill to finish them off.
Jill soon reveals by opening up her battlesuit that she is being controlled by a strange virus that is continually being pumped into her system. Upon Chris using his voice to remind her of him, he is able to temporarily confuse her enough so as to try and tear the device off. With the help of Sheva, they are finally able to tear the thing off completely. While back to her normal self Jill is still in a weakened state, and urges them to go and stop Wesker without her. But only before she indulges vital information regarding Wesker's own virus; by over-dosing him with a specific serum, that'll then course it to act as a poison. She also reveals Wesker's plan to use jets to unleash Uroborus upon the world. With this information in hand, Chris & Sheva go after Wesker.
Upon arriving on Wesker's battleship, they encounter Excella. However it turns out that she was betrayed by Wesker and infected with Uroborus so as to slow the two down. Excella begins to vomit out black-as-night tentacles, which envelop her as well as a small mountain of corpses nearby Wesker must have placed.
It grows large enough to practically encompass the entire ship, though with the use of a portable ion cannon Chris & Sheva are able to destroy the creature, while also finding the aforementioned serum in Excella's briefcase amidst it all.
The two again catch up to Wesker and do battle with him in the hanger; amidst the fight Wesker's explains his motivation to create a new world order via natural selection with Uroborus. With the use of an RPG, they are able to weaken him enough so as to inject the serum. However is able to escape onto a jet; Chris and Sheva soon join him and another battle occurs, with Sheva injecting Wesker with the serum once more.
Chris, Jill, and Sheva after another day's workThe jet ultimately crash lands near a volcano during the chaos inside. All three managed to survive the crash, with Wesker now morphing himself with Uroborus. Though unlike past subjects, Wesker's DNA is proven to be compatible, so he retains free-will while also mostly keeping to a humanoid-appearance.
Chris & Sheva split-up so as to confuse, and then regroup upon a small hill. From there they are able to weaken Wesker's heart-like orifice; Wesker then eventually falls into the lava below. Amidst the battle, Josh and Jill arrive via helicopter and pick up Chris and Sheva. Wesker then gives one last attempt at Chris' life, but is then killed once and for all when Chris & Sheva--each equipped with an RPG--destroy him.
Weapons
Enemies
Common Majini
Carrying on from the role of the Ganado in Resident Evil 4, the Majini--meaning 'evil spirit' in Swahili--and its varieties are the most common adversary encountered throughout Resident Evil 5. Like the Ganado, they differ from zombies in that they exhibit some degree of intelligence and are much more so aggressive than the zombies of entries past.
There are three distinctive iterations of Majini found throughout Resident Evil 5:
Village Majini
There are first the civilians of the African town Kijuju who will function much like the Ganado, wielding shovels, sickles, dynamite and other such rudimentary weapons.
Wetlands Majini
These are the Majini who were once apart of an African tribe living amongst the wetlands. This kind is significantly more agile and can leap impressive distances to attack the player -- which may require a QTE to avoid. Their weapons consist of bows, spears and shields, giving them ample defense and a longer reach of attack than the Villager Majini.
Soldier Majini
Finally there are the Soldier Majini, who are the most advanced of the three Majini varieties. They are intelligent enough to know how to use automatic firearms and utilise cover, work together more efficiently, and will even make sound use of grenades, cattle prods and bulletproof shields. The Soldier Majini suffer one notable drawback, however, in that some will often be found wearing an array of grenades over their chest, introducing an opportunity for players to take advantage and kill the Majini instantly by shooting the grenades.
Common Majini Mutations
Like the Ganado before them, once Majini have taken enough damage there is often a high chance that they will mutate into something further.
Cephalo
The most common mutation, usually brought forth after a successful headshot, Cephalo is a plagas that protrudes out of a Majini's neck, almost resembling a large centipede. The Majini will no longer make use of any weapons they previously used and will instead use the plagas almost like a whip to swipe the player. Because of the many skittering legs that litter the plagas, simply being too close to the mutated Majini can inflict damage without the Majini actually initiating an attack. Damage to the plagas host is now largely ineffective, and the Majini from then on is most vulnerable by shooting the plagas itself.
Kipepeo
The second most common mutation, and another that is largely ported from one such Ganado mutation in Resident Evil 4. This one is a form a flying plagas that bursts out of the Majini's back once it has received enough damage. Once airborne and out of its host, its attacks are sporadic and unpredictable, and it can also quickly dart out of the way should the player aim at it. Otherwise it is relatively weak and can be taken down in groups easy with a few accurate shotgun rounds.
Duvalia
Only encountered against the soldier Majini, the Duvalia, as is custom with mutations, occurs once the Majini has received so much damage. Then the Majini begins to rapidly mutate into what almost looks like an exotic flower. The entire upper-half of the Majini is enclosed within an impenetrable shell, with the vulnerable 'mouth' residing with. The Duvalia will primarily try to whack the player using its shell, but given the chance should the player get close enough will open its shell and 'chomp' the player, instantly placing the player in the dying state. The only way to kill it is to shoot the lower regions of the Majini, forcing the Duvalia to fall onto its knees with the shell open, then shooting the inside.
Explosion
While not a mutation per se, sometimes a soldier Majini will quickly begin to boil and eventually explode after it has taken enough damage.
Bui Kichwa
While they were originally meant to be another Majini mutation, for the final game they are instead only encountered independently. Resembling a sort of exotic arachnid, their main attack is to quickly latch around the player. They do minimal damage, but they also restrict the player to only walking as they struggle to remove the Kichwa. This then allows other enemies in the vicinity to more easily attack the player.
They are otherwise dispatched easily enough with just one or two pistol rounds. Because of their small size, however, they are often able to strike outside of the player's view catching them off-guard.
Adjule
Infected Doberman dogs, these are mostly encountered during the stages set in the Kijuju village and on Wesker's ship deck . They normally function as highly aggressive dogs, attempting to leap at the player. These can also mutate, however the catalyst is if they are not killed quickly enough rather than should they receive a certain degree of damage.
Once mutated, their heads open up revealing a large vertically aligned array of sharp teeth surrounding plagas tentacles in the middle. During this phase, they can withstand a much more significant amount of damage before dying, and they will often attempt to leap onto the player and slam their 'mouth' around the character's face killing them instantly.
Big Man Majini
A sub-boss of sorts encountered amidst groupings of the villager and soldier Majinis. They are pot bellied and carry a lot of strength - enough to withstand many close-range shots from a shotgun. They are formidable when close, however, and can knock the player onto the ground with ease should any one of his attacks hit.
While he is encountered amongst both villager and soldier Majini, the only difference between the two is cosmetic; his villager iteration is seen wearing shorts while the soldier iteration is wearing urban camo pants and boots.
Chainsaw Majini
Another sub-boss, the Chainsaw Majini is the 'spiritual successor' to Dr Salvador from Resident Evil 4, as they utilise the same sort of chainsaw-related attacks and are equally as sturdy. Though unlike Salvador, before Chainsaw Majini strike they tend to laugh manically often giving the player an added second to escape the Majini's attack range.
There are two versions of the Chainsaw Majini distinguished by the color of their trousers. The Chainsaw Majini wearing red, once killed, will stay dead. The ones wearing blue, however, once bested will soon get up and begin to flail madly with their Chainsaw making them much more so dangerous than usual. To compensate, their health is kept to be relatively low during this phase.
Executioner Majini
Huge, intimidating lumbering Majini, these are only encountered once during the main game, though are much more prevalent in other areas of the game including the Mercenaries modes and Desperate Escape DLC story.
Wielding a massive hammer, they will pull it along the ground and slowly slam it unto the player should the player be close enough. The attack itself will empty a character's entire health bar, leaving them in the dying state. Besides that, the Executioner may also pick up the player forcing them to quickly tap a button to escape, or to rely on their partner to save them. If neither is successful, the Executioner throws the player to the ground and will execute and kill the player instantly - ignoring the dying state completely.
There is another variant encountered only in the Prison map for the Mercenaries modes. It functions exactly the same as the regular Executioner, though it has a different appearance, wearing less clothing with a noticeably tight red leather sack over its head.
Giant Majini
Encountered alongside the infected Sodibaya Tribe of Majini, Giant Majini earn their moniker well, standing at maybe 12ft tall equipped with a huge crafted mace. Wearing an indestructible tribal mask that completely covers their head, they are otherwise unarmored across the rest of their body. They are still highly resistance to damage all the same, however.
Using their large mace for attacks, they will most often swing it within close proximity doing severe damage to players caught within range. Besides their height, they are also often easy to pick out by ear due to the warcries they'll make to let their presence be known.
Gatling Gun Majini
Sharing a particular resemblance to the "J.J." Ganado from Resident Evil 4, Gatling Gun Majini's are stocky Majini equipped with, like their name implies, gatling guns. Chomping on a cigar, sporting aviators and a beret, these Majini's are understandably only encountered amongst the soldier Majini. They will of course primarily use their gatling gun to rip through any players they manage to catch within their fire, though they can also use the gatling gun to smack the player away should they get close enough.
Reaper
Resembling what looks like a massive humanoid cockroach, Reapers are an accidental creation courtesy of exposure from the Uroboros virus. Reapers are pretty much indestructible lest the player shoots their weak points, which are littered across the back of the Reaper and will sporadically expose themselves only for a second. Should the player manage to shoot one of the weak points, the Reaper keels over revealing two more weak points, finally resulting in the Reaper bending backwards to reveal its most vulnerable region within the middle of its carapace.
If the player shoots anywhere else besides one of the telegraphed weak points, the Reaper emits a mist which clouds the player's vision of the Reaper. Because of their high demand for precise timing to kill it, and the fact that they can swiftly kill a player instantly should they get close enough, Reapers are arguably one of the most antagonizing enemies of the game.
Licker β
Primarily recognised for their appearance in Resident Evil 2, Licker β's are an advanced form of Lickers that have been injected with the progenitor virus. While they largely look the same, they are noticeably bigger in mass with more muscle. The most notary difference is for their resistance to bullets, allowing them to withstand copious amounts of firearm fire. Unlike the original Lickers, however, Licker β's have one particular weakness: Their exposed heart. Because of this, should the player manage to knock a Licker onto its back, they can then commit and instant kill by way of a button prompt allowing them to stab the Licker directly in its heart. One other weakness they have inherited over their predecessors is their inability to see. Though they have highly acute hearing, it is possible during some occasions for the player to avoid combat with Lickers altogether as long as they walk past without firing their weapons.
Licker β's still attack using the same array of moves, including their tongue which they now use to pierce a character's shoulder continually draining the character's health the longer it stays. Their large claws are also an asset Licker's will often use given the chance if a player is close enough, or sometimes they will even leap across the air - potentially grabbing the player and killing them instantly by stabbing them if the player's partner can't save them in time. One final similarity Licker β's have with their predecessors is the ability to maneuver across flat surfaces, crawling up walls and across ceilings.
Guardian of Insanity
Only encountered during the Lost in Nightmares story DLC, the Guardians of Insanity are an iteration of the Executioner Majini seen during Resident Evil 5. They lumber around carrying large anchors rather than hammers, however, and are also much more resistant to gunfire. Shooting them forces them to temporarily bleed acid, which does minimal damage but will also stun the player if caught within the splash. The most suitable tactic for beating the creatures is to shoot the small eye it has located on the back on its large hump.
Unlike the Executioners, should a Guardian manage to grab the player, they need their partner to save them otherwise the player currently grabbed will die - no QTE's to allow them to escape the Guardian's grasp.
Crocodiles
While not infected, the native crocodiles of West Africa are much more so aggressive than average crocs. They are only encountered during the marshlands: First whilst the player is riding a raft, as the crocodiles attempt to bite them, and secondly as the player is traversing waist-high water to reach a small settlement of huts. On the raft they can only be avoided via QTE's, but when travelling through the water they can be killed. The crocodiles are unusually sturdy against gunfire, however, and should they get close enough can kill the player instantly.
Boss Battles
Uroboros Test Subject
Unleashed by Ricardo Irving after the B.S.A.A. Alpha Team began their pursuit, it is first referenced off-hand by Dan DeChant and his team while it is heard over radio that they're being attacked by a mysterious unknown B.O.W.. Eventually, Chris and Sheva come upon it themselves and are forced to do battle against it.
Somewhat humanoid in shape, it largely consists of a series of squiggly black tentacles. Its attacks consist of stretching force a bastion of tentacles at the player. Should it get close, it can also envelop the player with its tentacles, and without the aid of the player's partner will drain the player's health until they reach the dying state. It has fairly slow movement, though it also has the ability to disperse and recreate itself within seconds in another position - possibly right below the player.
Initially, ordinary weapons fire is nigh useless against it. Though after it has been attacked by fire, it quickly starts to weaken and tendrils begin to sprout out revealing its weak points. The player can do battle with it this way, though they can also attempt to lure it into the nearby furnace then stun it by using, for example, an incendiary grenade, and then turn on the furnace. It takes two attempts to kill it using this method, but would still save players a great degree of supplies.
Popokarimu
A Bio-Organic Weapon that was being transported to be sold, it is accidentally let loose during a vehicular crash. The Popkarimu is faced twice: First on the outskirts of a mining station, and then again while Chris & Sheva are exploring a series of underground African caves. The first time is mandatory, though the second may be avoided if the player can manage to outrun it. For both appearances the boss fight plays out the same.
Resembling a giant bat with a scorpions tail, it will switch between chasing the player on the ground, and hounding the player from the air. Popokarimu's front is impenetrable from gunfire, though its rear up its tail is highly vulnerable. The most suitable strategy is for the player to lay down mines; after the Popokarimu comes in vicinity, the explosion will knock it over giving the player ample time to fire at its weak point. Otherwise, if its a cooperative game, one player can always act as bait while the other shoot at its rear.
Ndesu
The successor to El Gigante from Resident Evil 4, Ndesu is Tricell's counterpart. Though it looks similar in appearance, it differs in that it has multiple Las Plagas parasites within rather than a single large Plagas like El Gigante. Unlike in Resident Evil 4 where El Gigante's was faced on foot, Ndesu is fought whilst Chris and Sheva are in a B.S.A.A. Humvee using turrets.
It attacks using similar such tactics as its El Gigante brethren; with its brute strength it attempts to smash and stamp down on the Humvee, while also picking up power posts and even a boulder to throw at the vehicle. The player is tasked with continually shooting at whatever Ndesu equips to quickly cause him to flinch so he'll drop his weapon. Besides Ndesu there are a small squadron of Kijuju Majin that'll attack the player with molotovs or by using their crossbows. They are easily dispatched thanks to the turret's power, however another group will always return after an allotted time until the battle is over.
After it takes so much damage, the many Las Plagas within erupt out of its skin. Once they've been killed, Ndesu keels over for a much larger parasite to expose itself out of its back giving players the chance to finally shoot at its weak point. After 2-3 assaults on the main Las Plagas parasite, Ndesu is finally killed.
Ricardo Irving
Because of his failure at stopping Chris & Sheva's pursuit, Jill Valentine currently in her 'Bird Lady' outfit hands Irving a vial with a Master Plagas sample, and orders him to use it should he be cornered. As such, once Chris & Sheva manage to finally catch up to Irving on his luxury boat, he gives in to the potential power a Master Plagas would give and injects himself with it.
It only takes seconds for the parasite to cause Ricardo to mutate; after leaping into the water, Irving soon resurfaces as a monstrously huge amphibious creature. Because this is the work of a Master Plagas, Irving has complete control over his actions. To fight back against the beast, players must use the turrets conveniently located on Irving's boat. Two miniguns and two rocket launchers, players are to shoot at the glowing weak point until it submerges and its tendrils pop out in exchange. Occasionally, it will swim up to attempt to bite the player with its gigantic maw; a button prompt will quickly appear so as the player can avoid the attack. Soon after so much punishment, the creature latches onto the boat as Ricardo, now essentially functioning as the uvula of the monster, reveals himself so as the player can shoot him. After so many attempts, the beast soon spits out Ricardo's body as it dies. Ricardo then soon follows as his sack-like body disintegrates.
U-8
The U standing for 'Ultimate', U-8 is a massive crab-like B.O.W. Excella Gionne unleashes to attempt to kill Chris & Sheva. Acting as a blockade stopping the elevator they're currently on from descending any further, the duo have no choice but to fight against the U-8. Because of its size, its mass stretches across nearly half the size of the elevator; its weak points are the patches of fleshy skin along its claw, however should the player get close, U-8 will often attempt to strafe around the elevator.
Once enough damage has been done, it will eventually collapse onto the elevator with its mouth agape. This then gives the chance for players to unload at the mouth. Alternatively, players can throw a grenade down its throat (which triggers a small cutscene) to do maximum damage. Each grenade hurled in breaks apart of the armor covering U-8's head, allowing more opportunities to do significant damage. U-8 attacks by performing long range slices with its claws, which'll open a button prompt to help players avoid in time. It will also eventually summon a small array of flying insects to pester players and knock them off their aim when they're shooting U-8's weak points.
Uroboros Mkono
The second helping of Uroboros comes courtesy of Excella Gionne, who once against attempts to halter Chris & Sheva's advance. Though unlike their first encounter, this one is much stronger and there are no conveniently placed furnaces nearby either. Instead players are given multiple gas canisters to drop, along with a flamethrower. The gas canisters, once dropped, will become melded with Uroboros should it move nearby one allowing the player to better maximise the fiery damage potential inflicted. The flamethrower is first stationed on the wall; it has limited ammo, and once used up must be returned so it can be refuelled.
Tactics for this encounter work pretty much the exact same as the last one and players must use the various fire-related weaponry at their disposal for Uroboros to reveal its weak points. The flamethrower using during the battle is strictly for this battle alone; once it's finished, the player cannot take it with them.
Albert Wesker & Jill Valentine
After much travel and many B.O.W. creatures killed, Chris & Sheva finally manage to catch up to Excella. However, Albert Wesker soon reveals himself to the duo along with a brainwashed Jill Valentine. Wesker finally decides to settle the score with Chris, and along with Jill, they have a two vs two battle inside an underground temple.
Despite the circumstances, Jill Valentine is not to be killed and it will result in a game over should that happen. She will have no qualms about attempting to kill the player, however. Albert Wesker of course shares the same philosophy. Ordinarily the player is to try and survive for seven minutes, though the player can also attempt to fight Wesker and should they do enough damage, Wesker will cut the current battle short and leave.
Albert Wesker because of his increased strength and agility is able to avoid nearly all weaponry fire, and can move about the environment considerably faster than the player. His choice of attack is to quickly charge in and use melee attacks against the player; sometimes he will also swiftly pull out his H&K P8 and shoot two rounds at the player, though the player is given button prompts to avoid the shots. The most reliable strategy to beating Wesker during this stage is to run away; after so long has passed, or if the player heads near the door, Wesker will kick the player through it giving access to the upper floor and its corridors. From there the player can attempt to get some distance between them and Wesker, take cover, and then quickly pop out and shoot him. The same works if one player is able to distract him while another attempts to shoot his back.
Jill Valentine primarily uses her dual VZ61 submachine guns as she effortlessly scurries throughout the environment. It's advised that one player attempts to keep her busy by throwing a flash grenade or the knife to stun her, then do a context-sensitive melee attack knocking her out temporarily. Despite her fondness for her submachine guns, she will still make use of her acrobatic abilities to attack the player should they get close enough.
Should the player manage to do enough damage, or if the seven minutes run out, Wesker leaves and the current battle ends. Though if the player manages to beat Wesker by inflicting too much damage, a unique treasure is then dropped within the area.
Jill Valentine Part II
Once Albert Wesker has left, he then leaves it to the still brainwashed Jill Valentine to finish Chris & Sheva after revealing the device on her chest that is the source of her behaviour. Jill functions much like she did during the previous battle against her and Wesker. She will scurry around almost like a wild animal--she will even hiss on occasion--while using her submachine guns and her athletic melee attacks to kill the player.
The player is a still not to kill Jill and must now attempt to use Chris' voice to 'awaken' Jill by using the A/X (default 360/PS3 controls) while avoiding her attacks; should the player be playing as Sheva in single-player, pressing A/X will still automatically have Chris call out to Jill. Once Chris manages to temporarily get through to her, the device begins to malfunction giving the players time to try and rip the device off. Though when this happens, the player is given two possible choices on how to respond: The player can either use a melee attack, knocking Jill to the ground, and then attempt to pull off the device that way, or one player (or the AI) can grab a hold of Jill while the other player (or AI) can attempt to rip the device off.
The first option is more effective and will require less tries, though tearing off the device by using the second option will award the player with a trophy/achievement.
Uroboros Aheri
What was once the beautiful Excella Gionne, Albert Wesker's betrayal has forced her to become a monstrously huge Uroboros creature. After absorbing a small mount of corpses, the third encounter with Uroboros quickly grows to the entire size of the ship cruiser. At first Chris & Sheva retreat back into the ship during a small QTE sequence; once they arrive back inside the ship, the players only interaction with Uroboros is by avoiding its many surprise attacks.
Eventually they reach the back of the ship, and along with a portable Ion Cannon weapon do battle with the monster. First the player is to shoot the exposed bulbs, while avoiding its reactionary attacks via a button prompt, and after they've all been extinguished, the 'brain' of the creature is exposed giving players the opportunity to use the Ion Cannon to shoot at it. All the while, Aheri will continuously spawn small Uroboros monsters; they're relatively weak and should often be left as duty for the other player.
Albert Wesker Part II
Fighting near a runway, Chris & Sheva have finally caught up to Wesker and are planning to inject him with a serum that'll neutralize the virus that enhances his strength and agility. Wesker still uses the same sort of attacks as he did when fighting against him previously, though the tactics for beating him have changed. Now players are to turn off the lights so as to stay hidden from Wesker; using an RPG, they are to then shoot at Wesker, who will often grab a hold of it just before it hits him, then shoot the rocket, and finally attempt to inject the serum.
It usually takes around 3-4 tries before it's finally successful. Between each attempt, however, the player must find other rockets littered about the environment, and then the other player (or AI) must help reload it. After the first attempt, Wesker will then start throwing missiles at the player, but his usual array of attacks revolving around his enhanced agility are what fill out the most of his tactics.
A similar fight against Wesker also occurs at the end of the Lost in Nightmares story DLC that takes place during the flashback when Chris & Jill are exploring Ozwell E. Spencer's current residence. Though naturally he doesn't have any missiles to throw. Like the battle against both Wesker & Jill, this battle can either end two ways. Either the hidden timer will end, forcing the cutscene to trigger, or the player will be able to do enough damage that it will end prematurely. If players manage to beat Wesker by way of inflicting enough damage, they are awarded a trophy/achievement.
Albert Wesker Part III
The final battle located within a volcano - Wesker has now allowed a containment of Uroboros to meld with his DNA, only this time Uroboros actually agrees with its host's DNA. As such, Wesker has full control of his enhanced powers and abilities. His appearance is still altered, however, as the majority of his upper-body is enveloped in the traditional black tentacles that Uroboros is made of.
This fight goes through a small number of stages. First, the player is to run away until Chris & Sheva are inadvertently split up. One player is then forced to keep on running while the other must gain Wesker's attention from afar. Sheva will be running alongside a small pathway while Chris is further below. Reagardless of whom Wesker decides to follow, it's up to the other to safeguard them while either: Sheva is attempting to climb back up after apart of the pathway crumbles beneath her feet, or while Chris is attempting to move a boulder out of his way. Then when both characters are reunited, the player is to lead Wesker up to a small hilltop. From there the ending battle begins.
Players are intended to shoot Wesker in his heart-like orifice which is initially exposed within his back. After enough shots, it will also become visible from his chest as well. Wesker attacks using his Uroboros arms as whips, while also attempting to grapple players; should a player be grabbed, they'll need the assistance of their partner to escape.
To beat Wesker, players could simply follow the routine of shooting his heart. However, once Wesker is stunned, player's can instead choose to run forward and initiate a QTE event showing Chris & Sheva stab at his heart from both sides -- eventually resulting in the player winning the battle. Wesker is then ultimately killed when the player shoots him with an RPG launcher via a button prompt during the following cutscene.
Unlockables
Several unlockables can be achieved in Resident Evil 5, most if not all are gained when finishing the game once, and most of which are achieved by a separate shop system using points gained from performance in the story mode or Mercenaries at the end of the game. Points are then spent for several unlockables listed below.
Filters
All filters can be unlocked at the end of the game by purchasing them from the "Bonus Features" menu option for the cost of 0 points. Filters add to the visuals of the game in several different ways and can be accessed by the "Special Settings" menu option. Filters also work during cutscenes.
- Filter (Default) - The way the game was original designed to look/no change.
- Filter (Classic Horror) - Black and White.
- Filter (Retro) - Adds a Sepia Effect which is reminiscent of old style movies.
- Filter (Noise) - Adds a film grain effect.
Story Costumes
Costumes are different "skins" for each playable character in the storyline (Chris and Sheva) that change their appearance, all of which require beating the game once. When these requirements are met, they can be purchased from the "Bonus Features" menu option for the cost of 0, and can be activated in the "Special Settings" menu option. Costumes persist into the story cutscenes as well.
- Sheva (Clubbin') - Is unlocked when the game is beaten once on any difficulty (all levels must be beaten).
- Chris (Safari) - Is unlocked when the game is beaten once on any difficulty (all levels must be beaten).
- Chris (S.T.A.R.S.): Is unlocked when the game is beaten once on any difficulty (all levels must be beaten) and when 25 out of 30 BSAA emblems are found.
- Sheva (Tribal) - Is unlocked when the game is beaten once on any difficulty (all levels must be beaten) and when 30 out of 30 BSAA emblems are found.
Weapons
Other than the weapons that can be acquired and bought through playing the story, there are a number of weapons that can be gained after finishing the game and fully upgrading each first generation weapon (the first type of weapon in its class). Fully upgrading any of the weapons can grant the player unlimited ammo from the "bonus features" screen, however the infinite rocket launcher requires a different means of achieving it.
Weapon Unlocks
- M93R Pistol Can be purchased by fully upgrading the 9M2 pistol
- Hydra Triple Barrel Shotgun can be purchased by fully upgrading the Ithaca M37 Shotgun
- Longbow (Sheva Only) can be purchased by fully upgrading the S75 Rifle, by outset it has infinite ammo
- Gatling Gun (Chris Only) can be purchased by fully upgrading the VZ61, by outset it has infinite ammo
- S&W M500 A.K.A Handcannon can be purchased by fully upgrading the S&W M29 Magnum
Infinite Ammo
- All weapons short of the rocket launcher and the grenade launcher can receive infinite ammo by fully upgrading the weapon of choice and purchasing the infinite ammo feature for the player's gun of choice in the "bonus features" menu option. IMPORTANT: For infinite ammo to be turned on, one must access the "Special Settings" option and activate infinite ammo, on top of that they also must play "New Game " with the option of allowing infinite ammo weapons.
- The infinite rocket launcher can be achieved by beating the game in under 5 hours cumulatively. Meaning that it does not matter what order the levels are played in. As long as the combined total is under 5 hours, players receive the weapon. The player must have a rocket launcher to receive its benefits.
Unattainable Weapons
There are two handguns available for specific characters in The Mercenaries and Versus' modes that can't be found in the main game.
- Samurai Edge is the S.T.A.R.S. custom pistol that Wesker (S.T.A.R.S.) has available in The Mercenaries & Versus. Barry (S.T.A.R.S.) also has it available in the Mercenaries Reunion mode.
- PX4 is Jill's (B.S.A.A) unique pistol that can be used in The Mercenaries & Versus.
Files
Files are unlocked when finishing chapters throughout the game. There are 12 chapters in all, and by the time players finish the story mode, they will have unlocked all 12 files. These files are biographies, histories, and documents about the game's fiction including topics such as the origin of Umbrella corporation, Bioterrorism Security Assessment Alliance (BSAA), Biological Organic Weapons (BOWs), S.T.A.R.S., the previous protagonist and heroines, group of eleven and so forth.
The Mercenaries
Overview
Unlocked simply by completing the main game on any difficulty, The Mercenaries is a classic Resident Evil mini-game first introduced in Resident Evil 4. Based around arena combat, the player is to kill as many enemies as they can within the time limit; killing enemies within quick succession will start up a combo meter, which often leads to a substantial amount of points. Beginning with 2:00 minutes, the players can extend their time by locating the many time bonuses hidden throughout the map; any enemies killed via a melee attack will also reward the player with a 5 second bonus. Josh Stone acts as the announcer for both the beginning and ending of a Mercenaries match.
Leaderboards are available for players to show off their scores, and filters can be set to allow players to see their overall ranking worldwide, or to see how well they've done when compared against their friends.
One of the time bonuses in the Public Assembly mapFor each of the different maps, there exist mini-bosses taken from the main game who will appear sporadically. Such examples would be The Executioner for The Public Assembly and Prison maps, to the Chainsaw Wielding Majinis for the Ship Deck map. Killing these foes gains the player a sizeable point bonus, as well a 100% chance to drop some added supplies, be it a first-aid spray or some ammunition. Once a player's health reaches the ''dying'' state, they are to tap the O/B (default PS3/360 controls) quickly so they can regenerate their health back to its minimum.
Once time has run out, the player is then scored from D to SS (SS requiring above 90K) based upon their performance, which is graded on not only how many overall enemies the player killed, but also how high their combo meter reached. Should the player die, however, they are not given any rank and must try again.
Cooperative Gameplay
Mercenaries can also be played with a friend, via online, split-screen, or even system-link. With another player, they can still make use of the same list of characters and can both even play as the same one should they choose. Because there are now two players, one player cannot tap O/B to regenerate their health should they fall into the ''dying'' state, and will require the other player to heal them. Scores required to reach ranks are also doubled to account for the other player at hand as well.
Much like during the story, the player can use the O/B button's to call out for their ally, with various ad-libs depending on the situation. Each character has been fitted with their own unique dialogue as well - including Wesker, who will often shout out ''Useless!'' should the other player perish in a 2-player round.
Characters:
| Character | Starting Inventory | Unlock with an A or higher Rank on: |
|---|
| Chris Redfield (B.S.A.A.) | - M92F Handgun w/ 20 Rounds
- Ithaca M37 Shotgun w/ 20 Rounds
- 5 Hand Grenades
- 50 Handgun Bullets
- 10 Shotgun Shells
- First Aid Spray
| Unlocked by default. |
| Chris Redfield (Safari) | - SIG P226 Handgun w/ 16 Rounds
- M3 Shotgun w/ 10 Rounds
- RPG Launcher
- RPG Launcher
- 30 Handgun Bullets
- 10 Shotgun Shells
| Village map. |
| Chris Redfield (S.T.A.R.S.) | - SIG 556 Assault Rifle w/ 65 bullets
- S&W M29 Magnum w/ 12 bullets
- Grenade Launcher w/ 12 Electric Grenades
- 150 Machinegun Bullets
- 6 Magnum Bullets
| Experimental Facility map. |
| Sheva Alomar (B.S.A.A.) | - M92F Pistol w/ 40 rounds.
- VZ61 Machinepistol w/ 150 rounds.
- Dragunov Sniper Rifle w/ 13 Rounds
- 50 Handgun Bullets
- 150 Machinegun Bullets
- First Aid Spray
| Unlocked by default. |
| Sheva Alomar (Clubbin') | - AK74 Assault Rifle w/ 50 Rounds
- Jail Breaker Shotgun w/ 8 Rounds
- S75 Sniper Rifle w/ 20 Rounds
- 100 Machinegun Bullets
- 20 Shotgun Shells
- 10 Sniper Rifle Bullets
| Ancient Ruins map. |
| Sheva Alomar (Tribal) | - Bow w/ Infinite Ammo
- Grenade Launcher w/ 6 Ice Rounds
- 3 Flame Grenades
- 3 Flash Grenades
- First Aid Spray
| Missile Area map. |
| Jill Valentine (B.S.A.A.) | - PX4 Handgun w/ 25 Rounds
- H&K MP5 Submachine Gun w/ 150 Rounds
- 5 Flash Grenades
- 50 Handgun Bullets
- 150 Machinegun Bullets
- First Aid Spray
| Public Assembly map. |
| Jill Valentine (Battle Suit) | - VZ61 Machinepistol w/ 300 Rounds
- H&K PSG1 Sniper Rifle w/ 9 Rounds
- 3 Hand Grenades
- 150 Machinegun Bullets
- 30 Sniper Rifle Bullets
- Mixed Herb made up of 2 Green
| Ship Deck map. |
| Albert Wesker (Midnight) | - H&K P8 Handgun w/ 15 Rounds
- S&W M500 Magnum w/ 6 Rounds
- 5 Hand Grenades
- 5 Proximity Mines
- 50 Handgun Bullets
- 5 Magnum Bullets
| The Mines map. |
| Albert Wesker (S.T.A.R.S.) | - Samurai Edge Handgun w/ 15 Rounds
- Hydra Shotgun w/ 6 Rounds
- Lightning Hawk Magnum w/ 8 Rounds
- 30 Handgun Bullets
- 10 Shotgun Shells
| Prison map. |
Maps
Public Assembly - Taken from story Chapter 1-2.
Enemies:
- Village Majini
- Instigator Majini
- Executioner Majini (Miniboss)
The Mines - Taken from story Chapter 2-2.
Enemies:
- Village Majini
- Big Man Majini
- Reaper (Miniboss)
Village - Taken from story Chapter 3-2.
Enemies:
- Wetlands Majini
- Bui Kichwa
- Giant Majini (Miniboss)
Ancient Ruins - Taken from story Chapter 4-1
Enemies:
- Wetlands Majini
- Giant Majini (Miniboss)
Experimental Facility - Taken from story Chapter 5-2
Enemies:
Missile Area - Taken from story Chapter 6-2
Enemies:
- Soldier Majini
- Gatling Gun Majini (Miniboss)
Ship Deck - Taken from story Chapter 6-1
Enemies:
- Villager Majini
- Chainsaw Majini (Miniboss)
Prison - An all new environment built specifically for the Mercenaries mode.
Enemies:
- Villager Majini
- Big Man Majini
- Executioner Majini
Versus
The Versus pack was released soon after the game's initial launch. It features two game types: Slayers Mode, which is a "point-based game that challenges players to kill Majinis," while Survivors Mode is the game's take on deathmatch. 1v1 or 2v2 is available for both game types. The games are essentially the classic Mercenaries modes with team-based gameplay. The Slayers game mode lets players earn points for killing Majinis and other creatures.
The Survivors mode pits players against each other and they earn points for getting kills. While Majinis and other creatures will be present in this mode as well, players do not get points for killing them. Versus is the least popular of the DLC, given that RE5's control scheme does not lend itself well to deathmatch.
Lost in Nightmares
Chris & JillThe Lost in Nightmares DLC is a 1-2 hour mini-campaign, playable in singleplayer or co-op. While it's generally rather short, the game cannot be saved and must be completed in one go.
Lost in Nightmares follows Chris & Jill during the BSAA mission glimpsed in flashback amidst the main campaign. Set in 2005, three years before Resident Evil 5's story occurs, Chris Redfield and Jill Valentine are to infiltrate a mansion to locate Ozwell E. Spencer, the founder of the sinister Umbrella Corporation. The mini-campaign is deliberately reminiscent of the original Resident Evil, with innumerable easter eggs and references. These include:
- Jill Valentine having to play moonlight sonata to open a secret passage within a wall.
- Jill also having to lockpick a door.
- An Itchy Tasty reference.
- Cranks.
- A remix of the original Resident Evil Save Room theme that plays over the results screen.
- The ability to play the first third in the mansion with camera angles in place, should the player examine the entrance three times.
Lost in Nightmares focuses heavily on puzzles over combat, with only one type of enemy across the story -- a new creature called the Guardian of Insanity, which is similar to the Executioner from Resident Evil 5's campaign. However, multiple Guardians are encountered throughout; most are scripted to show up, however the very firsts appearance is random.
The player's inventory from the main game cannot be transferred into Lost in Nightmare, and both Chris & Jill will always begin with the same M92F pistols. Other weapons can be acquired within the mansion, although what weapons players will find are randomized. The list of weapons that can be found are but a fraction of what can be attained in the main game, however. A list of potential weapons the player may find is as such:
- M3 Shotgun
- H&K Handgun
- S&W Magnum Revolver
- PSG1 Sniper Rifle
- MP5 SMG
The mini-campaign ultimately concludes with Jill and Chris fighting the ill-fated boss encounter with Wesker depicted in the flashback, which functions exactly like the default Wesker battle from the core game. Wesker can similarly be beaten by either surviving long enough to trigger the cutscene, or by dealing enough damage to end the fight prematurely.
BSAA emblems, similar to the ones found in the main game, are hidden throughout the area and can be shot for points.
Desperate Escape
Jill & JoshThe Desperate Escape DLC is another 1-2 hour mini-campaign, this time focusing on the actions of Jill Valentine and Josh Stone immediately after the boss fight against a mind-controlled Jill. Jill and Josh must flee the TriCell Facility while Chris and Sheva pursue Wesker. Unlike Lost in Nightmares, Desperate Escape focuses almost entirely on combat, with players constantly being ambushed by Majini of all varieties as they make their way across all new environments. Though what enemies the player will face during a playthrough is randomized.
Like Lost in Nightmares the player's inventory from the core game cannot be transferred over, and both Jill & Josh begin with a pre-set inventory. Many more weapons and supplies can be procured in the field, though they are once again random. The same listing of weapons that can be found in Lost in Nightmares is the same here, only with the added chance of locating an RPG launcher.
It ends with a last stand, where Jill and Josh must defend themselves until a rescue helicopter comes to save them. This explains how they got their hands on one in time for the main campaign's finale. Like Versus and Lost in Nightmares, Desperate Escape is playable in singleplayer or co-op, splitscreen or online, and costs $5 on Playstation Network or XBox Live Marketplace.
BSAA emblems can once again be found and shot to increase the player's overall score.
The game became available for purchase on February 16, 2010 on the Xbox Live platform Games on Demand for $29.99 USD. All three DLC packs were included in the new Resident Evil 5 Gold Edition.
Mercenaries Reunion
A remix of Resident Evil 5's original Mercenaries minigame, Reunion is first made available should the player purchase the Lost in Nightmares pack or Desperate Escape pack, and is also packed within the Gold Edition of Resident Evil 5. All of the available characters are packed in as well, however should the player only purchase Lost in Nightmares or Desperate Escape, the roster list is cut in half. Because Reunion is a separate mode from the default Mercenaries mode, each set of characters is exclusive to each mode, disallowing the option for having Barry Burton and Albert Wesker team up in 2-player for example.
Because the roles of Josh and Jill have been reversed (Josh now being playable while Jill is not), Jill is the announcer for Mercenaries Reunion.
Characters - Lost in Nightmare Unlocks
| Character | Starting Inventory |
|---|
| Barry Burton (S.T.A.R.S.) | - Samurai Edge Handgun w/ 30 Rounds
- S&W M29 Magnum w/ 12 Rounds
- Dragunov Sniper Rifle w/ 18 Rounds
- 50 Handgun Bullets
- 6 Magnum Bullets
|
| Excella Gionne (TriCell) | - M93R Raffica Pistol w/ 30 Rounds
- AK74 Assault Rifle w/ 50 Rounds
- Grenade Launcher w/ 12 Flash Rounds
- 50 Handgun Bullets
- 150 Machinegun Bullets
- First Aid Spray
|
Characters - Desperate Escape Unlocks
| Character | Starting Inventory |
|---|
| Rebecca Chambers (S.T.A.R.S.) | - H&K MP5 Submachine Gun w/ 120 Rounds
- Jail Breaker Shotgun w/ 10 Rounds
- 150 Machinegun Bullets
- 150 Machinegun Bullets
- 30 Shotgun Shells
- 30 Shotgun Shells
- First Aid Spray
- First Aid Spray
|
| Josh Stone (B.S.A.A.) | - M92F Handgun w/ 100 Rounds
- M3 Shotgun w/ 7 Rounds
- RPG Launcher
- 3 Hand Grenades
- 10 Handgun Bullets
- 10 Shotgun Shells
|
Characters - Costume DLC Unlocks
| Character | Starting Inventory |
|---|
| Chris Redfield (Warrior) | - H&K P8 Handgun w/ 25 Rounds
- Hydra Shotgun w/ 10 Rounds
- H&K PSG1 Sniper Rifle w/ 15 Rounds
- 30 Handgun Bullets
- 15 Shotgun Shells
|
| Chris Redfield (Heavy Metal) | - Gatling Gun w/ Infinite Ammo
- Cattle Prod
- 3 Proximity Mines
- 3 Hand Grenades
- Melee Vest
- Bulletproof Vest
|
| Sheva Alomar (Fairy Tale) | - SIG 556 Assault Rifle w/ 80 Rounds
- Ithaca M37 Shotgun w/ 25 Rounds
- S&W M500 Magnum w/ 6 Rounds
- 100 Machinegun Bullets
- 10 Shotgun Shells
- 6 Magnum Bullets
- 5 Golden Eggs
|
| Sheva Alomar (Business Lady) | - SIG P226 Handgun w/ 16 Rounds
- Lightning Hawk Magnum w/ 8 Rounds
- 5 Proximity Mines
- 50 Handgun Bullets
- 12 Magnum Bullets
- First Aid Spray
|
Maps
Reunion features all of the same maps from the original mode. However each map has been remixed, with different placements for the time bonuses, a new musical theme, and even new enemies have been included - such as the infected Doberman dogs that can now be found in The Mines map.
Development
Chris' original look from RE5's debut teaserResident Evil 5 was in development for 3 and a half years and approximately 121 people worked on the project.
Like most games, Resident Evil 5 went through innumerable revisions throughout development. It was initially developed to be a single-player game like Resident Evil 4 before it and zombies were once again the primary opponents the player would face. Other such revisions include Jill Valentine being Chris' Partner instead of Sheva Alomar. Furthermore, even when planned as a single-player game, Jill would still appear in the game and could in fact permanently die during the story based upon a player choice. Sheva was always planned to star in the game one way or the other, only she was originally depicted as a member of a guerilla group instead of the BSAA.
Excella Gionne was to initially be featured in the game as a TriCell secretary as opposed to being the head of its West African division. What is now known as her role in RE5 was to be filled in by a male ''CEO type character'', to whom she and Wesker would betray, though only before Wesker would also ultimately betray Excella.
One notable mechanic that was removed mid-development was that of heat disorientation. Should the player have been wandering around out in the sun for too long, their character would start to become disorientated and would even begin to hallucinate. Players would then have to find some shade to take cover from the beating down sun and recuperate.
Racism Controversy
After the first full gameplay trailer was released during 2007's E3, many interpreted the trailer depicting a lone white character (Chris Redfield) killing infected colored African Majini as to feature racist overtones. However the next trailer then showcased more common Majini varieties besides those of a dark complexion, including Caucasian and some that even look vaguely Spanish. Sheva Alomar, a West African native, was also confirmed to star as Chris' partner during the very same trailer.
Resident Evil 5 producer Masachika Kawata stated in response to the criticisms "We can't please everyone. We're in the entertainment business – we're not here to state our political opinion or anything like that. It's unfortunate that some people felt that way." Lead producer Jun Takeuchi also expressed surprise at the complaints, and refuted any claims that the game was altered in any way as a reaction to the accusations.
Demo
On Friday, December 5th, 2008 a demo for the game was put on XBLA for Japan. Included in the demo are two stages, Shanty Town and District, which can be played either on solo, or via offline or online Co-op play, which is a highlighted new feature in Resident Evil 5. With some clever snooping on the Internet, one would have been able to acquire the demo for the 360 version of the game. For those who patiently waited, the 360 demo was released on January 26 via the Xbox Live Marketplace being exclusive to Gold Xbox Live members for a week. It was released on PS3 via the Playstation Store a week later on February 2nd.
Trivia
- Jill coincidentally bears a somewhat close resemblance to Fiona, the protagonist of the Capcom game Haunting Ground.
- Sheva is the first left-handed playable character in the Resident Evil franchise, and the camera is positioned over her left shoulder to compensate; in addition, her HUD is horizontally flipped from the other characters'. The reason for this is to create a more pleasing visual when playing the game in co-op split-screen mode.
- Chris Redfield's voice actor in RE5, Roger Craig Smith, also voiced antagonist Curtis Miller from the straight-to-DVD RE feature flick Resident Evil: Degeneration.
- During Chapter 1-1, should players let Chris & Sheva go idle for a few minutes, this will then trigger a secret conversation between the two where they talk about elements of North American culture.
- During development, the Uroboros creature was nicknamed 'Wriggles' by the staff.
Soundtrack
US and European CoverThe original score for Resident Evil 5 was composed by Kota Suzuki and Wataru Hokoyama and was released under an impressive 3 full-length CD edition.
CD 1
| Track # | Song Title | Running Time |
|---|
| 01 | Title Movie | 00.19 |
| 02 | Opening - Chris' Arrival (original version) | 03.42 |
| 03 | Item Box | 01.37 |
| 04 | New Fear | 01.58 |
| 05 | Magic Act | 00.31 |
| 06 | The Butcher | 00.35 |
| 07 | The Town | 01.48 |
| 08 | First Encounter | 01.08 |
| 09 | Majini I | 01.55 |
| 10 | Hospitality | 01.07 |
| 11 | Majini II | 02.16 |
| 12 | Game Over | 00.15 |
| 13 | Damsel In Distress | 00.29 |
| 14 | Majini III | 02.54 |
| 15 | A Piece of the Puzzle | 01.07 |
| 16 | Unindentified Threat | 00.46 |
| 17 | An Emergency (digital version) | 02.40 |
| 18 | The Storage Facility | 00.57 |
| 19 | Result | 01.08 |
| 20 | The Ripper | 00.28 |
| 21 | Executioner | 02.00 |
| 22 | The Crisis - Reinforcements Arrive | 02.02 |
| 23 | Voices of the Darkness | 01.55 |
| 24 | Terror from Above | 00.51 |
| 25 | Flying Nightmare | 01.48 |
| 26 | Pursuer and the Pursued | 01.51 |
| 27 | Shaking off the Majini | 00.39 |
| 28 | Grand Resurgence | 01.30 |
| 29 | Burning with Anger | 02.48 |
| 30 | Delta Team's Distress - New Decision | 01.19 |
| 31 | Shadows of the Past | 02.54 |
| 32 | Eerie Stillness | 01.33 |
| 33 | Majini IV | 01.22 |
CD 2
| Track # | Song Title | Running Time |
|---|
| 01 | Majini V | 02.29 |
| 02 | Unite But | 01.09 |
| 03 | Too Late | 00.45 |
| 04 | Get Out! | 02.33 |
| 05 | Majini's Trap I | 01.58 |
| 06 | The Patrol Boat | 02.46 |
| 07 | Evil Mutation | 03.40 |
| 08 | A New Clue | 01.13 |
| 09 | Ancient Noise | 02.10 |
| 10 | Majini VI | 02.28 |
| 11 | Majini's Trap II | 01.17 |
| 12 | Excella and Wesker | 02.08 |
| 13 | Underground Garden | 01.29 |
| 14 | The Claw | 02.17 |
| 15 | Huge Facility - and Then | 01.10 |
| 16 | Gigantic Attack | 03.14 |
| 17 | The Enigma | 01.25 |
| 18 | Majini VII | 02.38 |
| 19 | Haze of Horror | 02.07 |
| 20 | UROBOROS | 02.22 |
| 21 | The Mask | 02.22 |
| 22 | Two On Two | 03.07 |
| 23 | Old Friends, New Enemies | 01.51 |
| 24 | Sad but True | 03.32 |
| 25 | Trust | 02.01 |
| 26 | The Tanker | 00.28 |
CD 3
| Track # | Song Title | Running Time |
|---|
| 01 | Majini VIII | 02.52 |
| 02 | Shot or Death | 02.18 |
| 03 | A New Nightmare Begins | 02.14 |
| 04 | Fragments of Fears | 01.30 |
| 05 | The Sign | 02.38 |
| 06 | A Big Despair (digital version) | 02.56 |
| 07 | Message | 01.31 |
| 08 | Majini IX - In Flames | 03.37 |
| 09 | Rematch | 02.00 |
| 10 | Wind of Madness (digital version) | 04.12 |
| 11 | The Vulnerability | 01.37 |
| 12 | Sky-High Skirmish | 03.08 |
| 13 | The Final Curtain | 01.18 |
| 14 | Deep Ambition (digital version) | 03.27 |
| 15 | Striker | 01.07 |
| 16 | Homeward Bound! | 01.03 |
| 17 | Pray - Theme Song (original version) | 03.22 |
| 18 | Plan of Uroboros (digital version) | 03.24 |
| 19 | Menu | 02.06 |
| 20 | Viewer | 02.02 |
| 21 | Colors | 01.40 |
| 22 | Assault Fire | 03.19 |
| 23 | Dreamy Loops | 00.56 |
| 24 | On the Bass | 01.08 |
| 25 | Rust In Summer 2008 | 03.55 |
| 26 | KILLERS | 02.59 |
| 27 | Do You Challenge Again | 01.00 |
PC System Requirements
CPU
- Minimum: Intel Pentium D Processor or AMD Athlon64 X2.
- Recommended: Intel Core 2 Quad Processor or AMD Phenom X4
Video card
- Minimum: 256MB VRAM; DirectX9.0c/Shader 3.0; NVIDIA GeForce 6800 series or ATI Radeon HD 2400 Pro.
- Recommended: 512MB VRAM; NVIDIA GeForce 9800 series or ATI Radeon HD 4800 series.
RAM
- Minimum: 512MB if on Windows XP, 1GB in Windows Vista.
- Recommended: 1GB if on Windows XP, 2GB in Windows Vista.
Interface: Keyboard and mouse, or gamepad (Xbox 360 controller recommended).
Hard drive: 8GB
Internet: Broadband recommended for online modes.
Operating system
- Recommended: Windows Vista.
Sound card: DirectSound Compatible (DirectX9.0c or higher).
Log in to comment